Showing posts with label Garden. Show all posts

Thursday, October 29, 2020

Free How to Draw Flowers by the Rural Fence Worksheet

Below is a Free How to Draw Flowers by the Rural Fence Worksheet. 

This picture was inspired by something I saw when walking my dog. There was a fence beside the path we were on, and some flowers were growing through the cross pieces of the fence. I took a picture of it with my cell phone and later created some art inspired by the scene. It is a simple and easy project, but it can be very lovely when it is finished.  

👇👇👇 SCROLL DOWN TO ACCESS THE FREE PDF.

You do not need to make a donation to download and use my worksheets. If you want to support this blog, use the donate button below the worksheet. 

I spent all night and half of the next day creating this one.  I hope you enjoy it. 

If you have problems printing the image below, then click on the HOW TO PRINT tab for some tips, or try the updated file below.

Free Printable How to Draw Worksheet, Flowers at a Rural Fence


Thank You!

Below is a PDF file that may work better for some printer devices. 

👉👉👉 CLICK HERE for a PDF of the image above. 

 CLICK HERE to visit the How-to-Print page for some suggestions to help with the printing of the PDF.

I create these how-to worksheets because I believe in giving back, and that when you have been blessed, you should seek to be a blessing to others. These worksheets take hours or even days to create and I hope they are a blessing to you.

PRINTABLE NOTES


During the beginning stages draw lightly so you can make erasures and corrections later on. 

The fence starts out as a series of long rectangles. Two are verticle and four are horizontal, they do not need to be perfect. 

Do not draw the fence perfect, give it some crooked and bent parts like something that has been outside for a long time might look. 

Use circles and half-circles to place where the flowers will be in the picture. Some of the flowers are facing out to you and some are facing up, the ones facing up look like half circles. Draw small circles for the center. Put some flowers in front of others.
 
Draw the petals from the center to the outer circle. Use two lines, one for each side. Use a guideline to keep the petals going straight. then erase the extra lines.  

The leaves in the shrubbery below the flowers are like the letter "V" but rounded. 

Use short choppy lines to give the wood a rough texture.

Use the shading technique to give the picture depth. The far trees are a light gray, the distant shrubbery are a darker gray. The darkest areas should be the closest like the side of the post and the underside of the cross pieces. Shade around the leaves and the flowers but leave the flowers and leaves white so they stand out. 

Sign and date your work about an inch from the bottom so there is room for a mat and frame.

I hope this picture turns out beautifully for you. 

Adron © 10/29/20

Saturday, October 17, 2020

Free How to Draw the Apple Harvest Bushel Picture Worksheet.

Here is a free how-to draw of the Apple Harvest Bushel Picture. 


This picture was inspired by some tables at a roadside fruit stand that had different varieties of apples in big bushels on some boxes. 

SCROLL DOWN TO ACCESS THE FREE PDF.

If you have problems printing the image below then click on the HOW TO PRINT for some tips or try the updated file below.


Free how-to-draw worksheet for apples in a bushel.

I create these how-to worksheets because I believe in giving back and that when you have been blessed you should seek to be a blessing to others. These worksheets take hours or even days to create, and I hope they are a blessing to you.


Here is a file in PDF format that may print better on some systems.

CLICK HERE for a file in PDF format.  

This how-to-draw worksheet took three days to design and create. I hope you have fun with it. 

YOU MAY COPY THESE LESSON NOTES. 


Draw lightly at first so that you can erase and clean it up later. 
Start by gathering your reference materials like favorite pictures of tulips from cards, magazines, or calendars. I used some photos that I took at a fruit stand beside the road in Pennsylvania USA. 
Use the pictures for ideas and design. 

The bushel is in front of a box. The Box is drawn with parallel lines that form a Parrallegram on the top and sides. But do not worry if it is not perfect it is supposed to look old and worn. 

The bushel is two horizontal ovals and vertical lines that connect the top and bottom ovals. Use a guideline to keep both sides level or else one side will be higher than the other. 

Draw an apple on top of the box, just make it a circle at first. You will come back and finish it later. 

Draw two or three bushes in front and one on the side, it gives the picture interest.  

Use circles to compose the apples, remember to draw them lightly at first. place them randomly and not too orderly.  Do not make them look like a pyramid or too tall, just a few on top of others. Start them as circles. Have some in from of others. Once they are in the right places erase the bottom of the circles if you need to.  

Add details to build up the realism. Draw lines that show the thickness of the edge of the box. Draw a second line around the edge of the bushel to show its thickness  Draw vertical lines for the parts of the bushels. Draw two lines for the top edges of the bushels, and for the band that wraps it.  

Draw verticle lines to indicate the wall behind, draw horizontal lines to give the look of the wood floor. 

Erase the extra lines. 

Determine which side the light is coming in from. Add shadows on the opposite side of the light. So if the light is from the right the shadow will be on the left.  Put shadows inside the box and behind the bushels. Take your time with the shadows since they give it depth and roundness. 

Use choppy lines to give the wood wall and floor texture and character. 

I hope your drawing is a masterpiece!

(c) Adron 10/16/20

My how to draw worksheets are free. But they cost me a lot of time and energy to create. Won't you please consider making a small contribution to support my art? Please click HERE and enter an amount that shows your level of appreciation. Your donation will enable me to create more for you. Thank you. 

Become a Patron!

Wednesday, January 17, 2018

How To Draw A Garden Wheelbarrow Full of Flowers Worksheet

This is a free How To Draw A Garden Wheelbarrow Full of Flowers. 

Here is a free printable worksheet that will help give the young artist ideas for drawing a garden scene.

SCROLL DOWN TO ACCESS THE FREE PDF.
THANK YOU FOR YOUR DONATION!

I first drew this as a part of an illustration for my book of poetry and liked it so much I thought I would make it into a project to share. It is a simple project and ideal for young artist or extra drawing practice.

YOU CAN HELP

My How to draw worksheets are free but they take a lot of my time to create for you. Won't you consider making a small contribution to support my art? Click HERE TO DONATE to make a one-time gift of appreciation for having something like this available. Thank you.

If there are problems printing it see the HOW TO PRINT tab above or try the link below.

How to draw a garden wheelbarrow worksheet and lesson.


These take me a long time to design and create.  But I am glad to do it for you because art has been ab blessing to me and I hope it is to you.


Thank You!

You might also like how to draw a garden urn worksheet. CLICK HERE.

The link below is in PDF and you are welcome to download and print it. 

CLICK HERE for a file in PDF format, (recommended).

YOU MAY PRINT THE PROJECT NOTES BELOW.


Draw lightly at first so you can erase later on.
Do not worry if you can't draw straight lines this is an old beaten-up wheelbarrow so straight lines do not matter.

BEGINNING
Draw a line for the ground so that the wheel and the back legs are on the same level.
Draw a simple circle for the wheel. From the center of the wheel to the back draw two lines like a sideways V for the handles.

On top of the sideways, V for the handles, draw the box for the wheelbarrow.  It is like two rectangles, a long one going back from the wheel to the handles and a smaller one for the front.
The back end curves downward to the handles.

DETAIL
Draw the lines for the sideboards.
The back of the handles are rounded and turned downward.
There are two legs at the back for it to stand on, draw them as straight lines going down to the line for the ground but they do not need to go straight.

THE FUN STUFF
Draw circles to design where you want the flowers to be.
Use circles inside circles for the centers and draw the petals between the circles.
Don't make them all the same size, make some big some medium and some small.
Make some to have four petals and some to have many petals.
Give some big centers and some smaller centers.

Fill the spaces in between the flowers with leaves.
Make some leaves big and some small.
Add grass to the ground below it and a few more flowers.

(c) A.E. Dozat 1/17/18


Thank You!

Saturday, August 6, 2016

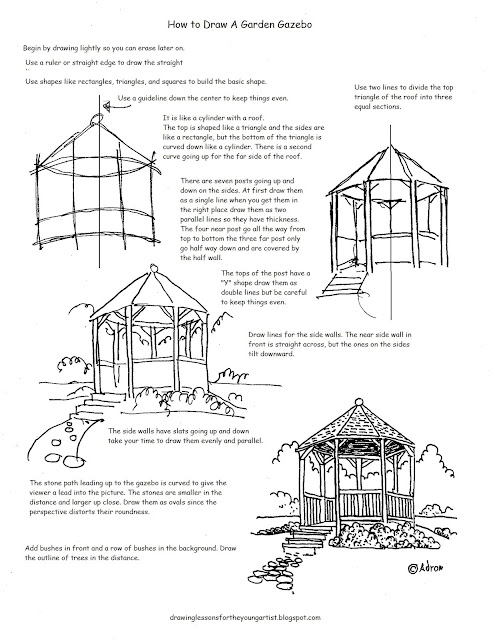
How to Draw a Garden Gazebo Worksheet and Drawing Lesson

This is a free How To Draw A Garden Gazebo is a how-to-draw worksheet.

You can make a nice picture of a gazebo by itself, or it can be used to add focus and interest to a landscape. It may look simple at first, but you must give attention to symmetry. This is a good practice project for a young artist.\

SCROLL DOWN TO ACCESS THE FREE PDF.
THANK YOU FOR YOUR DONATION!

If you have problems printing,  "CLICK HERE" to visit the how-to-print page or try the updated link below that should print better.

If you would like to see how this looked like a finished watercolor painting, CLICK HERE.


How to draw a gazebo in a garden worksheet

Sometimes it takes me hours but I create these how to draw worksheets but I do it so that I can give back because I believe that when you have been given a gift it is so you can be a gift to others, and I hope these worksheets are a means of blessing to you.


Thank You!

The link below has been modified to print better.

CLICK HERE for a file in PDF format.

PRINTABLE NOTES


Begin by drawing lightly so you can erase it later on. 

Use a ruler or straight edge to draw the straight lines.

Use shapes like rectangles, triangles, and squares to build the basic shape. 

Use a guideline down the center to keep things even.

It is like a cylinder with a roof.
The top is shaped like a triangle, but the bottom of the triangle is curved down like a cylinder. There is a second curve going up for the far side of the roof. The sides are straight.

There are seven posts going up and down on the sides. At first, draw them as a single line; when you get them in the right place, draw over them as two parallel lines, so they have thickness. The four near posts go all the way from top to bottom. The three far posts only go halfway down and are covered by the half wall.

Use two lines to divide the top triangle of the roof into three equal sections.

Draw lines for the side walls. The near side wall in front is straight across, but the ones on the sides tilt downward.

The tops of the post have a "Y" shape. Draw them as double lines but be careful to keep things even.

The side walls have slats going up and down. ake your time to draw them evenly and parallel.

The stone path leading up to the gazebo is curved to give the viewer a lead into the picture. The stones are smaller in the distance and larger up close. Draw them as ovals since the perspective distorts their roundness.

Add bushes in front and a row of bushes in the background. Draw the outline of trees in the distance.

Use dark areas to give interest.  Put shadows inside and on one side.

I hope you draw a masterpiece!

(c) Adron 8/6/16

Saturday, February 22, 2014

How to Draw a Japanese Garden Pagoda

How to draw a Japanese garden pagoda drawing lesson and printable worksheet.

Many gardens all over the world have these little structures in them. Some are only decoration others have spiritual significance.  The shape and color is a powerful contrast in any garden scene. 

This is a beautiful project when it is done and easier to draw using a few tips provided in this worksheet.  Parents and teachers may use this how-to-draw worksheet and the notes for personal and class use.

If you have problems printing CLICK HERE to visit the how to print page for some suggestions or try the updated file below.
 

How to Draw a Japanese Garden Pagoda Worksheet

Sometimes it takes me hours but I create these how to draw worksheets but I do it so that I can give back because I believe that when you have been given a gift it is so you can be a gift to others, and I hope these worksheets are a means of blessing to you. You are welcome to print as many as you like.


Thank you!
If the jpeg file above does not work well for you then the PDF file below will be better. 

CLICK HERE for a file in a universal portable format, PDF.

YOU MAY PRINT THE PROJECT NOTES BELOW.

OVERVIEW
The pagoda is a small monument in a garden. Our sketch is composed of some basic shapes and lines.

BEGINNING
Lightly draw a guideline up and down for the center so things are even on both sides, you will erase this later.
The top of the pagoda looks like an umbrella. Draw a triangle with the top point on the guideline. Below the triangle draw a curve like a bow on its back from tip to tip of the triangle, this is another guideline, you will erase it later. Below the bow-shaped guideline draw a square and then a second square around the square for the front of the pagoda. On each side draw a parallelogram (it is like a crooked rectangle) for the side windows and then draw a larger one around it for the side walls. Below these three sides draw the rectangles of the lower edge. Below that draw a tall rectangle for the pillar.

DEVELOP FORM
The top has two or three circles on the very top. The top is divided into three sections each like a triangle. These sections have curving lines; each section has a ball at the corner. The sidewalls of the pagoda each have a window. The pillar has flat sides, draw these as lines going up and down. The bottom has a circle base draw this as an oval with sides going down.

DETAILS
Draw the inside that you see through the window. Add shadows to the side away from the sun and inside. Create a garden to put it in.

(c) Adron D. 2/22/14

Wednesday, January 15, 2014

How to Draw The Rustic Garden Gate With A Stone Arch

How to draw a rustic garden gate with arch drawing lesson and printable worksheet.

This how-to draw a rustic garden gate project can be a colorful and satisfying picture. It can be used by parents, teachers and art students in class or at home.

SCROLL DOWN TO ACCESS THE FREE PDF.
THANK YOU FOR YOUR DONATION!

PRINT THE WORKSHEET

If you have trouble making the worksheet below print or are printing on A-4 sized paper then CLICK HERE to visit my how-to-print page for some suggestions. 


How to Draw A Rustic Garden Gate Worksheet.

Sometimes I spend hours creating these how-to-draw worksheets, but I do it so that I can give back because I believe that when you have been given a gift it is so you can be a gift to others, and I hope these worksheets are a means of blessing to you. You are welcome to print as many as you like. Use the Paypal button to make your donation. 


Thank you!

👉👉👉 CLICK HERE for a printable file in PDF format

YOU MAY PRINT THE PROJECT NOTES BELOW.

BEGINNING OUTLINE
The rustic garden gate is a stone arch. Draw the arch as a double set of lines so you have the inside and the outside in place. Sketch in the stone wall as parallel lines one for the top of the wall and one for the base. The path is wider at the bottom of the picture and more narrow where it meets the wall.

DEVELOPING DETAILS
Plan where to draw the flowers by drawing circles where they will look best. The flowers should go over the arch and may go all the way down one side but not both.  Once you have the flowers placed fill in the areas between the flowers with leaves.

The stones in the wall are different sizes and shapes, draw them lightly until you get a good design with a lot of interest. The stones in the arch are all the same size and are in two rows. Some of the stones will be hidden by the flowers.

Draw a flower pot on one or both sides of the gate.

The path is large squares but they are not even or the same size.

The iron gate is easy it is just drawn in lines. Draw an arch on the top and a square on the bottom. Put a guideline up and own the center and divide the gate into squares. Fill in the squared with twisted decorations. They do not need to be perfect since gates wear out and get all banged up.

A few wiggly lines make a background but keep the background simple.

If you draw grass then keep it random and clumpy so it looks real.


Illustration For How To Draw A Rustic Garden Gate

To see more how to draw worksheets like this click on the label for Garden in the sidebar.

(c) Adron Dozat 1/15/14

Monday, September 23, 2013

How to Draw Apples on the Tree Worksheet.

How to draw apples on a tree, a drawing lesson, and a printable worksheet.

This is a simple project that will give the young artist confidence. The free worksheet below may be printed.

You do not have to make a donation to download my how-to-draw worksheets. However, if you'd like to, the donate button is located below the picture. Thank you for your gifts, prayers, memberships, and donations. I would not be able to create these without your support. 

PRINT THE WORKSHEET

To print the worksheet below, just highlight it and send it to your printer or save it to your device to print later. If you have problems or are printing on A-4 sized paper, CLICK HERE to visit the HOW TO PRINT page to get some suggestions. You can try the updated link below.


How to draw apples on a tree worksheet.


Thank You!

👉👉👉CLICK HERE for a file in a portable universal format (PDF)

You may want to print the project notes below, too.
.
ROUGH DRAFT
Start by lightly drawing the circles of the apple. Not too many and have one slightly in front of the other. The circles should not be perfect but be a little flat at the top. Two lines come out of the top for the stem. The stems connect to the branch; use a double line to draw the branch. The leaves come in groups of three; they are round at the stem and come to a blunt point. They are curled, so the sides roll-up.

For interest, put some leaves behind the apples and behind the other leaves. Have one leaf in front of the apple.

Look at the rough draft to see if it needs any changes.

ADD VALUE (DARKNESS)
The apples are round, and the shadows make them look round. Remember, the light comes from one side, so all the shadows are on the other. There might be reflected shadows and reflected lights. They make it look natural.

The leaves are a little darker than the apples but just a little and the stem is even darker.

DETAILS
The bottom of the apple has papery parts of the old flower, it looks like a scribble. There are some dots both darker and lighter going up the sides of the apple. The leaves have saw-tooth edges.
Worksheet.

(c) Mr. Adron D. 9/23/13

My printables are free for you. I only ask that if you are able that you consider making a small contribution to support my art. Click on the DONATE tab or the Paypal button and choose an option that best reflects your level of appreciation for having these available to you. Your gift will enable me to create more how to draw printables like these. Thank you for your gift.

Wednesday, August 28, 2013

How To Draw The Garden Urn With Flower Worksheet

How to draw a garden urn, a drawing lesson, and a printable worksheet.

This free-to-print worksheet will give the young artist confidence and pride in the project. It can be used as a point of interest in a drawing or as the focus of a piece of art.

How To Draw a Garden Urn Worksheet. by MrAdron.


Even though it takes hours, I create these How to Draw Worksheets because I believe that when we have been blessed, it is so that we can become a blessing to others. I hope you enjoy these projects and they help you.

To print the worksheet just highlight it and send it to your printer or save to your device to print later. if you have problems printing, CLICK HERE to visit the how-to-print page for some suggestions

YOU MAY PRINT THESE LESSON NOTES


The urn looks like a goblet or cup on a stand, as seen from slightly above.

BEGINNINGS:
Start by lightly drawing the urn (but save the flowers for last). The main part of the urn is like a giant letter "U" with an oval across the top. Most of the oval will be lost later on but is drawn for reference.  Draw a line going up and down the center for reference to keep things straight. The stem part underneath is curved inward, use the guideline to keep it even.

DETAILS:
There are decorations around the edges. The decorations look like leaves or scallops or you can add your own design. Start drawing the decorations from the middle, go back and forth on each side and go outward to the edges.

The base is a small square but the back is narrower than the front.

The rings on the side are up to you, you can put something else on the side or leave it off.

FLOWERS:
The flowers and plants fill the top and spill over.
There are some grass blades that go up and out.
There are some small leaves that look like upside-down teardrops.
There are some medium and large leaves that look like hearts.
There are some flowers that are shaped like popcorn.
There are some little flowers that look like tiny softballs
There are some plants that have leaves hanging off of a stem.

Fill the areas between the leaves with lines, shadow, and texture that will make it look really full of plants.

Add shadow to the picture to give the urn roundness.

(c) Mr. Adron 8/28/13

Join my Patreon community, and you will not only support my art, but you will also get stuff. 

Become a Patron!

Wednesday, August 7, 2013

How To Draw A Birdbath Worksheet

How to draw a birdbath drawing lesson and printable worksheet.

How to draw a birdbath is an easy project for the young artist and will give much satisfaction.

Parents, home school families, and teachers may print a copy for personal and classroom use; just highlight the worksheet and the project notes and send to your computer or save them to your device.

To print the worksheet below, just highlight it and send it to your printer or save it to your device to print later. If you have problems,  CLICK HERE to visit the how to print page for some suggestions or try the updated link below.

How To Draw A Birdbath Worksheet 

My how-to-draw worksheets are free, so print as many as you need.  I only ask that you consider making a small contribution to support my art if you can. Your gift will let me know you appreciate these, and I will be able to create more.


Thank you

Here are two links that may work better on some printers.

CLICK HERE for a link to a file in a portable format (PDF).

You may want to print the project notes below, too. Start by drawing a guideline down the center to give balance and to help keep things even. Then using basic shapes of circles and ovals, draw the top and base of the birdbath. All the top and bottom curves should match, so don't draw a curved bowl and straight lines elsewhere. The body of the pedestal is shaped like a teardrop.  It helps to draw from the top down a little on each side as you measure against the guideline.

Add decorations, like leaves or shapes. Use a guideline to keep the decorations following the same curves as the top bowl.

Using shading will give the effect of the birdbath being round and three-dimensional.

Put the birdbath in a scene like a garden by adding flowers around the bottom. Put a wall or fence behind it. Add bushes behind the wall and trees behind the fence. Bushes and leaves can give a contrasting effect against the smooth stone of the birdbath.

I hope you create a masterpiece.

(c) Mr. Adron D. 8/7/13

Sunday, April 28, 2013

How to Draw a Garden Gate Worksheet

I am delighted to share this how-to-draw a garden gate drawing lesson and printable worksheet with you. 


A garden gate can be an exciting feature in a landscape or rural scene. This project is not difficult and can be rewarding as a confidence-builder.

How to Draw a Garden Gate Worksheet.


Even though it takes hours, I am glad to create these How to Draw Worksheets because I believe that when we have been blessed, it is so that we can become a blessing to others. I hope you enjoy these projects and they help you. Thank you.

PRINT THE WORKSHEET

If you have trouble making the worksheet below print or are printing on A-4 sized paper then CLICK HERE to visit my how-to-print page for some suggestions. 

LESSON NOTES

Start with the middle ground and draw a wiggly line for the bushes at the bottom of the fence. Then draw a guideline for the top of the fence. A third wiggly line makes the horizon with a line of distant treetops.

Draw a large "S" for the path. You will erase part of this later, so draw lightly. The path is wider at the bottom and narrower by the gate.

Draw the fence slats as thin rectangles standing in a row. Give them an edge; you can do this with a shadow on one side so they won't look flat.

The gate is open, so the lines get closer by the edge of the gate.

Using a louse scribbling technique, outline the tree behind the fence.

Add details to the fence like the cross beam, the hinges, and texture to the bushes at the bottom.

The bushes across the field are darker, so the fence is in light contrast.

The stone steps are bigger at the bottom of the picture and smaller at the top.

Use different textures on the tree trunk and on the leaves.

Add texture to the distant trees but keep it simple.

I hope you draw a masterpiece!

(c) Mr. Adron 4/28/13

Monday, March 25, 2013

How to Draw Grapes on the Vine Worksheet

How to draw grapes on the vine drawing lesson and printable worksheet.

Parents and teachers may use this free printable how to draw grapes on the vine worksheet to help the young artist gain confidence in drawing. It is a simple approach and uses basic shapes and forms.

To print the grapes on the vine worksheet below, just highlight it and send it to your printer, copy and paste to a word doc, then print from there (if the margins are off, you can reset them in the toolbar at the top). You can copy and save it to your device to print later. If you have problems printing, see the how-to print tab above or try one of the updated links below.
Note; use grayscale to get the shadows.


How To Draw Grapes on a Vine Printable Worksheet.

Sometimes it takes me hours, but I create these how-to-draw worksheets, but I do it so that I can give back because I believe that when you have been given a gift, it is so you can be a gift to others.  I hope these worksheets are a means of blessing to you.


Thank You

Here is a link that is upgraded to print better. It is a PDF.

CLICK HERE for a PDF file.

Make the outline of the basic shapes. To give the picture freshness, scribble the outline loosely.

The leaves are large and look like floppy spades or hearts with splatter edges, draw the splatter edges as a wavy and choppy line. Put one leaf in front and one behind the grapes. The leaves have vanes that all start at the same spot near the top. Draw these as a straight line.

The grapes are larger at the top of the cluster. Put some halfway behind the others. Put a shiny spot in each grape and a shadow beneath each grape. Shadow in the grapes that show a little behind the others. Take your time with the grapes, and it will look good.

I hope you draw a masterpiece!

Thank You
© A. E. Dozat 2/25/13

Monday, October 15, 2012

How To Draw A Simple Rose. Lesson and Worksheet

How to Draw A Rose. 

This is a free printable drawing worksheet, How To Draw a Simple Rose.


tHIS is an easy drawing lesson for the young artist or the beginner. It is a popular theme and makes a wonderful greeting card or framed art.

The worksheet may be printed by highlighting it and sending it to your printer or saving it to your device and printing later. Some people have better luck by dragging the image off to the desktop and then printing from there. If you need  CLICK HERE to visit the how to print page for some suggestions, or try one of the updated links below.

How to draw a rose worksheet. Updated.

Sometimes it takes me hours but I create these how to draw worksheets but I do it so that I can give back because I believe that when you have been given a gift it is so you can be a gift to others, and I hope these worksheets are a means of blessing to you.


If the file above does not work for you the one below will be better it is a digital file called PDF.

CLICK HERE for a file in a universal portable format.

This is not a hard project as one would think; once you recognize the basic and simple shapes you just put them together and add details.

Start with a large "U" shape, with a small circle beneath. Draw this lightly so you can erase as needed later on. Outline the stem by drawing two lines one for each side of the stem.

Lightly draw the outline of the three leaves, they almost make a cross. The leaves are shaped like teardrops. For interest put one of the leaves behind the rose or the stem.

Going back to the rose petal, use three curved lines to make the petals, one going down from the left top, one starting halfway up from the first and the third going up to the top right. Draw three short wiggly lines on the top, together they will cross the top. There are four leaves under the blossom, they are like triangles going out and away with a little curve.  Now you may need to erase a few of the lines you did before.

The three leaves have veins going down the middle and veins going out to the sides from the one in the middle- don't make too many. The edge of the leaves have points all the way around draw about seven or eight on each side.

Use soft grey shadow and just a little dark grey shadow on the shady edge to make the rose look round.


Illustration for How to Draw A Rose

I hope you create a masterpiece!

(c) Adron D. 10/15/12

Monday, October 8, 2012

How To Draw A Pumpkin. Worksheet and Lesson.

How to draw a pumpkin. 
This free printable drawing worksheet, How to Draw a Pumpkin, is easy and with a few details can turn out very good.


FIRST A WORD OF ENCOURAGEMENT:  If your drawings do not turn out the way you were hoping do not give up, learning to draw takes practice. Draw every day and soon you will be making beautiful pictures. Come back to this blog often and try some of my other projects.

PRINT THE WORKSHEET
You may print the worksheet below by highlighting it and sending it to your printer or saving to your device and printing later. Some people have better luck b dragging it off to the desktop and printing from there. If you have problems CLICK HERE to visit the how to print page for some suggestions. Below the image are links to alternate image files.

NOTE; use greyscale if your printer has that option so you get the benefit of the shading.


Printable how to draw a pumpkin worksheet

Sometimes it takes me hours but I create these how to draw worksheets but I do it so that I can give back because I believe that when you have been given a gift it is so you can be a gift to others, and I hope these worksheets are a means of blessing to you.


Thank you!

Some printers work better with a PDF file. 

For a PDF file CLICK HERE.

PRINTABLE PROJECT NOTES.

Pumpkins are round but not a circle. Draw the outline as a lopsided circle with the bottom mostly flat. Draw a second pumpkin outline in front of the other. These outlines can be a little lumpy shaped but don't overdo it.

The stem is not at the very top but a little lower, this gives perspective to the pumpkin. The stem is rough so draw it with little short choppy lines. Add shading to the shadow side with short choppy marks made with the "cheek" or side of the pencil. Do not shade in the top cut off part, it remains white. The bottom of the stem has little bumps like toes, sketch them in like circles with a shadow on one side.

The pumpkin has creases or folds in the sides. These creases are shaped like a bow without the string or arrow,  they start at the top then bend outward and then back into the bottom where they might touch. These creases often are a shadow but will have a highlight on the outside edge next to the shadow.

Remember to leave the highlights where the light is shining on the side of the pumpkin. Lightly outline the highlights before shading the shadow side of the pumpkin.

The shadows make it look round and real. Shadows come in very dark, dark, and gray. Do the very dark first at the bottom and the side away from the light. Then add the dark around the very dark and last lightly fill in everything else with the gray- but keep the highlights pure white. Leave a little highlight between the pumpkins to help show they are separated.

A shadow on the table and the wall behind the pumpkin will make it look like it belongs somewhere.

I hope you create a masterpiece!

(C) Adron D. 10/18/12

Saturday, July 28, 2012

How to Draw a Well: Art Lesson and Worksheet

Here is a free printable how to draw worksheet, How To Draw A Well, 


This is a fun little drawing project for a beginner artist. Look at my example below in watercolor to see that it makes a lovely greeting card. A well can be a focal point in any rural or garden scene.

PRINT THE WORKSHEET
If you have trouble making the worksheet below print or are printing on A-4 sized paper, then CLICK HERE to visit my how-to-print page for some suggestions. 


Worksheet for How to Draw a Well 

My how-to-draw worksheets are free, and you may print as many as you like. I only ask that you consider making a small contribution to support my art.


Thank you!

PRINTABLE PROJECT NOTES 


Begin with a basic outline. The base of the well is a cylinder. The curve of the front top should go down and match the curve of the bottom. The curve at the top back should go up. The roof starts with parallel lines; two for the post on either side of the well, two for the top and bottom of the roof, and two at an angle for the edge.

I draw guidelines that form a grid on the roof for the shingles. Draw this lightly since you may need to erase extra marks. Make some shingles wider than others but keep them pretty much the same length. Don't draw everyone; on some, just give a slight suggestion that the shingle is there, making it look old and weathered.

The side posts are three lines going up and down. There is a cross piece for the bucket to hang from, making two lines for this. Remember to draw the rope in the middle. The bottom of the cross piece is darker than the top because of the shadow.

I also use a grid for the stones on the side of the well. Keep this light so you can erase it later. Don't make the stones all the same shape. Give them some different shapes. Draw the stones by outlining them and leaving a gap between each one for the mortar.

The bucket is a cylinder with a few details, like some lines curving across for the metal bands and some lines going up and down for the wood. Draw the crank like a letter "Z."

Add shadows under the stones and the bottom edges of the shingles and inside the roof.

You can put trees in the background and bushes in front of the trees. You can add flowers and a stone path leading to the well.
Example of well from Drawing Lesson

Greeting Card 

(c) Adron 7/28/12

Monday, July 9, 2012

How To Draw A Hummingbird, Lesson With Worksheet

A worksheet from the lesson on how to draw a hummingbird.
How to Draw A Humming Bird 

This is a free printable drawing worksheet, How To Draw A Humming Bird. 

Parents and teachers are welcome to use this for personal and class use.

Scroll down for the link to download the free PDF 

HOW TO PRINT
To print how to draw a hummingbird worksheet, just highlight the image below and send it to your printer or save it for later. Some printers work better if you drag the image to the desktop and print from there. Some printers work better if you first drag the image to your desktop and print from there. If you have problems,  CLICK HERE to visit the how-to-print page for some suggestions.

Printable How To Draw A Hummingbird Worksheet

I am glad to offer these how-to-draw worksheets for free; I hope you enjoy them.


Thank You!

Here is a file that may print better if you have problems with the one above. 

Some printers work better with a portable format. For a portable file, CLICK HERE.

Printable notes

INTRODUCTION
Learning to draw takes time, patience, and practice. If the hummingbird does not turn out the way you hoped, do not get discouraged because you learned some skills, and your next picture will be better. The more you draw, the better you get, so look over my worksheets and print out a few, do one or two every day for a while, and you will be surprised at how good your art will become.

OVERVIEW
Hummingbirds are beautiful, amazing, and very easy to draw. You only need to know a few basic shapes and take your time to make a beautiful picture.

BEGINNING
Start with a 2b pencil and draw lightly so you can erase later. Use a circle for the head and an oval for the body. The oval should be no more than twice the size of the circle you drew for the head. The first wing, the one away from you on the other side, is just a triangle; don't make it too big, no more the size of the oval. The tail is a small triangle.

DETAILS
The beak is two lines, don't make it too fat at first; do it skinny, and you can fatten it up later if it needs.

The rear wing is a line like a fancy number "7" with a foot on the bottom; it should look like an incomplete triangle. Draw eight wing feathers on each wing, starting at the top and working your way down. Try to draw the feathers in one beautiful stroke going out, then down and back.

Erase any extra lines.

Draw a curved line for the eyebrow and then draw the eye underneath it like a half-circle with the top of the eye covered just a little by the eyebrow. Draw the shiny spot in the eye before you color it in, so it doesn't get colored out.

The feet are tucked in, and you only see three toes, use short straight lines to draw them.

Some hummingbirds have brilliant colors. Most are green with white bellies and chins and black wings. Some have red throats or blue.

An example from the lesson on how to draw a humming bird.
How to draw a hummingbird example.

I hope you draw a masterpiece!
(c) Adron D. 7/9/12

Sunday, June 17, 2012

How to Draw A Monarch Butterfly Lesson and Worksheet

  How To Draw A Monarch Butterfly is an easy project the young artist will be proud of.


How to Draw A Monarch Butterfly
 Worksheet.
Butterflies are beautiful creatures and easy to draw. If you take your time and do a little on each side of each wing and keep going back and forth, the butterfly will look very realistic.

To print the how-to-draw a butterfly worksheet below, just highlight it and send it to your printer. Set the preferences to greyscale, so you get the shadows in the illustration. If you have problems, try dragging the image to your desktop and printing from there. See the how-to print tab for more suggestions, or try one of the updated links below.

My how-to-draw worksheets are free, and you may print as many as you like. 

Printable How to Draw a Monarch Butterfly Worksheet
 

Sometimes, it takes me hours to create these how-to-draw worksheets. I do it so that I can give back because I believe that when you have been given a gift, it is so you can be a gift to others. I hope these worksheets are a blessing to you.
Thank You!

CLICK HERE for a file in a universal portable format (PDF).

PRINTABLE PROJECT NOTES

BEGINNING STEPS
The first lines make the basic shape. Start with a curve for the front of the wing. Halfway across, draw a line down to mark where the body goes.  Draw two lines going down and out like an upside-down "V" these start just below where the neck would be.

WINGS
The back of the wing is six short curving lines connected together. Start from the outside edge of the wing and draw a little of each one. Go back and forth between the wing to be sure to keep everything matching.

DETAILS OF WINGS
Draw the wing patterns evenly by copying back and forth on each side as you go; if you try to do all one side, then the other wing won't match.  The top wing has a line going out away from the body to the tip and then three lines going down from it. The bottom wing has a teardrop-shaped line next to the big dividing line (that dividing line is a wide line). There are three teardrop-shaped lines coming off, the first going downward.

There are two rows of dots at the back edge. You might try to draw a row of figure "8"s to get them even. On the tip of the wing are four rows of dots; the second row has three big dots.

Color the outline black. Try a sharpie. Color the wings orange and red. The dots say white except for the three big dots at the edge.  Color the background blue or green.
.
An illustration of a butterfly for a drawing lesson
Illustration for How To Draw a Monarch Butterfly


(c) Adron D. 6/17/12

Thursday, June 7, 2012

How To Draw A Birdhouse Project and Worksheet

This is a free how-to-draw a birdhouse worksheet for kids.

This free printable drawing worksheet, How To Draw A Birdhouse, is a nice project for a greeting card or picture to frame.

Work sheet for how to draw a birdhouse lesson and project.
Draw a birdhouse  worksheet

To print the image below just click on the image and send it to your printer. If you have trouble making the worksheet below print or are printing on A-4 sized paper then CLICK HERE to visit my how-to-print page for some suggestions.  

After you finish this project you might like to try How To Draw A Birdbath.


How to Draw a Birdhouse
You are welcome to print as many of my worksheets as you like. Use the Paypal button to make your donation. 


Thank you!

CLICK HERE for a file in Universal Portable format, PDF.

PRINTABLE LESSON NOTES

It is easy. Start the drawing with a 2b, and make a light outline first. The tree trunk is just two lines going up and down, you can split it off to make a few branches. The birdhouse starts out as a square with a triangle roof. The bird starts as two circles for the body and head.

Outline lightly the flowers and the leaves, put them down one side. The leaves are heart-shaped, don't make them side by side but put a few behind others. The bird's wing is like a large letter "C" with a long bottom. The flowers are morning glories and they are round with dark centers. They don't need to be perfect but try to make them all the same size.

Make the tree bark rough with short choppy lines.  Add the leaves to the tree, they are shaped like the letter "V". Give the flowers some detail with dark centers.

When you are happy with the basic design change to a darker pencil or a marker and go over the drawing again adding any detail you feel it needs.

Shadows add realism, shade the side of the tree, the side of the birdhouse, and around the flowers.

Use yellow and green for the flower leaves.
Use blue and green for the tree leaves.
Make the tree bark gray or brown.
The bird is blue and black.
The flowers are purple.

Take your time and this will be a picture you can be proud of.

(c) Adron  D 6/7/12