Showing posts with label bird. Show all posts

Sunday, November 8, 2020

Free How to Draw a Seagull on the Beach Worksheet and Art Lesson

I am glad to share my free how-to-draw a seagull on the beach worksheet and art lesson that you can download and print out for your class or personal enjoyment.

SCROLL DOWN TO ACCESS THE FREE PDF.
THANK YOU FOR YOUR DONATION!

I have always thought the seagulls were marvelous creatures. They inhabit shores all over the world. Sometimes they are alone, and sometimes they are in a flock. There is something beautiful in how they seem to drift in the sky as they search for food. They are bold, too, and will come close enough to a person to snatch their food.  So it seemed that sooner or later, I had to create a how-to-draw worksheet for the noble seagull.  

If you have problems downloading the image below, click on the HOW TO PRINT tab, I have listed some common issues and possible solutions you can try. You can also download the PDF below if the image file is too problematic. 


Free how to draw a seagull on the beach worksheet 

I create these how-to worksheets because I believe in giving back and that when you have been blessed, you should seek to be a blessing to others. These worksheets take hours or even days to create, and I hope they are a blessing to you. 


Thank You!

Here is a file that may work better on some devices. It is a PDF.

Click HERE for a PDF file.

PRINTABLE NOTES


The setting is as important as the portrait of the seagull so start with the horizon line, just as you would with any landscape picture.  Start your drawing with a loose and free approach, almost as if you are just going to play around with some ideas. Scribble random circles where the huge clouds might be. Don't even try to put them anywhere on purpose; let the design of the clouds be like an accident. We'll come back to them later. 

The seagull is in the foreground so draw it before you do too much with the background. Start the seagull with a teardrop shape sideways, an oval for the head, a rectangle for the neck, and a thin rectangle for the beak. Dont make the legs just straight; make him doing something like walking; it gives the picture interest. 

Draw a few lines across the water for the crashing wave. When waves roll across the beach, they make foam on edge.  Draw a wavey line where you want the foam edge to be.  

Go around the lines of the shapes that you used to start the seagull and make it look more like a seagull, then erase the extra lines.

There are so many different types of seagulls that you dont need to worry about making yours perfect because somewhere there is one just like yours.

Go around the scribbled circles that started the clouds and make the best parts darker, then erase the others, make sure the sunlight is on one side and the shadow is on the other. 

Keep the sea simple. Use lines going right and left for the waves. The waves far away are small and short; the waves become larger up close where they are longer and larger. 

Use a triangle to add a sailboat; this will give a sense of distance and size. 

For the foam of the crashing wave, start with tiny circles, then go around them and erase the extra lines. There will be shadows underneath the foam and under the part where the wave curls over. 

The water of the wave will have a flow over from the top, and a flow out from the bottom uses fine lines to show this. 

Use lines back and forth to shade the dark areas of the foreground water.

The sand is darker and coarser near the bottom; it is finer and lighter near the water. Take your time and use many dots in horizontal rows to give the sand texture.   

Take your time with shading and texture; this is what will make the picture look real.

(c) A. E Dozat  11/8/20

Monday, February 20, 2017

How to Draw A Cardinal Bird Worksheet

This is a free How-to-draw a Cardinal bird lesson and printable worksheet.

Here is a  printable activity that will help give the beginner satisfaction in drawing a popular picture. It is a simple project and ideal for young artists or extra drawing practice. It can be used in class and at home.

SCROLL DOWN TO ACCESS THE FREE PDF.
THANK YOU FOR YOUR DONATION!

If you have problems printing, see the "HOW TO PRINT" tab above or try one of the updated links below that should print better.


How To Draw A Cardinal Bird Worksheet.

I am glad to create these How-to-draw worksheets for you, and I hope you can use them. You are welcome to print as many as you like


Thank You!

You may print the PDF below for free.

CLICK HERE for a file in a universal portable format.

PRINTABLE NOTES.
Start by drawing lightly so you can erase later.

BEGINNING
Start by drawing lightly so you can erase later.
The body is like an oval or a teardrop shape upside down with a slight tilt to the left at the bottom.
Use two lines to position the tail feathers. They taper to a rounded point at the bottom.

Use two lines to form the beginning of the wing. These lines are shaped like the letter "U."

The basic shape of the head and beak are like two triangles, one pointing forward and down and one pointing backward and up.

The eye is in the middle; draw it first, and use it as a reference to outline the black mask around it.

The feet are only pairs of short straight lines around the branch.

Use guidelines to keep the layers of feathers straight.

Erase the extra lines and add details like feathers. Use short, thin lines to give the feathers a soft look around the chest and waist. Use long lines for the feathers on the wing and tail.

If you work in color, this can be a beautiful picture; use red for the bird. Put blues and greens in the background.

I hope you draw a masterpiece.

(c) Adron 1/20/17


Thank You!

Tuesday, March 10, 2015

How To Draw A Toucan Bird, Free Printable Worksheet

I am happy to share this free how-to-draw a toucan bird worksheet.

These beautiful birds are fun to draw, and this drawing worksheet offers one way to draw a picture that the young artist can be proud of while developing confidence in drawing.

If you have problems printing,  "CLICK HERE "  to visit the how to print page or try one of the updated links below that should print better.


.
Free How To Draw a Toucan Bird Worksheet.


Thank you!

The file above may not work on all printers. The file below is digital and will be a better choice if you have problems. 

CLICK HERE for a portable universal formatted file.

Sometimes it takes me hours, but I create these how to draw worksheets, but I do it so that I can give back because I believe that when you have been given a gift, it is so you can be a gift to others, and I hope these worksheets are a means of blessing to you.

PRINTABLE LESSON NOTES

BEGINNING
The body is shaped like a cone on its side. Draw it with a curved line for the chest, next a straight horizontal line at the bottom of the curve going back as far as the curve went high; this line should tilt down just slightly. Then draw a line from the top of the curve going down to the tip of the horizontal line.

Draw a circle for the head, but it is inside the top of the cone shape, not above it.

The tail feathers are two straight lines going down.

THE BEAK
The starting point for the beak begins at the top center of the cone shape where the head is.  From there, draw a long, slowly curving line from the head out past the back of the tail. The bottom of the beak starts just below the first line, even with the top of the head going almost straight back. If it curves a little, that is OK since some toucans have a little curve in the bottom. The line that divides the top from the bottom is nearer the bottom by two/thirds and curves downward at the end.

DEVELOPING FORM:
The wing is a curving line from below the chin all the way to the start of the tail.
The feet have two toes going forward and two going back. Start them out like stick figures, then draw around them to give them thickness. There are bumps at the joints.
The eye is high on the head and near the beak. It is a dark circle with a lighter circle around it.
The end of the tail is rounded.

COLORING:
The toucan is mostly black but does not color him black if you can help it use gray if you can, and then use a little black for the shadows and details.
The legs and feet are blue.
There is a white area on the chest like a baby's bib.
Some toucans have a white stripe at the beginning of the tail.
The bill is very colorful. Mostly green, but the tip is red. There is orange on the upper bill and green with some blue on the bottom. You cannot make a mistake because there are many different kinds of toucans, and they all have different colors on their beaks.

I hope you create a masterpiece!

(c) Adron D. 3/5/15

My worksheets are free but would you kindly make a small contribution so that I can continue to create these for you. Please click HERE and enter an amount that shows your level of appreciation. Your donation will enable me to create more for you. Thank you. 

Wednesday, December 31, 2014

How to Draw A Peacock Feather, Free Printable Worksheet

How to draw a peacock feather drawing lesson and printable worksheet.

The free printable worksheet below will help the young artist develop confidence as they draw a realistic image.

Parents, teachers, and home-school families will find many ways to use this project. It can be given out as an extra activity in class or sent home to do on the student's own time. It is designed to give the young artist confidence in drawing a popular subject.

There is more than one way to draw a picture like this. I have kept it simple on purpose for the benefit of the young artist.

The trick to drawing good pictures is to practice. So draw every day. If it doesn't come out perfect, do not give up but keep at it, and soon, you will be making beautiful drawings.

Good luck.

If you have problems, see the how-to print tab above for some tips, or try the links below for alternate formats of this image.


How To Draw A Peacock Feather by MrAdron.

I am glad to share these how-to-draw worksheets for free, and I hope they are useful for you.


Below is a link that may print better on some devices.

Some printers work better with PDF format. To print in PDF, CLICK HERE.

BEGINNINGS
Start by drawing lightly so you can erase later on. The feather has a shaft (called a rachis); draw this with a graceful curve. The top is the beautiful part. Draw a large teardrop on top of the shaft. Draw a larger circle around the teardrop, do this lightly; it is just a guideline that you will erase later. On both sides of the shaft, lightly draw a guideline to keep the end of the veins the same length.

DEVELOP FORM
The top has four rings. The first is the green one; it is on the outer edge of the teardrop; draw it as a second line inside the teardrop shape. The next ring is brownish; draw it as a small inner ring that almost touches the bottom of the teardrop shape. The light blue is; next, it is inside the brown ring and has an upside-down heart inside. The innermost ring is the purple upside-down heart.

The shaft is thick; draw it as two lines on each side of the first guideline drawn earlier.
The barbs come out of the sides of the shaft. Draw them slowly and carefully; do not let them go past the second set of guidelines. Draw them in pairs on each side of the shaft. Use two lines for each barb, so you have a top and a bottom.
Have some of the barbs pass in front or behind others. Some will go in random directions, but all generally go upward.
The barbs at the top clump together. Outline them first, then draw in the individual barbs. Leave a few spaces between some of the barbs.

FINISHING
Color the feather green except for the eye. It is purple inside, then light blue, then brown, then green.

(c) Adron D. 12/31/14

Wednesday, October 8, 2014

How To Draw The Dove of Peace. Free Printable Worksheet.

I am delighted to share my how-to-draw the dove of peace drawing lesson and printable worksheet.

Drawing takes time and practice, so if your picture does not turn out perfectly, do not give up; keep on drawing. If you draw every day soon, you will be making beautiful pictures. I have a lot of projects, so come back often and try a few more.

Good Luck
If you have problems printing, see the "HOW TO PRINT" tab above or try one of the updated links below that should print better.


Free How To Draw A Dove Of Peace Worksheet. 

I am happy to create these how-to-draw worksheets for you. I hope you have fun with them and they are helpful. You are welcome to print as many as you like.


Below is a link to a file that may work better if you have problems with the above. 

CLICK HERE for a file in photo format that might print better on some printers.


LESSON NOTES

Keep the image as white as possible. The wings are medium to small for their body size. The tail is medium to large. The beak is small.

BEGINNING
Plan to have the dove at a more dramatic angle, not just straight up and down- which is boring. Draw a line for the axis; this line goes from the tip of the head to the tip of the tail. Next, draw a line across for the leading edge of the wings; draw lightly at this point since you will want to erase some of this later.

DEVELOPING FORM
Use an oval for the body; draw this on the axis line. The top will be at the wing edge and will end at the base of the tail. The tail is like a Chinese fan; the head is a circle that goes over the oval of the body just a little. The wings have a curving line going from the edge to the tail. Draw a line on each side of the body to the wing and round it off for the shoulder.

FEATHERS
Don't draw too many feathers. Eight or nine on each wing and ten or eleven on the tail will be fine. Mark the feathers off for spacing before you draw them, so they are all even and the same size. Make them round on the ends.

DETAILS
The eyes are black and almost round, with just a slight almond shape. The beak is a triangle. Keep the feet simple; a few curved lines will work.

Do not color the dove; just use a little shadowing. Color the sky and leave the dove white.

(c) Adron D. 10/8/14

My drawing worksheets are free for you to print, but they take me hours to design and create. Please use the DONATE tab to support my lessons with a small contribution. Thank you.

Monday, September 8, 2014

How To Draw An Egret Bird, Free Worksheet

How to draw an egret bird drawing lesson and printable worksheet.

The free how to draw an egret bird worksheet below and the project notes below will help give the young artist some ideas for drawing this splendid bird.  It is an easy lesson and ideal for the beginner.  I designed it for a handout to give students in a homeschool class I was teaching.


How To Draw An Egret Bird Free Worksheet

I do not charge you to print my how-to-draw worksheets, so you may print as many as you need. If you are able, won’t you please consider making a small contribution to support my art? Use the Paypal button.  Your gift will enable me to create more. 


Thank you. 

If the photo format gives you trouble, the PDF below should work better.

CLICK HERE For a link in PDF format, (You may need to download a temporary file by clicking on the down-pointing arrow in the toolbar, next open the file by clicking on the box at the bottom of your screen then you can print by clicking on the icon or as you would normally).

PROJECT NOTES YOU MAY PRINT


BEGINNINGS
The body of the egret is a large oval with a smaller oval below it. Draw this first step lightly so you can erase it later. The neck is like a large letter "S," use two lines for this, so you have a back and a front. The head is like a long triangle beside an oval.

DEVELOP FORM
The large body oval is going to be the wing. There are some feathers at the bottom; draw them with curved lines. Erase the top line of the oval and darken the other parts. The belly is covered with long soft feathers; draw them as short, bent lines.  The front of the neck has some long soft feathers, so draw them as curved lines too,

DETAILS
The eye is a circle with a white dot in the middle. The beak has a line going across it to divide the top from the bottom. The back has some shadow, and a shadow goes down the center of the back where the two wings meet. The legs point a little backward at the knee.  It is easiest to hide his feet in the water or tall grass.  The far leg is darker since it is in shadow.

(c) Adron D. 9/8/14

Monday, September 1, 2014

How To Draw A Feather, Free Worksheet

How to draw a feather drawing lesson and printable worksheet.


This printable drawing worksheet will be helpful to give the young artist confidence in how to draw a feather. Parents, teachers, and home-school families will find ways to use it in the classroom or as a take-home assignment for the students. Learning to draw takes time and practice, so keep on drawing in a short time you will be making beautiful pictures. I have a lot of projects come back often and try a few more.

👉👉👉 SCROLL DOWN TO ACCESS THE FREE PDF.

How to Draw A Feather Free Worksheet by Mr Adron.


Thank you!
Sometimes it takes me hours but I create these how-to-draw worksheets but I do it so that I can give back because I believe that when you have been given a gift it is so you can be a gift to others, and I hope these worksheets are a means of blessing to you.

CLICK HERE for a PDF formatted file. 

PROJECT NOTES YOU MAY PRINT


FIRST
Start with the line down the middle that makes the quill and shaft, so then you can use it as a reference for everything that follows. Draw the middle line as two lines so you have a top and a bottom. The line on the bottom will be a little thicker to show the shadow.

SECOND
The shape of this feather is oval, though some are triangular. Lightly outline the feather as an oval. Use two lines to draw the oval it will be evener.

THIRD
The feather has barbs, draw them as lines coming off of the middle line (shaft), and going to the edge, that is the outside oval we drew in the second step. Sometimes there are gaps in the barbs so draw the gaps early on, that way you are ready when you shadow it in.

There are downy barbs at the base of the feather. They go wild, so draw them every way, almost like a scribble.

FOURTH
Use shadow technique to show the connection of the barbs to the shaft this is done with short lines starting at the shaft going outward to the edge. Lastly, draw shot lines going from the edge inward toward the shaft. Leave spaces for interest. Use longer and darker lines on the bottom to give the shadow effect.

To see more free how to draw worksheets like this, click on the label for Bird in the sidebar.

(c) Adron D. 9/1/14

Support my art by joining my Patreon community and you will get stuff.

Become a Patron!

Monday, June 2, 2014

How To Draw A Robins Nest Picture, Free Worksheet

How to draw a robin and nest drawing lesson and printable worksheet.

The free drawing worksheet guides the young artist in a popular subject. It is simple and inspires the young artist while giving just enough challenge.

This worksheet can be given as a classroom assignment or sent as a take-home project.

YOU CAN HELP

I do not charge you to print my how-to-draw printables and you may print as many as you like. I only ask that you take a moment and consider making a small contribution to support my art. Click on the Paypal button or the DONATE tab and choose an amount that reflects your appreciation. Your gift will enable me to create more coloring pages for you. Thank you.


How To Draw A Robin's Nest Worksheet by MrAdron.

To print the worksheet just highlight it and send it to your printer or save to your device to print later. If you have problems see the how-to print above for some suggestions.

PROJECT NOTES YOU MAY PRINT


BEGINNINGS
Start with a loose sketch where you use basic shapes to work out the design. The nest is shaped like a bowl with rounded edges, so draw an oval with another oval inside and almost touching the top edge. The robin is shaped like a teardrop upside down with a circle for the head at the top. The tail is like a long triangle.

DEVELOP FORM
Since robins lay up to four eggs draw one or two ovals for the eggs.
The hatched chick is a circle for a body with triangles on the sides for the wings.
The chick head is turned up and all you see is the beak that is shaped like a triangle.
Draw leaves that are heart-shaped or almond-shaped below the nest and behind the nest.
Add a tree trunk, it is drawn as parallel lines wide apart below the nest and narrow together above the nest.

DETAILS
The nest is textured with long lines going around it. Make the lines thicker and darker for the shadow underneath and inside bottom of the nest. These lines should follow the curve of the nest.
The robin has two long feathers on the wing. The wing on the far side sticks out a little at the back.
The tail has two long feathers.
Give the tree trunk texture of bark by using short choppy lines.

SHADING
Things that are behind other things could be shaded darker to make the foreground stand out.
The robin's head is black, the wing and tail is gray and the chest is orange-red.
The egg is blue.
The chick is brown and gray.

The free drawing and the project notes may be printed by highlighting it and sending it to your printer or saving to your device for printing later.

(c) Adron 6/2/14
Become a Patron!

Thursday, February 6, 2014

How To Draw A Pelican on a pier Worksheet.

How to draw a pelican on a pier drawing lesson and worksheet.


This how-to-draw a pelican worksheet is an easy and fun drawing project that any young artist can do easily. It breaks down the figure into some basic shapes and then adds details until you have a beautiful pelican.  

SCROLL DOWN TO ACCESS THE FREE PDF.


How to Draw a Pelican Worksheet


Thank You!

Here is a link to an updated and easier-to-read file. It is a PDF and will be easier to download and print.  

CLICK HERE for the PDF file.

PRINT THE WORKSHEET

If you have trouble making the worksheet below print or are printing on A-4-sized paper, then CLICK HERE to visit my how-to-print page for some suggestions. 

Sometimes it takes me hours, but I create these how to draw worksheets, I do it so that I can give back because I believe that when you have been given a gift, it is so you can be a gift to others, and I hope these worksheets are a means of blessing to you.

YOU MAY PRINT THE PROJECT NOTES BELOW.

BEGINNING
Start sketching lightly so you can erase later. The basic shape is an oval for the body. Above the oval draw two lines for the neck, and on top of that, draw a circle for the head. The beak is a long triangle that is as long as the neck.

The back has a slight hump at the shoulder. Make the body a little wider at the lower half.

HEAD AND BILL
The eye is halfway down and a third of the way forward. The eye is a black dot inside a circle. The bottom of the bill is bigger; draw a line from the tip to below the eye and make sure the bottom beak is half as thin as the top. The nostril is on the top of the beak by the eye. This pelican has a black face; it looks like a wavy patch that goes around the eye and behind the bill. The bill has a little hook at the tip.

WING
The wing starts slightly below the shoulder and curves down to the tail. There are lots of feathers going downward on the wing. Draw the feathers as many lines but not too many; make sure they have a little space between them. There is a dark edge at the bottom of each feather.

FEET
The feet are a triangle with a line going down the middle for the middle toe. The legs have a backward bend like a person's ankle.

PIER AND WATER
The pear is a cylinder; it has an oval top and straight lines going down on the sides. The bottom has a curve that matches the top curve.

The water is a lot of back and forth lines like the letter Z but flatter. The water is darker in the lower area and lighter by the horizon. Make sure the horizon is level and not tilted.

I hope you draw a masterpiece!

(c) Adron 2/6/14


Thank You!

Wednesday, September 4, 2013

How To Draw A Baby Duck Worksheet

How to draw a baby duck drawing lesson and printable worksheet.


You do not have to make a donation to download my coloring pages. But if you want to the donate button is below the picture.

This printable drawing worksheet is a fun drawing project for the young artist, it will give confidence.  It can be used in school or at home.


How to Draw A Duck Worksheet.


To print the worksheet above, just highlight it and send it to your printer or save it to your device to print later. If you encounter any issues, refer to the 'How to Print' tab for guidance.

To see more projects like this, search the labels in the sidebar.

You can print the project notes below.

BEGINNING
Start by developing an outline. The head is a circle and the body is almond-shaped below the head. The body is tilted downward. The back of the head curves down to the back and the chest curves up to the cheek. The tail is pointed downward.

DETAILS
After the basic outline is finished add the details

The wing is a curving line at the shoulder that comes around then up.

The bill is stubby. There is a shiny spot in the eye, draw it in before you do much else to the eye. The eye is mostly rounded but has a slight oval point at the forward area.

The legs are far back and are short. The feet are flat and long. There is webbing between the three toes.

TEXTURE
The feathers are soft and fluffy so draw them as short strokes.

FINISHING TOUCHES
Add shadows underneath to give it roundness. There is a shadow under the eye and under the chin.

The baby duck can be yellow but some ducklings are brown or gray. The feet and legs are orange.

© Adron 9/4/13

Thursday, August 22, 2013

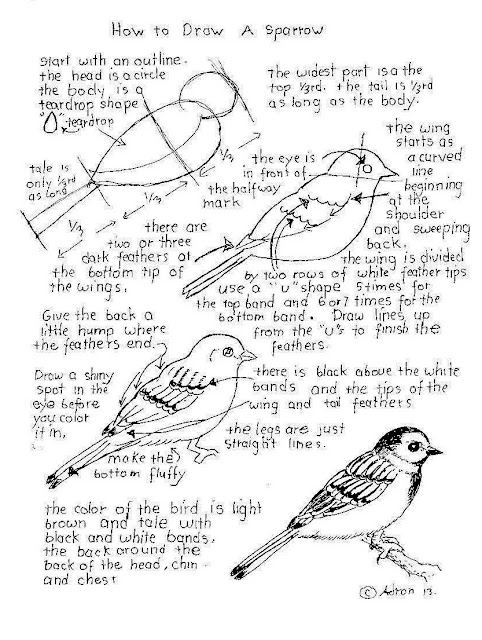
How To Draw a Sparrow, Worksheet and lesson.

How to draw a sparrow drawing lesson and printable worksheet.

This free how-to-draw a sparrow worksheet will help give young artists confidence in drawing and enable them to create something they can be proud of. Parents, teachers, and homeschool communities may print the worksheet at the bottom and the project notes below for class use and personal fun.


If you like this, you might also like how to draw a robin.

PRINT THE WORKSHEET

If you have trouble making the worksheet below print or are printing on A-4 sized paper, then CLICK HERE to visit my how-to-print page for some suggestions. 
How To Draw a Sparrow Worksheet.


Thank you!


Sometimes I spend hours creating these how-to-draw worksheets, but I do it to give back because I believe that when you have been given a gift, it is so you can be a gift to others, and I hope these worksheets are a means of blessing to you. You are welcome to print as many of my worksheets as you like.

You may want to print the project notes below.

BEGINNING
The sparrow is a small bird. The body is shaped like a teardrop. Start by drawing an outline of the bird as a circle for the head and a teardrop shape for the body. The tail is 1/3rd as long as the body, begin it as a couple of straight lines.

WING
The wing starts as a curved line beginning at the shoulder and sweeping across the center of the bird lengthwise and coming to a point above the base of the tail. The wing is divided by two bands of white feather tips. Use a "U" shape five times for the upper band and again seven times for the lower band. Draw lines up for the feathers. The white has a black top edge.

HEAD
The head is simple; the beak is a short triangle, and the eye is a little forward of center. The eye is black, but leave a little shiny spot in it by outlining the shiny spot before you black in the eye.

BODY
The body has fluffy feathers so draw the tummy soft and with short lines.

The tail is 1/3rd as long as the body it is three or four lines that are dark and have black tips.

The legs and feet are just straight lines. The leg bends backward.

COLOR
The color of the bird is light brown on the wings and tail with black and white sports. There is black around the back of the head and on the chin down to the chest.

(c) Mr. Adron 8/22/13

Tuesday, July 23, 2013

How To Draw A Flamingo Worksheet and Lesson

How to draw a flamingo drawing lesson and printable worksheet.


This how-to-draw a flamingo is an easy printable drawing lesson that will give the young artist confidence. A few curved and straight lines are all it takes to draw a beautiful flamingo.


Free How to Draw A Flamingo Worksheet


My how-to-draw lesson worksheets are free; you can download and print as many as you like. Please consider contributing through PayPal so I can continue to create these for you. Thank you.

You may print the worksheet and project notes by highlighting them and sending them to your printer or saving them to your device for reference later. 

If you have problems making it print, CLICK HERE to visit the how-to-print page for suggestions.

You can print the project notes below, too.

Start drawing lightly so you can erase the unnecessary lines later. 

Begin with the arch of the back. Make the arch slope outward toward the tail. The back or top line of the neck is just as long as the back and may curve like an "S." Use a circle to get the size and shape of the head. The line of the bottom of the neck curves all the way down and continues to the tail.

The beak is big. Draw a rectangle on the front of the head and then a triangle going down.

The legs are as long as the body. They start halfway on the body and halfway down is the knees.

After you have the basic outline of the body, then add the details.

The eye is slightly forward on the head; it is small and has a dot in the middle.

The beak is black at the triangle part. There is a line from the top end of the beak to the bottom of the eye.

The feathers sweep down and back on the body. There is a dark line of feathers low on the body.

The tail feathers droop down at the end.

The feet are webbed, with three toes.

(c) Mr.Adron 7/23/2

Wednesday, May 22, 2013

How To Draw A BlueJay Worksheet

How to draw a blue jay drawing lesson and printable worksheet.

How to Draw A BlueJay Worksheet is an easy project that can be very rewarding for a young artist.

The free worksheet and the project notes below may be printed by highlighting it and sending to your printer or saving to your device to be printed later. If you have problems see the how to print tab for helpful suggestions.

YOU CAN HELP

I do not charge you to print my how-to-draw printables and you may print as many as you like. I only ask that you take a moment and consider making a small contribution to support my art. Click HERE TO  DONATE and enter an amount that reflects your appreciation. Your gift will enable me to create more coloring pages for you. Thank you.

.
How to Draw A Blue Jay Worksheet. by MrAdron.


FIRST STEP
Draw an outline. Start with a circle for the head, and an upside-down teardrop shape for the body. The tail is as long as the body. It is shaped like a thin wedge but slightly curved on top and bottom. The forward leg has a triangle-shaped thigh and two lines form a shape like a letter "L. The rear leg is two straight lines. The top of the head has a crest shaped like a triangle. The beak is a short thick triangle.

DETAILS
Once you have the outline you can add details. The wing is a curved line that starts at the shoulder and goes to the top of the tail. The eye is a circle inside an almond shape, it is behind the beak.

COLORS
The chest is white, there is a band of white on the wing and at the tip of the wing and tail. There is a band of black from the chest to the ear. There are bands of black on the wings and at the tip of the wing and tail. There are bands of black on the tail feathers and the wing feathers. These bands of black are shaped like sideways letter "W"s.

(c) Mr. Adron 5/22/13

Tuesday, April 2, 2013

How To Draw A Peacock Worksheet

How to draw a peacock lesson simplified.

This free printable how to draw worksheet will give some tips and helps for the young artist who is trying to do a complicated project. Using a few suggestions to simplify and organize the process helps to make a beautiful picture.

Parents and teachers will find lots of ways this printable worksheet can be used in class and at home.

TO PRINT.

To print the image below just highlight it and send it to your printer or save to your device to print later.  Some printers work better if you first drag the image to your desktop and print from there. If you have problems printing  CLICK HERE to visit the how to print page for some suggestions, or try one of the updated links below.

How to Draw a Peacock Worksheet.

Sometimes it takes me hours but I create these how to draw worksheets but I do it so that I can give back because I believe that when you have been given a gift it is so you can be a gift to others, and I hope these worksheets are a means of blessing to you. You are welcome to print as many as you like.


Thank you!

 
Some printers work better with a PDF format. For a PDF file CLICK HERE.

PRINTABLE LESSON NOTES


BEGINNING
The body is like a skinny teardrop with a little head on top. There are short wing feathers going down from the side. The head has some feathers sticking out of the top like a crown. The beak is long and white. The eye is small and has a white area around it and a black area around the white area. The legs are skinny.

TAIL
The tail feathers take time to do nicely so be ready to work on them for a while. Start with some guidelines to keep things even. Draw these lightly so you can erase later. Make the guidelines like five or six arches going over the body.

DETAILS
On the guidelines draw the eyes of the tail feathers. The eyes look like teardrops with a dot and a smile. Keep them the same size and space them evenly along the guidelines but not too close together. There is a bunch of feathers at the base of the tail, draw these like half circles going up from the body.

FINISHING TOUCHES
Starting with the eyes closest to the body draw the stem of each feather going from each eye to the body, use a line for each side of the stem. On the stems are fine hairs that go out draw these as short light lines.

(c) Adron D, 4/2/13

Thursday, March 21, 2013

How To Draw A Flying Seagull Worksheet

How to draw a flying seagull drawing lesson and printable worksheet. 

This free printable how to draw a seagull worksheet can be used by parents and teachers to help give the young artist confidence in drawing a beautiful bird in flight. It is simple for the beginner.

Seagulls are beautiful when they are flying, they add something nice to a sky, and are not that hard to draw.

To print the worksheet below just highlight it and send it to your printer or save to your device to print later.  If you have problems printing CLICK HERE to visit the how to print page for some suggestions or try one of the updated links below.

How to Draw A Flying Seagull Worksheet

Sometimes it takes me hours but I create these how to draw worksheets but I do it so that I can give back because I believe that when you have been given a gift it is so you can be a gift to others, and I hope these worksheets are a means of blessing to you.


Thank you!

CLICK HERE for a file in PDF format.

If you like this project you might also like How To Draw A Pelican, CLICK HERE to see it.

PRINTABLE PROJECT NOTES

Start with an oval for the body. Draw lightly so you can have clean erasure later on.

Each wing is a little longer than the body, (from head to the tip of the tail). The wings make a widespread out letter "M."  Draw the top edge of the wings with a curved line going out and forward and the last third swings back.
The back edge of the wing has the same curves but draw closer together at the end where the edges form a tip-point pointing backward.

There are three rows of feathers one near the top edge, one near the bottom edge and the bottom edge is the third row.

The tail starts where the wings join the body. Seagulls have short tails.

The head comes right off the shoulder and the beak is short. You won't have much of the eye showing since our view is from below.

Color the wingtips black. Leave the seagull as white as you can. Color in the sky around the seagull so it looks whiter.

(c) Mr. Adron D. 3/21/13

YOU CAN HELP

I do not charge you to print my how-to-draw printables and you may print as many as you like. I only ask that you take a moment and consider making a small contribution to support my art. Click HERE TO DONATE and enter an amount that reflects your appreciation. Your gift will enable me to create more coloring pages for you. Thank you.

Tuesday, January 22, 2013

How to Draw a Horned Owl Worksheet and Lesson.

Here is a free how to draw worksheet for the Horned Owl.

This free printable drawing worksheet is a fun and easy project for the young artist. The hard parts can be easily worked around so no matter how confident the artist will have a picture that they will be proud of.

YOU CAN HELP

I do not charge you to print my how-to-draw printables and you may print as many as you like. I only ask that you take a moment and consider making a small contribution to support my art. Please click HERE and enter an amount that best shows how much you appreciate having these available. Your gift will enable me to create more. 
Thank you.  


How to draw a horned owl worksheet. by MrAdron


To print the worksheet highlight it and send it to your printer or save to your device to print later. Some people have better luck by dragging it to the sidebar and printing from there. If you have problems see the how to print tab above.

OUTLINE THE BODY
Start with an outline. Make an oval for the head. The head is about 1/4 of the length of the bird. The body is two lines that curve out and down and form a letter "U"

WINGS
The wings are just suggested by two lines that go down each side of the body; they are curved first in then outward.

GUIDELINES
Use a guideline down the center of the owl to help keep things even. (Draw this lightly so you can erase it later.) Another guideline across the head helps to keep the eyes level with each other and in the middle.

EYES AND FACE
The eyebrows start just outside the middle and point to the ear feathers. The ear feathers are like triangles but fuzzy on the outside edge. The eyes are circles that touch the eyebrows. There is a dark ring around the eyes. They do not need to be perfectly round, but the pupil does, you might want to trace a button or coin to make the pupil round. Leave a little square to be the shiny spot it will make the eyes look glassy.

There are three stripes around the eyes and five on the forehead.

The beak is a thin triangle that starts halfway down the face. There are feathers at the top of the beak so it looks a little fuzzy.

FEATHERS
Draw some guideline for the rows of feathers. There are stripes on the feathers. Draw the feathers like the letter "U" but shade the stripes on the bottom of each feather.

The feathers on the wings tilt down and outward.

The tail has four or five feathers. They are short and rounded.

FEET AND TALONS
The feet are bony. Start them as circles where the talons are and the knuckle joint right behind it. The leg is just two lines disappearing into the feathers. There are four claws but only two or three show, so if they are hard to draw just do two, one each foot. The talons are very long and sharp they have a slight curve.

COLOR
Color the owl a light brown and have the stripes on the feathers to be a darker brown. The stripes on the face and chest are black. The talons and beak are the darkest black. The feet are brownish and orange.

Illustration For How To Draw An Owl

(C) Adron

If you are able won't you consider making a small contribution to support my art? Please click HERE and enter an amount that shows your level of appreciation. Thank you. 

Thursday, January 10, 2013

How To Draw A Flying Eagle. Worksheet And Lesson

How to draw a flying eagle is an easy lesson for a beginner.

This will give young artist confidence in their abilities to draw.

This worksheet may be printed by highlighting it and sending it to your printer or saving to your device to print later. If you have problems printing this see the how to print tab for suggestions.

YOU CAN HELP

I do not charge you to print my how-to-draw printables and you may print as many as you like. I only ask that you take a moment and consider making a small contribution to support my art. Click on the Paypal button or the DONATE tab and choose an amount that reflects your appreciation. Your gift will enable me to create more coloring pages for you. Thank you.


How to Draw an Eagle Flying, Worksheet by MrAdron

If you like this worksheet you might also want to try How to Draw An Eagle's Face.

Begin with a light pencil that you can erase easily. The first two lines will be erased later but will be a guide to start the drawing with.

First, draw a crooked "t," but the cross-bar is twice as long as the body. Imagine the letter "t" is doing a one-handed push up that is what it will look like at first. The long line is for the wings and the short line is for the body.

On the line for the body draw an oval for the body of the eagle, this oval starts at the point where the two lines cross and will go halfway to the bottom of the line.

Draw a large triangle for the tail feathers below the oval on the line. Use the line to keep the triangle and the oval centered on the eagle and on the line.

Draw a circle for the head and two lines to connect the head to the line for the wing.

Draw a sweeping curved line from the bottom of the body, where the tail starts to the tip of the outside edge of the wing to finish the wing shape.

None of these lines need to be perfect, just go over them until you have a nice outline of the eagle.

Add the beak and the eyes.

The feathers take time and if you take your time it will look great. There are about 24 feathers on each wing. Before you draw them make marks where you want them to be. Keep them spaced evenly except for the last (on the tip- farthest away from the body), five or six, these last feathers are more spread out.

There are rows of feathers. If you overdo it the results might not look good.

Add details to the head. The eye has a black center. The beak is a triangle but bent downward at the end.

The feet start at the bottom edge of the wing the tail. The claws look like ugly bony hands.

Color the body dark brown, leave the head white, color the beak and claws yellow.

Illustration for How to Draw an Eagle.


(C) Adron

Sunday, November 11, 2012

How To Draw a Bird Easy Lesson and Worksheet

How to draw a goldfinch worksheet.


This free drawing worksheet, How to Draw a Goldfinch, is an easy drawing lesson for a beginner or young artist. 
There are only a few lines and some simple basic shapes to this project.

If you have problems printing see the HOW TO PRINT TAB above for help, or you may try one of the updated links below that have been modified to print better.

YOU CAN HELP

I do not charge you to print my how-to-draw printables and you may print as many as you like. I only ask that you take a moment and consider making a small contribution to support my art. Click on the Paypal button or the DONATE tab and choose an amount that reflects your appreciation. Your gift will enable me to create more coloring pages for you. Thank you.


Worksheet For How to Draw A Goldfinch Bird Lesson.


Here are two links that have been modified to look better and print better.

updated file
How to draw goldfinch

(Illustrated at the right.)
CLICK HERE for a file in PDF format.


PRINTABLE PROJECT NOTES

Start by drawing lightly so you can make changes as needed and you will want to erase some of the lines as you go along.

The body is like an upside-down teardrop pointed at the bottom and rounded at the top.

The head is like a circle but the back of the head continues down to the back of the bird. The beak is slightly longer than it is thick.

The shoulder starts as a circle just under the head and forward a bit toward the chest. You will erase the back part of the circle later, now it is just to help you put things in the right place.

The tail feathers are just four lines. Two lines for the back and the front they are almost straight but curve out away from each other just a little bit. The other two lines of the tail are curved inward one overlaps the other leaving a little upside down "V" where they touch.

The legs are drawn with short straight lines. The back leg is straight, and the claw is like a skinny diamond. The front leg is shaped like a large backward "S". The front claw looks like the letter "C" drawn with straight lines looping over the branch. Draw it lightly so you can put the branch in.

The eye starts off as an arch, next draw a circle over it but with most of the circle under the arch, (then erase the circle showing above the arch. Draw in the shiny spot before you start to color the eye black, there is a little line of the cheekbone below the eye.

There are white spots on the bird's back, and white on the tip of the wing and on the tip of the tail feathers, mark them off early before you fill in the black areas.

The wings, the tail, and the top of the head are all back. The beak and the legs are orange, everything else is yellow.

Draw a branch for him to sit on, use short choppy lines to give it rough contrast. Make the background blue it will cause the yellow bird to really stand out.


I did this project in watercolor to make a greeting card below.

Goldfinch watercolor from drawing lesson.
(c) A. E. Dozat

Monday, July 9, 2012

How To Draw A Hummingbird, Lesson With Worksheet

A worksheet from the lesson on how to draw a hummingbird.
How to Draw A Humming Bird 

This is a free printable drawing worksheet, How To Draw A Humming Bird. 

Parents and teachers are welcome to use this for personal and class use.

Scroll down for the link to download the free PDF 

HOW TO PRINT
To print how to draw a hummingbird worksheet, just highlight the image below and send it to your printer or save it for later. Some printers work better if you drag the image to the desktop and print from there. Some printers work better if you first drag the image to your desktop and print from there. If you have problems,  CLICK HERE to visit the how-to-print page for some suggestions.

Printable How To Draw A Hummingbird Worksheet

I am glad to offer these how-to-draw worksheets for free; I hope you enjoy them.


Thank You!

Here is a file that may print better if you have problems with the one above. 

Some printers work better with a portable format. For a portable file, CLICK HERE.

Printable notes

INTRODUCTION
Learning to draw takes time, patience, and practice. If the hummingbird does not turn out the way you hoped, do not get discouraged because you learned some skills, and your next picture will be better. The more you draw, the better you get, so look over my worksheets and print out a few, do one or two every day for a while, and you will be surprised at how good your art will become.

OVERVIEW
Hummingbirds are beautiful, amazing, and very easy to draw. You only need to know a few basic shapes and take your time to make a beautiful picture.

BEGINNING
Start with a 2b pencil and draw lightly so you can erase later. Use a circle for the head and an oval for the body. The oval should be no more than twice the size of the circle you drew for the head. The first wing, the one away from you on the other side, is just a triangle; don't make it too big, no more the size of the oval. The tail is a small triangle.

DETAILS
The beak is two lines, don't make it too fat at first; do it skinny, and you can fatten it up later if it needs.

The rear wing is a line like a fancy number "7" with a foot on the bottom; it should look like an incomplete triangle. Draw eight wing feathers on each wing, starting at the top and working your way down. Try to draw the feathers in one beautiful stroke going out, then down and back.

Erase any extra lines.

Draw a curved line for the eyebrow and then draw the eye underneath it like a half-circle with the top of the eye covered just a little by the eyebrow. Draw the shiny spot in the eye before you color it in, so it doesn't get colored out.

The feet are tucked in, and you only see three toes, use short straight lines to draw them.

Some hummingbirds have brilliant colors. Most are green with white bellies and chins and black wings. Some have red throats or blue.

An example from the lesson on how to draw a humming bird.
How to draw a hummingbird example.

I hope you draw a masterpiece!
(c) Adron D. 7/9/12