Showing posts with label buildings. Show all posts

Friday, February 5, 2021

Free How to Draw the Watermill by the Pond Worksheet and Art Lesson

This is a free how-to-draw worksheet and art lesson for drawing a picture of a watermill.


WATERMILLS

Watermills are a nostalgic thing of a past time. The river moves the wheel and causes the mill to turn inside the building. You do not see them very often except where they have been preserved as a historical site. Often the buildings are old and wooden and maybe a little rundown, so if your drawing has problems with straight lines or getting the perspective correct it is ok because it is telling the story of an old watermill.

SCROLL DOWN TO ACCESS THE FREE PDF.

PRINTING
The image file below is a JPEG and should print on most devices without problems. If you run into trouble making it print see the HOW TO PRINT tab for some suggestions. I have put a link below to a file that is upgraded to PDF which should work if you have problems.

THIS WORKSHEET

This worksheet took about a week to create I started with inspiration from a calendar and sketched it a few times adding elements and taking elements out of the picture. It takes several drafts of a picture to get the ideas and composition right, so do not get discouraged if your picture does not turn out perfect on the first try, just tell yourself it is a rough draft that you can use for reference when you do the next and final drawing.  

PRINT THE WORKSHEET

If you have trouble making the worksheet below print or are printing on A-4 sized paper then CLICK HERE to visit my how-to-print page for some suggestions. 

Free How to Draw the Watermill by the Pond Worksheet and Art Lesson

You are welcome to print as many of my worksheets as you like. Use the Paypal button to make your donation. 


Thank you!

Below is a link that has been upgraded to PDF format that may work better on some devices.
CLICK HERE for the file in PDF.

PROJECT NOTES.


Start by drawing lightly so you can erase later. 

Normally, when you begin be sure to NOT put the point of interest in the exact center because that is boring. 
However, this is not a normal landscape but like a portrait of the watermill so it is excusable to center the structure. 

The horizon where the sky meets the treetops. it is high up in the picture. Just draw it like a wavey line at first, you will come back to it later. 

Use basic shapes to outline the watermill. If you have problems drawing the wheel use the lid from a jar and trace around it. (it is not cheating it is using a tool).

Use more basic shapes to add details like windows. 

Outline rows of trees in the background. Give them some interest and random shapes so they do not look like rows of broccoli.

Outline the shrubbery around the pond They are half circles one behind the other. Outline the fence in the foreground. It is basically a bunch of long rectangles but make them crooked so it looks old. Our fence is not solid but has an opening so the viewer won't feel there is something keeping them out of the picture.

What makes this an interesting picture is all the different textures. As you are adding the details keep focusing on the textures. 

The roof has rows of shingles. Draw some light guidelines across so they stay even. Draw the singles at the same angle as the angle of the roof. Do not draw every single one, Make them random and interesting. 

The sides of the buildings have wood planks but the planks on the one building are verticle and on the other horizontal. Draw guidelines first and then go back and give them a rough look. There is a stone foundation that has a texture of lots of short lines at right angles.
 
Add the texture of the leaves. The shrubs in the foreground have larger leaves shown as dashes or fat squiggles, in the middle ground as thinner dashes, and in the distance as dots.  The leaves around the fence are shaped like the letter "V."  Some leaves point one way and some another.

Take your time as you give the leafy textures and the wood a rough look. 

The far trees are lighter use smaller textures and lighter touches. The trees close by are darker so use a darker texture and a heavier touch. 

Use only a few wavey lines for the water. Don't overdo the water so it stays shiny.
Add shadows, but do not overdo it. Keep the shadows all on one side since the sun is on the other. 

Happy sketching!
(c) Adron 2/5/21

Join my Patreon community to support my art; you will get stuff, too. 

Become a Patron!

Sunday, January 10, 2021

Free How to Draw a Picture of a Lighthouse in The Bay Worksheet

Free to print how to draw a lighthouse on the bay worksheet. 


In this lesson, we have a lighthouse on an island in the bay. Lighthouses are very popular subjects and fill us with a lot of romantic feelings for the lone sentimental guardian watching over the lives of the seafarers as they approach the dangerous rocky coast. 

SCROLL DOWN TO ACCESS THE FREE PDF.

If you have problems making the image below print then see the how-to print tab for some suggestions or try the updated link below


Free how to draw the lighthouse on the bay lesson and worksheet.


Thank You!

Below is a file that has been updated to print better, it is a PDF.

CLICK HERE for a file in PDF format.

PRINTABLE NOTES


Start by drawing lightly so you can erase with more ease later. 

Your first line should be the horizon. It will determine the viewer's relation to the features of the picture. Do not put the horizon in the middle of the page, it will divide the picture in half and that is boring.  Place the horizon about 1/3 of the way up from the bottom. Use a ruler or other straight edge to keep it straight and level. 

Use basic shapes to develop the house. The near corner is slightly higher than the far edges. 
Most lighthouses are cylinder-shaped, but this one is square so use a line to show the corner. It is slightly wider at the base. 

There is more than one technique to work out the design for the rocks of the pier that the house is built on. For this picture use the SCRIBBLE TECHNIQUE but don't over-do it. Lightly scribble randomly to get the basic texture and shape of the rocks. You will come back to them and give them more work later. Use the SCRIBBLE TECHNIQUE to design the land across the bay. 

Once you have laid out the design of the house the way you like it erase any extra lines and go over the lines that you want to keep. 

Go over the random scribbles of the rocks and decide on what you like and go over those parts you like. Erase anything that you don't like. It should look random but interesting. This is going to create a contrasting texture to other elements of the picture. 

Use basic shapes to add details like windows and doors. 

Use shading carefully at first. Make sure the roof is darker than the shadows of the sides but not black. 
The shading on the rocks should be darker than the shading on the house. 

The bay has peaceful waters so use long lines going back and forth horizontally to show the gentle rolling waves. The lines are thicker and darker in the foreground and thinner, shorter and lighter in the distance. There should be darker waters at the edge of the rocks.

Make the land across the bay as a silhouette but not too dark.


The sky should have clouds or the picture will look unfinished. The clouds at the horizon are the smallest. The clouds in the middle of the sky are medium-sized and the clouds at the top are the biggest. The different sizes of clouds will give an appearance of distance. 
Four clouds you can use the scribble technique and LIGHTLY draw some random circles of different sizes that overlap one another. Go over the parts you like and erase the rest. 

Sign and date your art about an inch from the bottom so there is room for a frame.

I hope you draw a beautiful picture!

(c) Adron 1/10/21


DONATE

Monday, November 16, 2020

Free How To Draw a Picture of a Sidewalk Cafe Worksheet

This is a free how-to-draw worksheet. 

Below is a how-to-draw a picture of a sidewalk cafe worksheet and art lesson.  This can be used in class or homeschool or for your own enjoyment.  It is an easy project and is almost all a matter of shapes.

SCROLL DOWN TO ACCESS THE FREE PDF.
THANK YOU FOR YOUR DONATION!
 
Wanted to create this worksheet for some time because I always liked the romance of the sidewalk cafe. It makes you think of lazy afternoons with a friend as you enjoying a favorite pastry.  It is a picture that anyone can appreciate.  It is easy to draw and a rewarding project when it is done. 

YOU CAN HELP

My worksheets are free and you may download and print as many as you need for your class club or personal enjoyment. May I ask that if you are able that you consider making a small contribution to support my work?  Please click HERE TO DONATE and enter an amount that shows your level of appreciation. Your donation will enable me to create more worksheets like this one for you. Thank you. 

If you have problems making it print on your device click on the HOW TO PRINT tab where I have put some tips that have helped in the past. 

Free How To Draw A Picture of a Sidewalk Cafe Worksheet

I create these how-to worksheets because I believe that when you have been blessed you should seek to be a blessing to others. These worksheets take hours or even days to create and I hope they are a blessing to you. 


Thank You!

Here is a link to a PDF file that may print better on some devices. 

CLICK HERE for the PDF.

PRINTABLE PROJECT NOTES


Draw lightly at first so you can erase later.  

This project uses a lot of basic shapes like rectangles squares triangles circles and more.  The tricky part is having everything line up. Use guidelines to keep things level and even. 
Do not be afraid to use a ruler to make your lines straight. 

In my design, there are three windows at the top with a rectangle flower box, there is a rectangle sign, a square store window, a rectangle door with a half-circle window, a triangle umbrella, an oval table cylinder flower pots. The chairs are a combination of thin rectangles. 

To make the letters even on the sign, divide the sign into halves and then quarters then draw the letters in the four spaces. Write each letter then go around it to give it volume. Shade the areas around the letters.

Start the lamp with a guideline down the center then use basic shapes. Use curved lines to show roundness. 

Begin the chairs with a line on the ground for how far down the legs go for the legs nearest the viewer, and use a guideline a little higher for how far down the legs go on the legs farther away. Draw the chairs like simple line shapes and then go around the shapes to give each one fullness. For interest have one behind the other. Use a rectangle for the back of the chair.

Use double lines around the doors and windows. 
Use scribbly choppy lines for the flowers. 
Focus on texture. 
Use short lines in random rows for bricks. 
Use long lines above for the siding of the areas around the windows. 
Use dots for the street. 
Horizontal lines for the door. 
Use shading to give depth and roundness. Don't make the windows solid black, leave some shiny areas. 
Sign and date your picture about 1 inch from the bottom so there is room for a frame.


I hope you draw a masterpiece!

© A. E. Dozat 11/16/2020

I do not charge you to print my worksheets, I only ask that if you are able that you consider making a small contribution to support my art. Please click HERE and enter an amount that shows your level of appreciation. Thank you. 

Sunday, June 2, 2019

How to Draw a Landscape with a Covered Bridge Worksheet and Lesson

Free how to draw a landscape with a covered bridge lesson and worksheet for the young artist.

SCROLL DOWN TO ACCESS THE FREE PDF.
THANK YOU FOR YOUR DONATION!

This is a free printable worksheet and drawing lesson that will help the beginner artist.  It is a little difficult but will help the beginner try a few things.

PRINT THE WORKSHEET

If you have trouble making the worksheet below print or are printing on A-4 sized paper, then CLICK HERE to visit my how-to-print page for some suggestions. 

How to draw a landscape with a Covered Bridge Worksheet and Lesson.

I create these how-to-draw worksheets because I believe in giving back and that when you have been blessed, you should seek to be a blessing to others. These worksheets take hours or even days to create, and I hope they are a blessing to you. 

Thank you!


CLICK HERE for a file in PDF format

YOU MAY PRINT THE ART PROJECT NOTES BELOW.


BEGINNING
First, determine the horizon. In this case, it is the hills in the background. The horizon should be high on the picture but leave room for the clouds.
Draw lightly at first so you can erase later.
Use simple lines to sketch a few hills, the far river banks, and the curved road. Keep in mind you are creating a background, middle ground, and foreground.
Use basic shapes to design the covered bridge. Use a rectangle for the side, and front a triangle for the front top a parallelogram for the roof. You are only doing the design at this point. You will do the details later. It is ok to use a ruler or straight edge to draw the bridge; all good craftsmen know when to use tools. The straight lines of the bridge will give an interesting contrast to the picture
Do not put the covered bridge in the center. That is boring; put it between the center and the edge of the picture that makes it interesting.

DEVELOPING
The clouds are the big summer ones that go up high from the horizon. Start by lightly drawing the fluffy humps of the cloud, then draw the bottoms going across. Draw one cloud behind the other, it will make them huge.

Add detail to the bridge by drawing the post that holds up the roof use three verticle lines. Next, draw lines from the top of one to the bottom of the next. Draw around the lines to make them thicker like huge beams. Draw one verticle line and two slanted lines for what is showing through the entrance of the bridge.

Use a lot of long lines back and forth for the water.
Very gently add shadow to the clouds.

This next part takes a lot of time to do well, so do not rush it. Add texture to the trees and bushes by drawing lots of tiny rounded "M" and "N" shapes. Add texture to the bridge by drawing lines for the wood. Use dashes across and more at an angle for the shingles for the roof.
Add rocks to the water and the road.
Give the river bank texture by drawing choppy lines down at an angle.
Use shadow inside the bridge and under it.

Use erasers to clean up your picture.
I hope this is a fun challenge for you and that it turns out well. Would you be willing to support this blog with a little donation through the Paypal button?  Thanks!

(c) Adron 6/2/19


Thank You!

Wednesday, August 29, 2018

How to Draw a Rural Water Tower Worksheet and Printable Art Lesson

This is a free how-to-draw worksheet of a rural water tower.

Here is a printable and drawing lesson that will challenge the young artist a little and build up confidence a lot.  It is not a very difficult project and is ideal for young artist or for extra drawing practice.

You do not have to make a donation to download my coloring pages. But if you want to the donate button is below the picture.

👇👇👇 SCROLL DOWN TO ACCESS THE FREE PDF.


    How to draw a rural water tower printable worksheet. 


    Even though it takes hours, I create these How to Draw Worksheets because I believe that when we have been blessed, it is so that we can become a blessing to others. I hope you enjoy these projects and they help you.
    Thank You!
    Below is a file in PDF that you may download and print.
    CLICK HERE for a file in PDF format.

    If you have trouble making the file to print then CLICK HERE to visit my how-to-print page where I have put some helpful tips. 

    PRINTABLE ART LESSON  NOTES.


    BEGINNINGS
    Start by drawing lightly so you can erase later.
    Draw a line straight across the bottom for where the ground, this helps keep the legs right. The tank can be a rectangle or square. Just lightly sketch the basic shape in to get started. Use a guideline down the middle to keep thing even, draw it lightly so you can erase later. Use some lines from the tank to the ground to keep things straight, draw them lightly so you can erase later. Use some lines to make the mountains in the background, draw them lightly you will want to come back to the background later.

    DEVELOPING THE FORM
    The barrel of the tank is a cylinder viewed from below. Using the cross lines of the square draw a curved line across the top. If the curved line is slight the tower looks lower to the ground if the curved line is very deep it looks like you are nearer to it.
    The top curve has the same degree as the bottom curve line. You will have two up curves and one down curve for the far bottom or back edge.
    The legs of the tower are slightly outward tilted for support and have cross supports just draw lines to get the arrangements right. Put one line off-center for interest and to give room for the center pipe.

    Draw two lines for the ladder, remember they have a slight bend where the tank ends and the outward bending legs begin. Mark off where the cross steps will be so you can keep them even. Use parallel lines to give the ladder substance.

    The top of the tank has a roof, draw it like a triangle.

    Go around the lines of the legs and the cross supports with additional lines to give them thickness. Then erase the original lines. Draw a third line to keep the planks and beams from looking two-dimensional.

    Use marks to plan where the planks are spaced on the round sides of the tank. The planks are wider in the center and closer together as they near the edges, this is perspective. Draw the planks as lines going from the top to the bottom.

    Add a figure like a cow or horse or farm worker to give the viewer a sense of size.

    The background will give the picture a sense of place. Draw bushes trees hills and mountains. Add grasses and rocks in the foreground. Add a shadow under the tank.

    I hope you draw a masterpiece
    © Adron 8/29/18


     Thank you!

Sunday, February 4, 2018

How To Draw A Village on a Distant Hill Printable Worksheet

How To Draw A Village on a Distant Hill.

This is a free printable worksheet and drawing lesson. The young artist or beginner will find it gives some challenge to their landscapes. 

I first drew this village as a part of a comic book I am helping to write and illustrate. I thought it would make an interesting drawing project for a young artist. It is a simple project and ideal for young artists or for extra drawing practice.

SCROLL DOWN TO ACCESS THE FREE PDF.
THANK YOU FOR YOUR DONATION!

If you have problems printing see the "HOW TO PRINT" tab above or try one of the updated links below that should print better.

YOU CAN HELP

I do not charge for you to print my worksheets, so print as many as you like. I only ask that if you are able that you make a small contribution so that I can keep on creating these for you. Click HERE to make a donation. Thank you very much for your support. 

How to draw a village worksheet by MrAdron.

These how-to-draw worksheets take a long time for me to create. I am glad to do it for you because art has been a blessing to me and I hope it will be a blessing to you.


Thank You!

You might also like the How To Draw A Bell Tower worksheet. CLICK HERE.

CLICK HERE for a file in PDF format. 

YOU MAY PRINT THE PROJECT NOTES BELOW.

BEGINNING
Use a few lines to draw a very simple landscape. Here we are drawing meadows and a hill for the village. The hills in the distance are closer together and the hills in the foreground are farther apart.
Be sure to have one big hill for the village.
Make the road that leads to the village with a few zigzags or curves- a straight road is boring.

Old villages had a stone wall around them like a fort for protection. Use a few lines to draw the village wall like a rectangle coming up from the lower hills. Add towers to the village walls.

HOUSES
Some houses are outside the wall but be careful to make sure they are smaller than the wall and be sure to leave the wall showing above those houses.

Use straight lines to make squares and rectangles and parallelograms to create houses. Draw the houses from the corner and not the full side view it is more interesting.

The houses closest to you are the lowest ones. Start with the lowest houses first like an uneven row. Then draw the next row above so they are behind the second row. The higher up the hill the less of the side of the houses you see and more of the roofs are visible. Keep adding more rows until you cover the hill. Have some houses facing one way and some facing another.

Develop the landscape with trees and bushes on the ridges of the hills. Use bushes or stone walls or fences beside the road that leads to the village. The bushes in the foreground will be darker and with more detail. The bushes in the distance will be lighter and drawn simply.

Add towers to the village walls.

When you think you have put in all the houses you can then look at it again and see if you can put in some more. This is hard work and takes patience but it will look good if you do.

Use dots and dashes to make rows for the crops in the fields. Make the rows go in different directions from one field to the next.

(c) Adron D. 2/4/18


Thank You!

Saturday, August 6, 2016

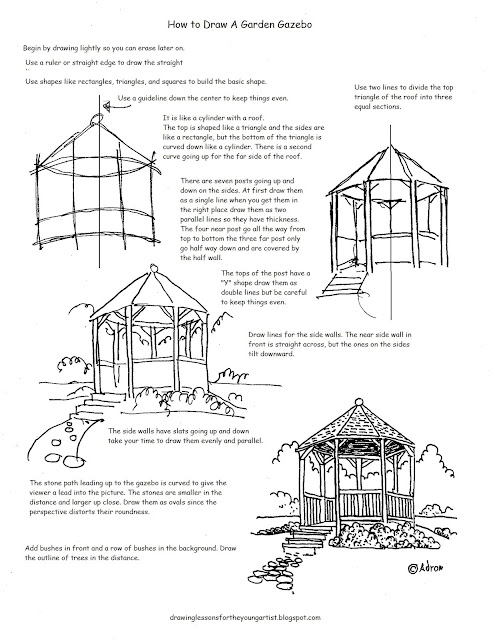
How to Draw a Garden Gazebo Worksheet and Drawing Lesson

This is a free How To Draw A Garden Gazebo is a how-to-draw worksheet.

You can make a nice picture of a gazebo by itself, or it can be used to add focus and interest to a landscape. It may look simple at first, but you must give attention to symmetry. This is a good practice project for a young artist.\

SCROLL DOWN TO ACCESS THE FREE PDF.
THANK YOU FOR YOUR DONATION!

If you have problems printing,  "CLICK HERE" to visit the how-to-print page or try the updated link below that should print better.

If you would like to see how this looked like a finished watercolor painting, CLICK HERE.


How to draw a gazebo in a garden worksheet

Sometimes it takes me hours but I create these how to draw worksheets but I do it so that I can give back because I believe that when you have been given a gift it is so you can be a gift to others, and I hope these worksheets are a means of blessing to you.


Thank You!

The link below has been modified to print better.

CLICK HERE for a file in PDF format.

PRINTABLE NOTES


Begin by drawing lightly so you can erase it later on. 

Use a ruler or straight edge to draw the straight lines.

Use shapes like rectangles, triangles, and squares to build the basic shape. 

Use a guideline down the center to keep things even.

It is like a cylinder with a roof.
The top is shaped like a triangle, but the bottom of the triangle is curved down like a cylinder. There is a second curve going up for the far side of the roof. The sides are straight.

There are seven posts going up and down on the sides. At first, draw them as a single line; when you get them in the right place, draw over them as two parallel lines, so they have thickness. The four near posts go all the way from top to bottom. The three far posts only go halfway down and are covered by the half wall.

Use two lines to divide the top triangle of the roof into three equal sections.

Draw lines for the side walls. The near side wall in front is straight across, but the ones on the sides tilt downward.

The tops of the post have a "Y" shape. Draw them as double lines but be careful to keep things even.

The side walls have slats going up and down. ake your time to draw them evenly and parallel.

The stone path leading up to the gazebo is curved to give the viewer a lead into the picture. The stones are smaller in the distance and larger up close. Draw them as ovals since the perspective distorts their roundness.

Add bushes in front and a row of bushes in the background. Draw the outline of trees in the distance.

Use dark areas to give interest.  Put shadows inside and on one side.

I hope you draw a masterpiece!

(c) Adron 8/6/16

Friday, May 13, 2016

Free Printable How To Draw Worksheet, Draw A Bell Tower

This is a free how-to-draw-the-old-world bell tower lesson and worksheet.

Here is a printable how-to-draw lesson for a  tower.  This worksheet is helpful to give you some pointers and helps for drawing a tower in a courtyard or village scene. It can be nice as an illustrated line drawing or a colorful project.

SCROLL DOWN TO ACCESS THE FREE PDF.👇👇👇

I designed this as a take-home handout for my art students.


PRINT THE WORKSHEET

If you have trouble making the worksheet below print or are printing on A-4-sized paper then CLICK HERE to visit my how-to-print page for some suggestions. 

YOU CAN HELP

I do not charge for you to print my worksheets, so print as many as you like. I only ask that if you can, you make a small contribution so that I can keep creating these for you. Please click HERE and enter an amount that shows your level of appreciation. Your donation will enable me to create more for you. Thank you very much for your support. 

How to Draw A Belltower Worksheet by MrAdron.


Thank you!

If the file above does not work for you, go straight to the PDF.

CLICK HERE for a file in PDF format.


PRINTABLE LESSON NOTES


Begin by drawing lightly so you can erase later on. 

Use a ruler or straight edge to draw the straight lines.

Use shapes like rectangles, triangles, and squares to build the basic shape. 

Use a guideline down the center to keep things even.

The view is at a slight angle so the front and a short "foreshortened" side are both showing.  

Add arched doors and windows.

Add buildings on the side.

Use a guideline for the ground.

Use a grid for the stones. Star with horizontal lines evenly across the front and sides of the building. Then divide the lines with vertical lines. Draw a line around the arches for the supporting stones and divide the double line into sections to look like arch stones. 

Draw the interior of the tower seen through the arches. The tower is open on the other side so you can see through it and light shines in. Draw bushes and background through the windows.

Add texture by adding jagged mountains in the background and scribbly bushes or trees in the foreground.

© Adron D. 5/13/16 

Saturday, April 23, 2016

Printable How To Draw The Castle Ruins Worksheet

This is a free printable how-to-draw worksheet for how to draw an ancient castle in ruins.


It is ideal if you are trying to come up with a scene for an adventure picture or illustrating a scene from a fantasy.

SCROLL DOWN TO ACCESS THE FREE PDF.👇👇👇
THANK YOU FOR YOUR DONATION

I researched images of ruined castles to get inspiration and found the Irish castles were what I had in mind.

If you have trouble making the image below to print then CLICK HERE  to see my how-to-print page for some suggestions on printing. There are updated links below that may print better.


How To Draw Castle Ruins Worksheet

My how-to-draw worksheets are free for you to print. Please consider making a donation of support. Use the Paypal button. 


The image above is a JPEG is like a photo. scan but PDF is digital and may work better.

👉👉👉 CLICK HERE for a file in PDF format.

PRINTABLE NOTES.


BEGINNINGS
Start by drawing lightly so you can erase it later.
Unless you are copying a picture, you need to come up with some ideas to make the drawing interesting and unique.  I like to use the freeform technique to get ideas. Scribble and draw shapes randomly on a practice sheet of paper. I even turn it right side or upside down to make sure it is random. This should only take a minute or two.

Next look at the mess you made and pick out shapes and lines that might make an interesting picture. Go over those lines with a darker pencil. This should give you some ideas. Sometimes you have to do this two or three times before you get enough ideas. You may need to go to a new piece of paper and use the ideas to make the actual drawing.

The neat thing is that you do not need to worry about drawing a straight line since it is old and crumbly the crooked line could be an old tower just about to fall.

Draw a line straight across the bottom for where it is on the ground, remember things nearer are lower on the ground and the things behind are a little higher.

ADD DESIGN FEATURES.
Use arches for windows and doors.  Have the windows show what is on the other side like part of a far wall. Have the doors show part of a wall inside. Put some things behind other things.

TEXTURE
Use short wiggly lines for the stones that make up the wall. There will be more of them and darker ones in the walls closest to you and fewer lighter lines for the walls behind.
Use small "V" shapes for ivy plants creeping up the wall

Use shading technique to make things stand out. Use light and dark contrast to help things stand apart.

FINISHING TOUCHES.
Put bushes and dead trees around the scene.
Draw a background with some low hills or forest.

I hope you create a masterpiece
(c) Adron D. 4/23/16

Thursday, April 14, 2016

How to Draw A Japanese Pagoda Temple Worksheet and Drawing lesson

This is a printable how-to-draw worksheet and lesson for how to draw a pagoda temple.


👇👇👇 SCROLL BELOW THE IMAGE TO ACCESS THE FREE PDF 

Here is a lesson that will be helpful for anyone in drawing an iconic scene and challenge them to push beyond their comfort level. The pagoda is one of the hardest worksheets I have done. The artist should obtain additional resources such as photographs or online images to inspire and help develop the composition.

PRINT THE WORKSHEET

If you have trouble making the worksheet below print or are printing on A-4-sized paper,  CLICK HERE to visit my how-to-print page for suggestions. 


How to draw a Japanese Pagoda Temple Worksheet

Sometimes I spend hours creating these how-to-draw worksheets, but I do it to give back because I believe that when you have been given a gift, it is so you can be a gift to others, and I hope these worksheets are a means of blessing to you. You are welcome to print as many of my worksheets as you like. 

Use the Paypal button to make your donation. 


Thank you!

👉👉👉 CLICK HERE for a file in PDF format.

PRINTABLE NOTES.

Start with a guideline down the center to help keep things even.

Use another guideline for the outside edges of the roofs. There will be four or five of them. Each roof is a different size, the bigger ones are below, and the smaller ones are above.

The higher roofs are seen from underneath so their undersides show more than, the lower roofs that are seen more on the edge, and less of the underside shows. This means the angle is different higher up and it is more diamond-shaped, while the lower roofs are more triangle-shaped.
Between the roofs are sidewalls, they are shaped like rectangles.

After you have a basic design, then give the roof beautiful curves. The top sweeps out and up. Under the roofs are supporting structures that make it look line a slight triangle upside down.

There are rounded shingles on the roof that are in rows.

Draw parallel lines horizontally for the railings around the sides.
Draw decorations on the top tower and the sides.

Shade one side more than the other and put shading underneath the roofs.

Add a background of trees by scribbling a few irregularly shaped lines for the tops of trees. Add a mountain with some light jagged lines. Put a garden in the foreground with a lot of small scribbled shapes and a few large rocks. Add a fence and a path leading up to the pagoda.'

(c) Adron D. 4/14/16

Friday, January 22, 2016

Printable How To Draw A Mission Bell Drawing Worksheet

How to draw a mission bell lesson and worksheet.


This printable drawing lesson and the worksheet below will help the young artist draw a classic feature found in many scenes. Parents and teachers will be able to use this in class and at home. It can be an extra activity or something that can be sent home for extra practice.

TO PRINT THE PICTURE BELOW

If you have problems printing, CLICK HERE to visit my how to print page for some suggestions. 
You can try one of the updated links below.


How to draw a mission bell updated worksheet.

It takes me a long time to create these worksheets for you, but I am glad to do it. 


Here is a link that may print better.

CLICK HERE for a universal portable file. (PDF)

PROJECT NOTES.

BEGINNING
Start by drawing a large circle for the top of the bell and an oval horizontally underneath. Add a few lines to connect the two to make the basic shape of the bell. Don't forget the clapper- the circle inside the oval.
Draw a larger circle for the arch of the bell wall and crossbar for the bell to hang from; a few short choppy lines will give the bar a rough wood look, don't forget the shadow underneath. 

After getting the bell and arch established, take a moment and look things over to make sure it is even and square.

DEVELOPING FORM
Make the stone wall by first drawing very lightly some horizontal lines to serve as a "grid" for the stones to be drawn in. Make sure the light reference lines are straight. Draw each stone slowly and carefully. Leave spaces between the stones; this will look like the mortar holding them together.

DETAILS Make a shadow under the bottom of each stone; this will make them look three-dimensional.
Shadow in the areas that need it, such as the inside of the bell, and use a gradual deepening shadow to make the bell look round.

If you are working with color, I suggest the stone can be some pale red and orange.  Make the sky beyond the bell a pale blue and the bell itself green.  Erase any leftover marks.

(c) Adron D. 1/22/16

Sometimes it takes me hours, but I create these how to draw worksheets, but I do it so that I can give back because I believe that when you have been given a gift, it is so you can be a gift to others, and I hope these worksheets are a means of blessing to you.

Tuesday, January 27, 2015

How To Draw An Arched Door, A Free Printable Worksheet

How to draw an arched door drawing lesson and printable worksheet.

The drawing worksheet below will help the young artist gain confidence in drawing. This one can look very nice in color.

This arch door might be found in an old castle or an old house in Europe.

There are many different ways to approach a project like this. I offer this worksheet as one method to draw an arched door. I have kept it simple on purpose for the young artist but it could be a beginning point for someone with more advanced skills.

PRINT THE WORKSHEET


If you have trouble making the image below to print then CLICK HERE to visit my how-to-print page for some suggestions.


How To Draw An Arched Door. Free Worksheet.

Sometimes it takes me hours but I create these how to draw worksheets but I do it so that I can give back because I believe that when you have been given a gift it is so you can be a gift to others, and I hope these worksheets are a means of blessing to you. You are welcome to print as many as you like.


Thank you!

CLICK HERE for a file in photo format that may print better.

PRINTABLE LESSON NOTES


BEGINNING
Start simple. If you have some round object trace around it to draw the top of the arch of the door. Use straight lines to draw the rectangle of the door sides and the bottom.

DEVELOPING FORM
Draw a second line around what has been drawn so far so it is an outline, but give it room to draw the bricks of the wall in. Divide this space with lines to mark off where the bricks will be. Outline the areas so they look like bricks with mortar between. them.

Draw a line down the middle to make the two doors.

Draw a line across the top for the top of the door.

Use guidelines to create rows for the bricks in the wall then divide the lines for the bricks. Outline the bricks and erase the guidelines.

Use texture to give the door a weathered wood grain look.

Use guidelines to place the hinges on each side so they are parallel with the hinge on the other side.

These hinges are wrought iron so draw them black and give them curves.

Use guidelines to make the flagstones even and outline the flagstones on the floor.

(c) Adron D. 1/27/15

Tuesday, October 29, 2013

How To Draw A Castle Gate Worksheet

How to draw a castle gate drawing lesson and printable worksheet.

How to draw the castle gate project is helpful for the young artist to add perspective and realism to their fantasy or historical drawings and will give confidence in their artwork.

The worksheet and the project notes below may be printed by highlighting then saving it to your device and printing. Parents, teachers, and home schools may print this for personal or classroom use.

A WORD ABOUT PRINTING THE FILE BELOW

To print the free worksheet below just highlight it and send it to your printer or save it to your device to print later. If you have problems printing,  CLICK HERE to visit the how to print page for some suggestions or try the updated link below.


How To Draw A Castle Gate Worksheet.

Sometimes it takes me hours but I create these how-to-draw worksheets but I do it so that I can give back because I believe that when you have been given a gift it is so you can be a gift to others, and I hope these worksheets are a means of blessing to you. You are welcome to print as many as you like.


Thank you!

CLICK HERE for a PDF file format.

LESSON  NOTES

The castle gate is a collection of geometric forms arranged on the drawing and then detailed to create the desired scene.

BEGINNING
Use basic shapes of cylinders, rectangles and half circles to organize the basic outline. The towers on each side of the gate are forward a little so the bottom will be lower in the scene than the walls. The bottom of the tower curves downward and the top curves upward.

Use guidelines to keep things even, draw the guideline for the top and bottom of the wall all the way across, even across the towers, so both sides of the wall are even, you can erase the lines later. Use three guidelines for the tops of the towers and the wall so you can draw the shapes that are at the top of the wall.

The gate entrance is an arch draw it like a half-circle over a square.

FILL IT IN
Once you have the basic design worked out then add the details. The top of the towers and walls have rectangles, draw them lightly using the guidelines and when they are even, then go over them to make it look good. The top has a series of supporting round arch shapes, draw them under the rectangles and add a little decoration like a square or circle at the bottom of each.

The towers have some windows they are rectangular and narrow. The windows have large stone tops and bottoms, draw narrow rectangles for these.

The towers have a guard's door in the bottom. It is a rectangle inside an archway, this door gives a reference so you get a sense of size.

The gate opening shows the thick wide walls on both sides. The bottom of these walls tilt up to the vanishing point, they are in shadow. There may be a door inside one side for the guard. Add shadow on the ground. Draw something inside the castle-like buildings.

STONES
The ground has a stone road. Use a grid that is wider at the bottom and narrower at the gate to give the perspective. Then draw over the grid some stones but not all the stones in the road.

The walls are stones. Use a grid to keep things even and then draw some of the stones.

The towers are round the stones wrap around so use curving guidelines to draw them.

Put something inside the castle that you can see through the gate.

(c) Adron D. 10/29/13

Tuesday, October 1, 2013

How to Draw A Castle Tower. Worksheet

How to draw a castle tower drawing lesson and printable worksheet.

You do not need to make a donation to download my How-to-Draw Worksheets. However, if you'd like to, the donate button is located below the picture. Thank you for your gifts, prayers, memberships, and donations. I would not be able to create these without your support. 

This free printable worksheet is ideal for drawing a background to a scene, adding to a larger piece, or as a stand-alone subject. Parents, teachers, and homeschool families can use this in class or as a do-at-home project.


How To Draw A Castle Tower Worksheet 


Sometimes, it takes me hours to create these how-to-draw worksheets, but I do it so that I can give back. I believe that when you have been given a gift, it is so you can be a gift to others, and I hope these worksheets are a means of blessing to you. You are welcome to print as many as you like. Thank you!

CLICK HERE for a PDF format file.

 If you have problems printing, CLICK HERE to visit the how to print page for suggestions or try one of the links below to update files for this image.

YOU MAY PRINT THE PROJECT NOTES BELOW.


The tower is a cylinder made out of stones.

START
Start with a basic cylinder shape, this is a rectangle standing up, but not flat on the top since perspective makes the top looked like a slight curve.

Near the top, the walls bend outward in a flair shape. At the top are cutaways in the walls, draw them like rectangles. The top has arches under the edge. The top of the cutaways slope outward, (so rain will drain down and out.)

Decide where you are going to put any windows and lightly draw them in.

FILLER DETAILS
The stones are wider at the bottom since many castles used stronger types of stone for the base and lighter smaller stones higher up. Draw guidelines across the tower making sure they arch slightly.  Divide the lines into stones by drawing vertical lines between them. Do not make a checker pattern but draw the lines so they skip a row. None of the lines need to be even. The vertical lines are spaced wider apart at the middle and closer together toward the edges so the tower looks round.

EXTRAS
The roof would be made out of wood to give the guards shade. It is a cone, draw it as a triangle with a curved bottom. The curve matches the curve of the tower top. The roof is held up by wooden beams, use straight lines to draw them.

At the top of the tower is the smaller "signal" tower, it is behind the roof. It may have two or three signal flags on it. Draw it with less detail since it is far away.

Add shadow to make the roundness look more believable.

The tower can be by itself, on a rock, connected to a castle wall, or connected to a bridge.

(c) Mr. Adron D. 10/1/13

Sunday, August 25, 2013

How to Draw The Ancient Roman Pillars Worksheet

How to draw the ancient Roman pillars drawing lesson and worksheet.


👇👇👇 SCROLL DOWN TO ACCESS THE FREE PDF. ðŸ‘‡ðŸ‘‡ðŸ‘‡

This worksheet will give the young artist confidence in drawing a classic scene that can be adapted to many themes. The nice thing is that since we are drawing ruins, things do not need to be perfect- in fact, if they are a little off, it is better.


How to Draw Ancient Roman Pillars Worksheet.

You do not need to make a donation to download the worksheet. But if you would like to, you may use the donate button below. 

If your printer is better with PDF, then CLICK HERE to go to a PDF file.

If you have problems printing, CLICK HERE to see the how-to print page above for some suggestions. Below are a couple of links to this image in different formats, in case your printer has trouble with the original.

You can print the project notes below.


DRAWING TIP: If you have lined paper or a grid paper, put it underneath to see it through the paper; that way, you can line things up straight.

BACKGROUND
Part of the scene is the Mediterranean landscape, so lightly draw a hilly horizon and some hills with a village or a farm. Keep it light and faint, so it looks far away.

PILLARS
The pillars are thin rectangles of different heights. Arrange them, so they are interesting. The eye-level is middle, so the top of the pillar curves downward, and the bottoms curve upward.  The short pillar is seen from slightly above, so the top looks like an oval. They stand on blocks that look like rectangles. About eight lines go up and down the pillars; the lines get closer together toward both outside edges. There are divisions across the pillars at even spaces; keep them the same on all the pillars. The bottom has a ring that uses curved lines to draw it. The top is shaped with curved lines like six or eight-letter "u" in a row. Make some of the lines inside the pillars to be broken or scruffy, so they look ancient.

THE BASE
The pillars are on a sill of sorts, so draw a large rectangle on the bottom and divide it into squares.

THE TILE FLOOR
The floor tiles do not look square; the lines go closer together as they go back. Weeds are growing up between them, and some are cracked.

SHADOWS
The light is coming from one side, so the shadows are all on the other side. The shadows get darker as they go around the pillars.

FUN DETAILS
Make some cracks and some chips on the pillars and things. Throw in some weeds and bushes, even an old tree.

(c) A. E. Dozat. 8/25/13

Monday, March 18, 2013

How To Draw A Windmill Worksheet

How to draw a windmill, drawing lesson and printable worksheet.

This free how to draw a windmill worksheet may be downloaded to your device and printed easily.

How to draw a windmill is a fun project that can add interest to any scene or stand by itself.


How to Draw a Windmill Worksheet

You are welcome to print as many of my worksheets as you like. To donate, use the Paypal button. 


Thank you!


PRINT THE WORKSHEET
If you have trouble printing the worksheet below, CLICK HERE to visit my how-to-print page for some suggestions. 

LESSON NOTES

The basic shape is a cone with sloping sides. It has a rounded dome top and a rectangle base. Use a guideline down the center to keep the slope even on both sides.

Draw a circle in the center of the dome top for the hub of the vanes. From the hub, circle draw a large "X" for the vanes. The vanes are thin rectangles made up of smaller evenly spaced rectangles. Place 15 or 20 evenly spaced marks on each vane to help keep the ribs even. Once all are marked then carefully draw the ribs across the vanes. You have options since some windmills have pieces going back and forth for support some have a cloth covering the vanes.

There is a support structure at the back going across the back and down. It is drawn as simple lines.

Add a window or two. The windows have little roofs over them and little shelves below.

Add a walk-around deck with a railing before you do the wood siding or the stone base. The railing is a line going across with shorter lines going down.

The base is stone. Draw the stones randomly without trying to draw every single stone but give an impression. There is a door in the base; it is a double rectangle frame with two rectangles inside.

The wood siding is drawn as a texture, use short horizontal lines, keep them random so it will not be boring or predictable.

Add trees in the background and clouds in the sky.

I hope you draw a wonderful picture!

(c) Mr. Adron 3/18/13

Sunday, March 3, 2013

How To Draw a Balcony Worksheet

How to draw a balcony drawing lesson and printable worksheet.

This printable how to draw worksheet for a Juliet balcony is a rewarding project for the young artist. One can add a few elements to give the picture a special interest such as a person in the balcony or below it.

YOU CAN HELP

I do not charge for you to print my worksheets, so print as many as you like. I only ask that if you are able that you make a small contribution so that I can keep on creating these for you. Please click HERE TO DONATE and enter an amount that shows your level of appreciation. Your gift, no matter how small, will enable me to create more.
Thank you very much for your support. 

How to Draw a Juliet Balcony Worksheet by MrAdron.


If you have problems printing this see the how to print tab above for some suggestions.

The project is simple. It begins by drawing a block. Use a ruler if you like. Keep all the lines parallel. It is drawn at an angle and seen from below, so you draw the bottom but not the top. Below the block add triangles for the braces, use a double line to make it look wide. Use guidelines to keep things even on both braces.

Add decorations: use arches and circles. Add an edge by drawing double lines on the top and bottom.

The door is an arch, this is really rare since most are square doors, but we like the shape- it gives contrast from all the straight lines. You can trace around a jar lid for the arch.  Draw an extra line around the arch for the door frame.

Put one door closed and one open, the door is straight lines diving the arch in half and a second pair of lines dividing it down the middle. The windows are divided into small frames with cross pieces use two lines for the cross pieces so they have thickness.

The wall is huge stone blocks. Trace over some lined paper to keep them straight and even on both sides of the door. The vertical lines are staggered. Add texture to the stones with spots or rubbing.

These old houses have ivy growing on them so draw little leaves shaped like wedges and hearts up one side.

(c) Mr. Adron 3/3/13

My coloring pages are free and you may print as many as you like. I only ask that if you are able that you consider making a small contribution to support my art. Please click HERE TO DONATE and enter an amount that shows your level of appreciation. Your gift, no matter how small, will enable me to create more. 
Thank you. 

Become a Patron!

Saturday, December 29, 2012

How To Draw A Totem Pole Worksheet

How to draw a totem pole drawing lesson and printable worksheet.

This free printable drawing worksheet will give the young artist confidence in drawing. Parents and teachers are welcome to print for their personal and class use. it can be part of a lesson or a stand-alone art project.

If you have problems printing CLICK HERE to visit my how-to-print page for some suggestions.


How to draw a Totem Pole Worksheet.

Sometimes it takes me hours but I create these how to draw worksheets but I do it so that I can give back because I believe that when you have been given a gift it is so you can be a gift to others, and I hope these worksheets are a means of blessing to you. You are welcome to print as many as you like.


Thank you!

CLICK HERE for a link to a file (JPEG) that may print better on some printers.

INTRODUCTION
Learning to draw takes practice; basically, if you sketch something every day you will get better as an artist. If the totem pole does not turn out the way you like do not give up, it may be that you will be more successful with a landscape or a still life. I have lots of worksheets to choose from find a few that offer variety and try them. Come back every day for a few weeks and print off a few and you will be surprised at how good an artist you have become.

OVERVIEW
How to draw a totem pole worksheet is easy to use and breaks down some of the problems young artist have with a project that has multiple themes.  The Totem pole I offer is inspired by tradition but simplified for the young artist.

The hand-carved totem pole is not a perfect representation of the people and creatures shown but are icons so the young artist does not need to worry about being perfect because it is more realistic if it is not perfect.

BEGINNING
Start with the basic shape and draw this lightly since it may need to be erased later on. The basic shape is a tall rectangle. If one wants an eagle at the top draw large wing shapes on both sides a little lower than the top.

Divide the rectangle into three or four units of squares and rectangles. Remember variety is interest so have two rectangles or two squares.

The totem pole tells a story or describes a family, so think of the story or family you want to illustrate.

DESIGN DETAILS
You might want to use scratch paper to work out the designs. Draw the designs to fit inside the squares and the rectangles of the totem pole. Your designs can be an owl, bear, beaver, dog, person, walrus or anything you want it to be.

The style of art used in totem poles is a style that fills in blank spaces with lines and shapes, so if you have a space that is empty put something in it. The easiest way is to outline things with another line.

FINISHING TOUCHES
When you have worked out the design go over it in a fine-tipped marker or colored pencils. The colors used in totem poles were made from natural sources so they were limited to white, black, red, brown, a very little bit of blue.

You can make a totem pole that tells the story of your family or of a person in your family.

I hope you draw a masterpiece!
(c) Mr. Adron D. 12/29/12