Saturday, August 31, 2013

How to Draw An Octopus

How to draw an octopus, a drawing lesson, and a printable worksheet.

This is a fun lesson that a lot of kids enjoy. 

This how-to-draw worksheet below may be printed for personal use. It will give the young artist confidence in drawing.

How to Draw an Octopus Worksheet.


Sometimes it takes me hours, but I create these how-to-draw worksheets I do it so that I can give back because I believe that when you have been given a gift, it is so you can be a gift to others, and I hope these worksheets are a means of blessing to you. Thank You!


To print the page above, highlight it and send it to your printer or save it to your device to print later. On some printers, it works better if you copy and paste the image into a Word Document and then print the Word Document as normal. If you have problems, click HERE to visit the how-to-print page for helpful tips.

You may want to print the project notes below.


The body of the octopus looks like a big toe or a blubbery bag: draw it as an oblong circle and a bump at the top for the eye. Behind the bump, add another for the eye on the other side. There is a ridge between the eyes, but it is not on all octopuses so don't go nuts trying to get it right.

The tentacles can go any way you want; they can be as long as you want or short since there are different types of octopuses. Draw the ones in front, closest to you, first. Start with an outline lightly at first.  For interest, have one go up so the body is behind it. After you have the first two just right draw the others behind.

The suction cups are on the bottom side in rows that get smaller as they go toward the tip.  Have them wrap around a bit for interest and to show the detail. Draw them as ovals since you see most of them on the side view if you draw a view of the bottom of a tentacle the suction cups will be a circle.

After the front tentacles take shape then draw the ones behind them. Do them one at a time so each one is behind the others.

You can color the octopus almost any way you want: some are very colorful with spots and splashes.

(c) A.E.Dozat 8/31/13

Thursday, August 29, 2013

How to Draw The Pirate Queen Worksheet

How to draw the pirate queen. a drawing lesson and printable worksheet.

How to Draw the Pirate Queen Worksheet is a fun project for any artist.  parents and teachers will find many ways to use this project to encourage young artists.

To print this worksheet just highlight it and send it to our printer or save it to your device to print later. If you have problems printing see the how to print tab for suggestions.

How to Draw the Pirate Queen Worksheet by MrAdron.

Even though it takes hours, I create these How to Draw Worksheets because I believe that when we have been blessed it is so that we can become a blessing to others. I hope you enjoy these projects and they help you.

To see more projects like this search the labels in the sidebar.

You may want to print the project notes below, too.

BEGINNINGS:
The face is basic. Start with an egg shape for the head, and use some reference guidelines to keep the features in place. One guideline up and down a little to the right since we are looking at a slight turn of the head. Halfway down draw across a guideline for the eyes and halfway again to the chin draw a line for the nose and halfway to the chin from there draw another for the mouth.

DETAILS:
The neck connects where the ears are attached, so it is wide.

The eyes are almond-shaped. The eyebrows are dark and thick but taper to an elegant point.

The mouth is full so the upper lip is all shadow. it looks like the letter "M" but very spread out. The lower lip is only shown by the shadow underneath.

The nose is only shown by the shadow on the right side and a little mark for the nostril keep it simple. The line of the nose continues up to the eyebrow ridge.

Draw one shoulder higher and the other shoulder low for interest.

HAT:
The hat starts as a large letter "M" spread way over both sides of the head. The bottom is low over the brow. In the middle of the "M" shape draw a hump.  If the hat is too hard then draw a bandanna instead. They wore all kinds of hats, not just the ones you see in the movies.

Draw the hair as an outline around the head first and then fill in the details. Draw it like shapes not as lines.

CLOTHING:
The clothing is three parts. The undershirt which is closest to the neck, the blouse which has a long folded down collar, and puffy sleeves. The last is a bodice it is a dark vest that is laced up the front.

Give her pearls gold chains and gold earrings.

 Click this link to see how to draw a pirate ship.

(c) Mr. Adron 8/29/13

Wednesday, August 28, 2013

How To Draw The Garden Urn With Flower Worksheet

How to draw a garden urn, a drawing lesson, and a printable worksheet.

This free-to-print worksheet will give the young artist confidence and pride in the project. It can be used as a point of interest in a drawing or as the focus of a piece of art.

How To Draw a Garden Urn Worksheet. by MrAdron.


Even though it takes hours, I create these How to Draw Worksheets because I believe that when we have been blessed, it is so that we can become a blessing to others. I hope you enjoy these projects and they help you.

To print the worksheet just highlight it and send it to your printer or save to your device to print later. if you have problems printing, CLICK HERE to visit the how-to-print page for some suggestions

YOU MAY PRINT THESE LESSON NOTES


The urn looks like a goblet or cup on a stand, as seen from slightly above.

BEGINNINGS:
Start by lightly drawing the urn (but save the flowers for last). The main part of the urn is like a giant letter "U" with an oval across the top. Most of the oval will be lost later on but is drawn for reference.  Draw a line going up and down the center for reference to keep things straight. The stem part underneath is curved inward, use the guideline to keep it even.

DETAILS:
There are decorations around the edges. The decorations look like leaves or scallops or you can add your own design. Start drawing the decorations from the middle, go back and forth on each side and go outward to the edges.

The base is a small square but the back is narrower than the front.

The rings on the side are up to you, you can put something else on the side or leave it off.

FLOWERS:
The flowers and plants fill the top and spill over.
There are some grass blades that go up and out.
There are some small leaves that look like upside-down teardrops.
There are some medium and large leaves that look like hearts.
There are some flowers that are shaped like popcorn.
There are some little flowers that look like tiny softballs
There are some plants that have leaves hanging off of a stem.

Fill the areas between the leaves with lines, shadow, and texture that will make it look really full of plants.

Add shadow to the picture to give the urn roundness.

(c) Mr. Adron 8/28/13

Join my Patreon community, and you will not only support my art, but you will also get stuff. 

Become a Patron!

Sunday, August 25, 2013

How to Draw The Ancient Roman Pillars Worksheet

How to draw the ancient Roman pillars drawing lesson and worksheet.

This printable on how to draw the ancient ruins are free to print. A worksheet will give the young artist confidence in drawing a classic scene that can be adapted to many themes. The nice thing is that since we are drawing ruins, things do not need to be perfect- in fact, if they are a little off, it is better.

If you have problems printing, CLICK HERE to see the how-to print page above for some suggestions. Below are a couple of links to this image in different formats if your printer has problems with this one.


How to Draw Ancient Roman Pillars Worksheet.


If your printer is better with PDF, then CLICK HERE to go to a PDF file.

You may want to print the project notes below.


DRAWING TIP: If you have lined paper or a grid paper, put it underneath to see it through the paper; that way, you can line things up straight.

BACKGROUND
Part of the scene is the Mediterranean landscape, so lightly draw a hilly horizon and some hills with a village or a farm. Keep it light and faint, so it looks far away.

PILLARS
The pillars are thin rectangles of different heights. Arrange them, so they are interesting. The eye-level is middle, so the top of the pillar curves downward, and the bottoms curve upward.  The short pillar is seen from slightly above, so the top looks like an oval. They stand on blocks that look like rectangles. About eight lines go up and down the pillars; the lines get closer together toward both outside edges. There are divisions across the pillars at even spaces; keep them the same on all the pillars. The bottom has a ring that uses curved lines to draw it. The top is shaped with curved lines like six or eight-letter "u" in a row. Make some of the lines inside the pillars to be broken or scruffy, so they look ancient.

THE BASE
The pillars are on a sill of sorts, so draw a large rectangle on the bottom and divide it into squares.

THE TILE FLOOR
The floor tiles do not look square; the lines go closer together as they go back. Weeds are growing up between them, and some are cracked.

SHADOWS
The light is coming from one side, so the shadows are all on the other side. The shadows get darker as they go around the pillars.

FUN DETAILS
Make some cracks and some chips on the pillars and things. Throw in some weeds and bushes, even an old tree.

(c) Mr. Adron D. 8/25/13

Thursday, August 22, 2013

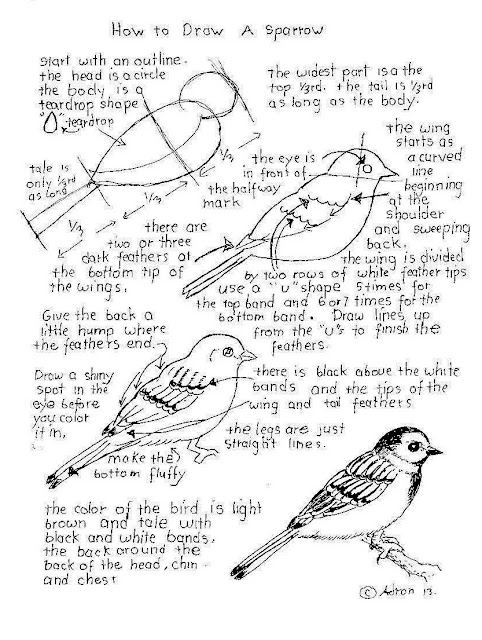
How To Draw a Sparrow, Worksheet and lesson.

How to draw a sparrow drawing lesson and printable worksheet.

This free how to draw a sparrow worksheet will help give the young artist confidence in drawing and help them create something they can be proud of. Parents, teachers, and homeschool communities may print the worksheet at the bottom, and the project notes below for class use and personal fun.


If you like this, you might also like how to draw a robin.

PRINT THE WORKSHEET

If you have trouble making the worksheet below print or are printing on A-4 sized paper, then CLICK HERE to visit my how-to-print page for some suggestions. 
How To Draw a Sparrow Worksheet.
Sometimes I spend hours creating these how-to-draw worksheets, but I do it to give back because I believe that when you have been given a gift, it is so you can be a gift to others, and I hope these worksheets are a means of blessing to you. You are welcome to print as many of my worksheets as you like. Use the Paypal button to make your donation. 


Thank you!

To see more projects like this, search the labels in the sidebar.

You may want to print the project notes below.

BEGINNING
The sparrow is a small bird. The body is shaped like a teardrop. Start by drawing an outline of the bird as a circle for the head and a teardrop shape for the body. The tail is 1/3rd as long as the body, begin it as a couple of straight lines.

WING
The wing starts as a curved line beginning at the shoulder and sweeping across the center of the bird lengthwise and coming to a point above the base of the tail. The wing is divided by two bands of white feather tips. Use a "U" shape five times for the upper band and again seven times for the lower band. Draw lines up for the feathers. The white has a black top edge.

HEAD
The head is simple; the beak is a short triangle, and the eye is a little forward of center. The eye is black, but leave a little shiny spot in it by outlining the shiny spot before you black in the eye.

BODY
The body has fluffy feathers so draw the tummy soft and with short lines.

The tail is 1/3rd as long as the body it is three or four lines that are dark and have black tips.

The legs and feet are just straight lines. The leg bends backward.

COLOR
The color of the bird is light brown on the wings and tail with black and white sports. There is black around the back of the head and on the chin down to the chest.

(c) Mr. Adron 8/22/13

Wednesday, August 14, 2013

How To Draw A Pirate Flag Worksheet

How to draw a pirate flag drawing lesson and printable worksheet.

The free printable worksheet below is a popular image that is fun to use and draw.  Parents, teachers, and homeschoolers are welcome to use this for personal and class use.


How To Draw A Pirate Flag Worksheet


Sometimes it takes me hours, but I create these how-to-draw worksheets I do it so that I can give back because I believe that when you have been given a gift, it is so you can be a gift to others, and I hope these worksheets are a means of blessing to you. You are welcome to print as many as you like. Thank you!

Some printers are better with a PDF image format. For PDF, CLICK HERE.

To print the free worksheet, highlight it and send it to your printer or save it to your device to print later. Some printers work better if you first drag it off to the desktop and print from there. If you have problems printing, CLICK HERE to visit the how-to-print page for suggestions.

You may print the project notes below.

OVERVIEW
Learning to draw takes practice, so if you draw every day, you will get better. If your first sketch doesn't come out the way you expected, do not give up, you are learning, and your next picture will be better. I have a lot of how-to-draw worksheets, so come back every day for a while and do a few. You will be surprised at how good an artist you will be.

DRAWING TIP
Draw the skull and crossbones first, then draw the flag around them.

SKULL
The skull starts as a circle, and a large letter "U" for the jaw below. Use a guideline up and down the center to keep things straight.

The eyes are two circles at the center of the head. The nose is a triangle going between the eyes and down to the upper jaw, and then it finishes as an upside-down heart. Use the big circle to start the cheeks. The cheeks wrap around the bottom half of the eyes. The teeth are half way between the nose and the bottom of the jaw, use a guideline across to keep them even but they don't really need to be even. Draw the four in the front on the top and bottom carefully. but the ones on the sides are around the side, and you don't see them. They are just a little line going up and down.

BONES
The crossed bones are two parallel straight lines with circles on the ends. These leg bones have a large circle on the side of the top for the hip joint.

DRESS IT UP
Dress up the skull with a hat or bandanna. Give him an eye patch (If you have trouble drawing the eye, sometimes an eye patch covers up a mistake. Draw a dagger in his mouth.

Some flags had crossed swords instead of bones.

FLAG
After you draw the skull and crossbones, draw the black flag around them. Make the edge tattered and torn. Put a few cannon holes in it.

Take your time, and it will spread fear wherever you hang it.

Click this link to see how to draw a pirate ship.

(c) Mr Adron D. 8/14/13

Thursday, August 8, 2013

How To Draw An Angelfish Worksheet

How to draw an angelfish drawing lesson and printable worksheet.

How to draw an Angelfish worksheet. This free-to-print worksheet is easy to follow and gives the young artist satisfaction in doing a beautiful picture. Parents and teachers will be able to use it in class and at home. It can be used as an art lesson by itself or as an extra activity, or as a handout to do on one's own time.


How to Draw an Angelfish Worksheet 

To print the free how-to print worksheet above, just highlight it and send it to your printer or save it to your device to print later. If you have problems, see the how-to print tab above.


Thank You!

You may want to print the project notes below.


OUTLINE
Start by lightly drawing the outline, use basic shapes to get the design right. The body is shaped like a sideways teardrop. The tail starts as a triangle, the top and bottom fin start out as a triangle.

ADDING FORM
The lines of the fins and tail taper and flow to the back with a curve. The tail curves gently and has long spikes on the top and bottom. The head is like a rounded bump at the front of the fish. The eye is a circle at the head. The mouth is open with a longer upper lip and a shorter lower lip.  The fin on the side is an irregular rectangle; two long feather-like fins under the front flow backward.

DETAILS
There is a half-circle for the gill but flat at the top. The upper jaw has a ridge; draw it as a slight line over the mouth. There are lots of bones in the fins; take your time and draw them carefully and slowly. The eye is a black dot inside a round circle.

STRIPES
The first black stripe goes right across the eye and down to the bottom. The second stripe is a third of the way back; it is narrow. The third stripe is widest, and ii is at the back third; it continues up into the top and down into the bottom fin. There are faint stripes on the tail and on the fins.

CAREFUL
If you add scales, take your time, draw careful rows of straight lines, and then turn them into scales.

(c) Mr. Adron 8/8/13

Wednesday, August 7, 2013

How To Draw A Birdbath Worksheet

How to draw a birdbath drawing lesson and printable worksheet.

How to draw a birdbath is an easy project for the young artist and will give much satisfaction.

Parents, home school families, and teachers may print a copy for personal and classroom use; just highlight the worksheet and the project notes and send to your computer or save them to your device.

To print the worksheet below, just highlight it and send it to your printer or save it to your device to print later. If you have problems,  CLICK HERE to visit the how to print page for some suggestions or try the updated link below.

How To Draw A Birdbath Worksheet 

My how-to-draw worksheets are free, so print as many as you need.  I only ask that you consider making a small contribution to support my art if you can. Your gift will let me know you appreciate these, and I will be able to create more.


Thank you

Here are two links that may work better on some printers.

CLICK HERE for a link to a file in a portable format (PDF).

You may want to print the project notes below, too. Start by drawing a guideline down the center to give balance and to help keep things even. Then using basic shapes of circles and ovals, draw the top and base of the birdbath. All the top and bottom curves should match, so don't draw a curved bowl and straight lines elsewhere. The body of the pedestal is shaped like a teardrop.  It helps to draw from the top down a little on each side as you measure against the guideline.

Add decorations, like leaves or shapes. Use a guideline to keep the decorations following the same curves as the top bowl.

Using shading will give the effect of the birdbath being round and three-dimensional.

Put the birdbath in a scene like a garden by adding flowers around the bottom. Put a wall or fence behind it. Add bushes behind the wall and trees behind the fence. Bushes and leaves can give a contrasting effect against the smooth stone of the birdbath.

I hope you create a masterpiece.

(c) Mr. Adron D. 8/7/13