Showing posts with label sea. Show all posts

Sunday, January 10, 2021

Free How to Draw a Picture of a Lighthouse in The Bay Worksheet

Free to print how to draw a lighthouse on the bay worksheet. 


In this lesson, we have a lighthouse on an island in the bay. Lighthouses are very popular subjects and fill us with a lot of romantic feelings for the lone sentimental guardian watching over the lives of the seafarers as they approach the dangerous rocky coast. 

SCROLL DOWN TO ACCESS THE FREE PDF.

If you have problems making the image below print then see the how-to print tab for some suggestions or try the updated link below


Free how to draw the lighthouse on the bay lesson and worksheet.


Thank You!

Below is a file that has been updated to print better, it is a PDF.

CLICK HERE for a file in PDF format.

PRINTABLE NOTES


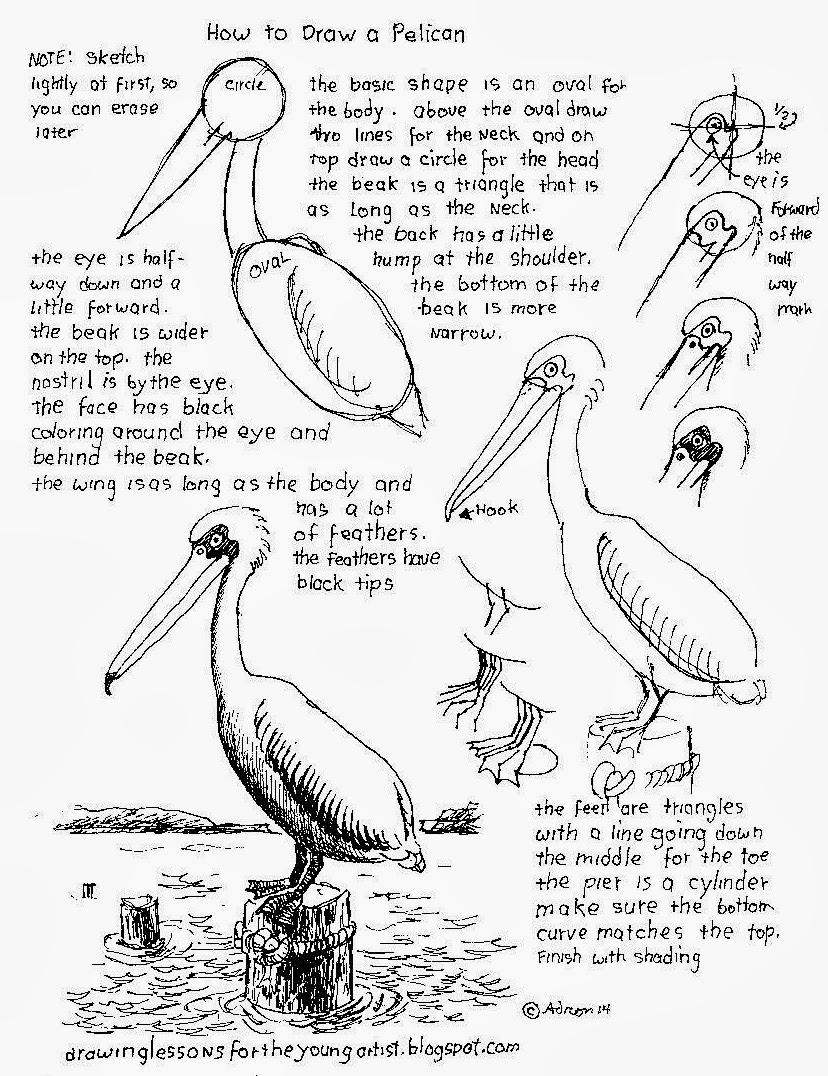
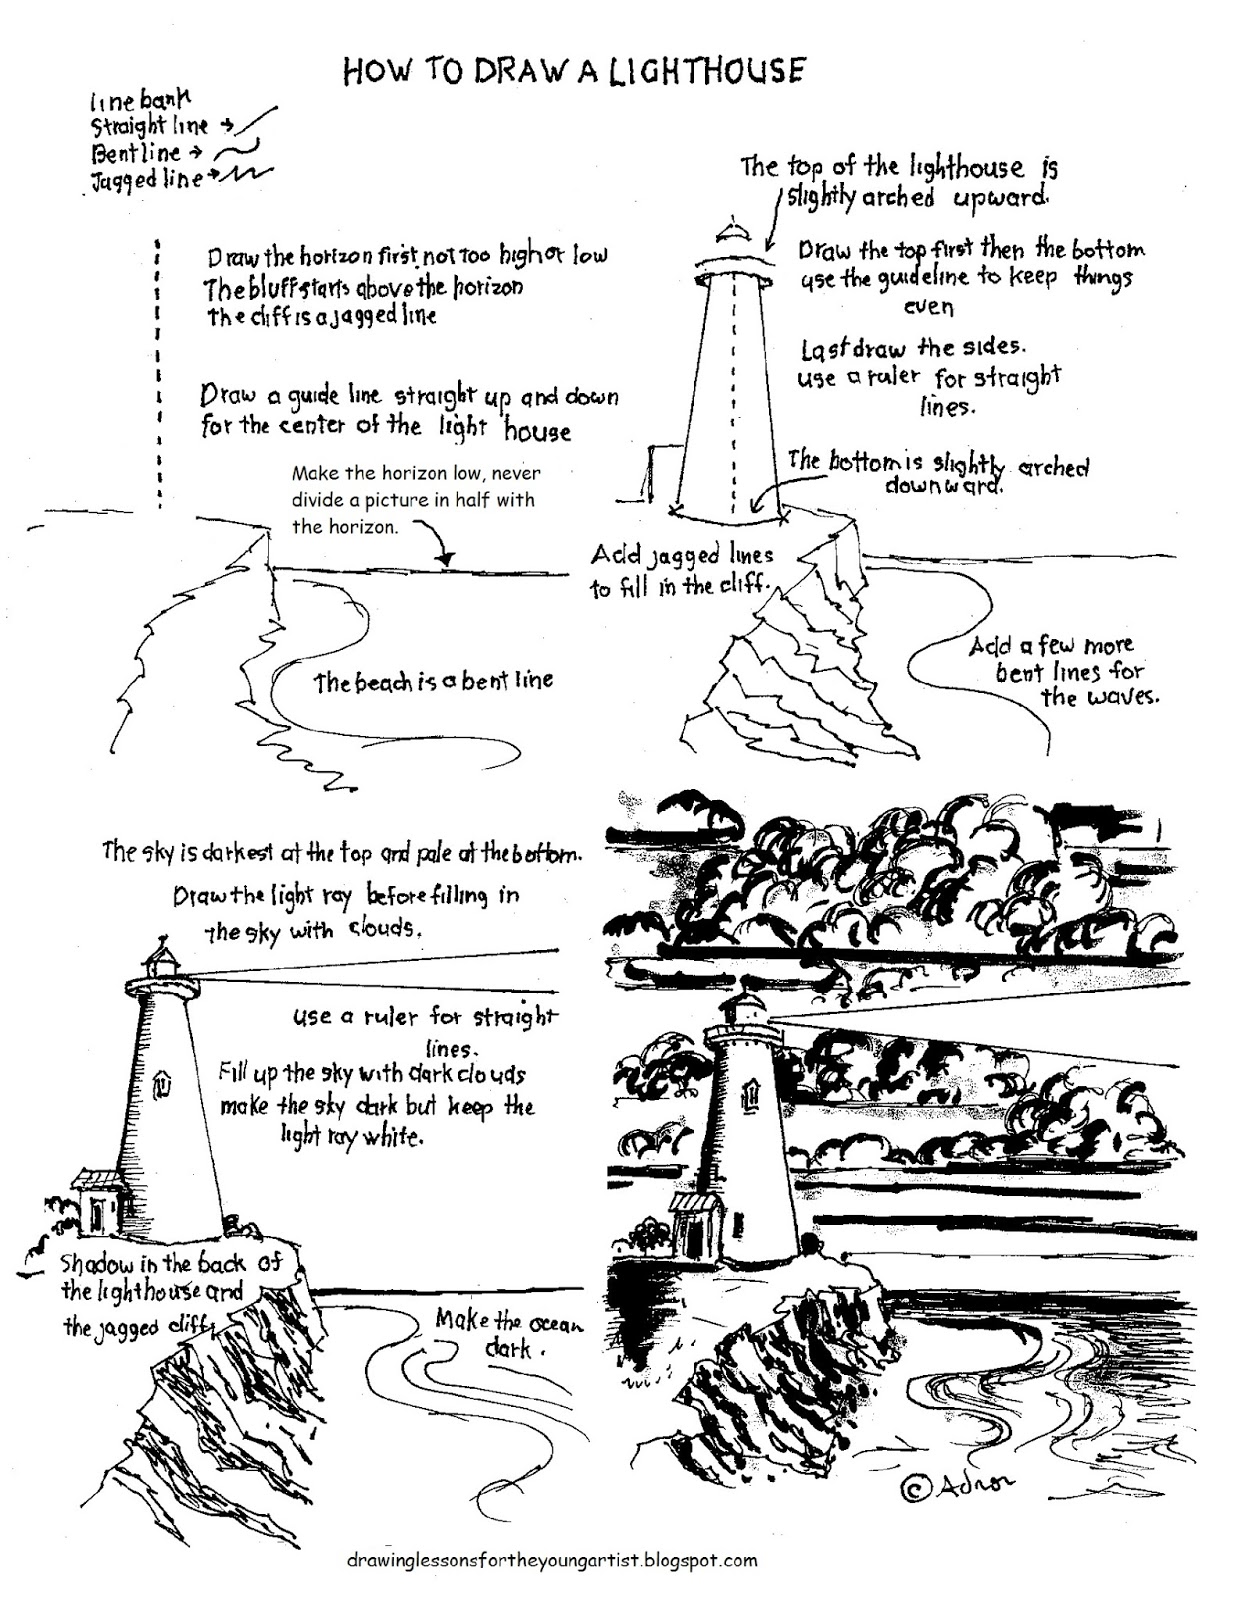
Start by drawing lightly so you can erase with more ease later. 

Your first line should be the horizon. It will determine the viewer's relation to the features of the picture. Do not put the horizon in the middle of the page, it will divide the picture in half and that is boring.  Place the horizon about 1/3 of the way up from the bottom. Use a ruler or other straight edge to keep it straight and level. 

Use basic shapes to develop the house. The near corner is slightly higher than the far edges. 
Most lighthouses are cylinder-shaped, but this one is square so use a line to show the corner. It is slightly wider at the base. 

There is more than one technique to work out the design for the rocks of the pier that the house is built on. For this picture use the SCRIBBLE TECHNIQUE but don't over-do it. Lightly scribble randomly to get the basic texture and shape of the rocks. You will come back to them and give them more work later. Use the SCRIBBLE TECHNIQUE to design the land across the bay. 

Once you have laid out the design of the house the way you like it erase any extra lines and go over the lines that you want to keep. 

Go over the random scribbles of the rocks and decide on what you like and go over those parts you like. Erase anything that you don't like. It should look random but interesting. This is going to create a contrasting texture to other elements of the picture. 

Use basic shapes to add details like windows and doors. 

Use shading carefully at first. Make sure the roof is darker than the shadows of the sides but not black. 
The shading on the rocks should be darker than the shading on the house. 

The bay has peaceful waters so use long lines going back and forth horizontally to show the gentle rolling waves. The lines are thicker and darker in the foreground and thinner, shorter and lighter in the distance. There should be darker waters at the edge of the rocks.

Make the land across the bay as a silhouette but not too dark.


The sky should have clouds or the picture will look unfinished. The clouds at the horizon are the smallest. The clouds in the middle of the sky are medium-sized and the clouds at the top are the biggest. The different sizes of clouds will give an appearance of distance. 
Four clouds you can use the scribble technique and LIGHTLY draw some random circles of different sizes that overlap one another. Go over the parts you like and erase the rest. 

Sign and date your art about an inch from the bottom so there is room for a frame.

I hope you draw a beautiful picture!

(c) Adron 1/10/21


DONATE

Sunday, November 8, 2020

Free How to Draw a Seagull on the Beach Worksheet and Art Lesson

I am glad to share my free how-to-draw a seagull on the beach worksheet and art lesson that you can download and print out for your class or personal enjoyment.

SCROLL DOWN TO ACCESS THE FREE PDF.
THANK YOU FOR YOUR DONATION!

I have always thought the seagulls were marvelous creatures. They inhabit shores all over the world. Sometimes they are alone, and sometimes they are in a flock. There is something beautiful in how they seem to drift in the sky as they search for food. They are bold, too, and will come close enough to a person to snatch their food.  So it seemed that sooner or later, I had to create a how-to-draw worksheet for the noble seagull.  

If you have problems downloading the image below, click on the HOW TO PRINT tab, I have listed some common issues and possible solutions you can try. You can also download the PDF below if the image file is too problematic. 


Free how to draw a seagull on the beach worksheet 

I create these how-to worksheets because I believe in giving back and that when you have been blessed, you should seek to be a blessing to others. These worksheets take hours or even days to create, and I hope they are a blessing to you. 


Thank You!

Here is a file that may work better on some devices. It is a PDF.

Click HERE for a PDF file.

PRINTABLE NOTES


The setting is as important as the portrait of the seagull so start with the horizon line, just as you would with any landscape picture.  Start your drawing with a loose and free approach, almost as if you are just going to play around with some ideas. Scribble random circles where the huge clouds might be. Don't even try to put them anywhere on purpose; let the design of the clouds be like an accident. We'll come back to them later. 

The seagull is in the foreground so draw it before you do too much with the background. Start the seagull with a teardrop shape sideways, an oval for the head, a rectangle for the neck, and a thin rectangle for the beak. Dont make the legs just straight; make him doing something like walking; it gives the picture interest. 

Draw a few lines across the water for the crashing wave. When waves roll across the beach, they make foam on edge.  Draw a wavey line where you want the foam edge to be.  

Go around the lines of the shapes that you used to start the seagull and make it look more like a seagull, then erase the extra lines.

There are so many different types of seagulls that you dont need to worry about making yours perfect because somewhere there is one just like yours.

Go around the scribbled circles that started the clouds and make the best parts darker, then erase the others, make sure the sunlight is on one side and the shadow is on the other. 

Keep the sea simple. Use lines going right and left for the waves. The waves far away are small and short; the waves become larger up close where they are longer and larger. 

Use a triangle to add a sailboat; this will give a sense of distance and size. 

For the foam of the crashing wave, start with tiny circles, then go around them and erase the extra lines. There will be shadows underneath the foam and under the part where the wave curls over. 

The water of the wave will have a flow over from the top, and a flow out from the bottom uses fine lines to show this. 

Use lines back and forth to shade the dark areas of the foreground water.

The sand is darker and coarser near the bottom; it is finer and lighter near the water. Take your time and use many dots in horizontal rows to give the sand texture.   

Take your time with shading and texture; this is what will make the picture look real.

(c) A. E Dozat  11/8/20

Wednesday, August 21, 2019

Free Printable How to Draw A Sea Turtle Swimming, Lesson and Worksheet

I am glad to share my free how-to-draw a sea turtle, printable worksheet, and drawing lesson.


This free printable is a drawing lesson designed to help young artists gain confidence and direction in drawing a sea turtle picture.  It is not a very difficult project and is ideal for young artists or for extra drawing practice.

👇👇👇SCROLL DOWN TO ACCESS THE FREE PDF.


How to Draw a Swimming Sea Turtle Lesson And Worksheet by Mr. Adron


Thank You!

If the file above gives you trouble, the PDF below will work better.

👉👉👉 CLICK HERE for a file in PDF format.

ABOUT PRINTING

If you have problems printing, CLICK HERE to visit my how-to-print page.


YOU MAY PRINT THE ART PROJECT NOTES BELOW.

BEGINNING
Start out by drawing lightly at first so you can erase later.
Use basic shapes to work out the design. The largest shape will be a teardrop shape, but it is sideways. Draw long ovals for the front flipper and ovals for the head and rear feet.  It does not need to be perfect.

DEVELOPING
The front flipper has a curve like a knee going front that makes it look like a backward number "7." The flipper is not straight but has curves going back and forth on the front edge and on the back edge.

Draw the top of the shell in the shape of a long narrow oval with a point at the back.

The top shell, head, and flipper have a pattern of scales. Lightly draw a grid of lines that make box shapes on the flipper and on the shell, but don't make it perfect; let some be different sizes and irregular shapes. Draw around the inside of the shapes of the grid, so it looks like boxes inside a net. Erase the grid, leaving spaces between the boxes (remember I said to draw it lightly so you can erase). The bottom of the shell has simple lines like for the scales and is plainer than the top.
Erase all the extra lines and go over the lines you want to keep.

SHADING
Put shadows underneath the turtle. Use shading to make the far flipper look darker; use shading under the neck and chin. The top of the shell is much darker than the bottom but be careful that you do not lose the pattern.

Draw wavy lines for the water effect.

(c) Adron 8/21/19

I create these how-to-draw worksheets because I believe in giving back and that when you have been blessed, you should seek to be a blessing to others. These worksheets take hours or even days to create, and I hope they are a blessing to you.


Thank You!

Sunday, July 7, 2019

Free Printable How to Draw a Conch Shell Worksheet and Drawing Lesson

Free, How to Draw a Conch Shell, Printable Worksheet, and Drawing Lesson.


This free printable and drawing lesson will help give the young artist some confidence and direction to draw.  It is not a particularly difficult project and is ideal for young artists or those looking for extra drawing practice.

👇👇👇 SCROLL DOWN TO ACCESS THE FREE PDF.
For help with printing, see the "HOW TO PRINT" tab above or try one of the updated links below that should print better.


Free How to Draw A Conch Shell Worksheet and Art Lesson.


I create these how-to-draw worksheets because I believe in giving back and that when you have been blessed, you should seek to bless others. These worksheets take hours or even days to create, and I hope they are a blessing to you.

If the file above is not working, the one below will be better. 

👉👉👉 CLICK HERE for a file in PDF format.

YOU MAY PRINT THE ART PROJECT NOTES BELOW.

BEGINNING
Start out by drawing lightly at first so you can erase later.
Use the basic shape of a triangle to start; it does not need to be perfect. Add an arch like a rainbow over the large triangle. Make the arch lopsided so it is higher at the top of the triangle than at the bottom. Draw a small triangle centered on the back end of the large triangle.

DEVELOPING
Draw several curves going inward on the arch for the wrinkled edges. Draw three or four guidelines on the small triangle to help keep the spurs even and in line. Across the guidelines, draw bumps for the spurs of the shell. Draw the two larger spurs on the bottom like a lopsided letter "V" pointing down and back. The bottom edge curves upward a little and is wavey.

CLEAN UP THE PICTURE
Erase all the extra lines and go over the lines you want to keep.

SHADING
Put a shadow underneath the conch shell. Put shadows on the edges to give the shell roundness. Use shadow to define the wrinkles.
Use shading to show the long folds in the sides.

(c) Adron 7/7/19


Thank you.

Monday, January 14, 2019

Printable How To Draw a Picture of a Ship Coming to You Art Lesson Worksheet.

This is a free how-to-draw worksheet of a ship coming toward you.

I create these how-to-draw worksheets because I believe in giving back and that when you have been blessed, you should seek to bless others. These worksheets take hours or even days to create and I hope they are a blessing to you.

SCROLL DOWN TO ACCESS THE FREE PDF.

This worksheet and drawing lesson will help you feel confident in drawing and it usually turns out nice. 

If you have problems printing see the "HOW TO PRINT" tab above or try one of the updated links below that should print better.


Printable Art Lesson Worksheet for How To Draw a Picture of a Ship Coming to You


Thank You!

PDF

CLICK HERE for a file in PDF format.

This project was inspired by a drawing I did as one of the illustrations I drew for a book. It was one thing to draw the picture but very different to go back and describe how I drew it. I tried to provide a lot of details about how to draw this picture. I used a marker to draw it but you can use these instructions in almost any medium.

YOU MAY PRINT THE ART PROJECT NOTES BELOW.


BEGINNING
First, draw a straight line across for the horizon, DO NOT DRAW IT HALFWAY DOWN- that is just too boring.

Draw lightly at first so you can erase later.

The hull or body of the ship is like a letter "U." Draw it over the line for the horizon so the horizon line goes through it, you can erase later.

The ship is coming toward you, so you see the point of the front. Draw it like a triangle with a point going up and a little to the side.

Draw a line in a curve for the very front of the ship. It is a little to one side but curves away to the other, this line helps give a feeling of the direction the ship is going.

The cabin is like a rectangle. Draw it lightly at first so you can erase the part that is not showing. The cabin is slightly at a side so draw a line to show the corner of the front and the side.

There is a mast that goes out from the front. Draw it as a straight line but it is a line that is a part of the top edge of the side of the ship.

SAILS
The big sails are on two masts, draw them lightly at first because the sail is in front of them and you will only see the tops, but draw them so you can get everything straight erase them later. There is a cross beam across the top so it all looks like a letter "t."

Before you do the beautiful shapes of the sails, use squares to get them where you want them to be. This drawing has two square sails, one in front of the other. Use squares to work out the design. The sail in the back is lower, so the bottom and side are all that shows.
There are two triangle sails on the very front.

The pendants on top of the mast are two lines shaped like a long skinny letter "Z," that connect at a point. The two lines are connected by a backward letter "C" where they touch the top of the mast.

SPLASH AND CLOUDS
Use circles to design how you want the splash at the front to look. Just work out your ideas then later make it look like a splash with shading and bubbles.

Use circles to design how you want the clouds to look. The far clouds over the horizon are smaller than the ones up top, (overhead).

Go over all the sails with lines that curve to show that the wind is pushing them out. Erase any part of the mast that is behind and unseen.

SHADING
The sun is behind, so the front of the ship is in shadow. Shade the front of the ship and the cabin. Use shading on the bottom of the splash and keep the top clean. Use little circles for bubbles if you like.. Do not shade all the sides leave the outside edges light for contrast.

Clean up the clouds and keep them simple, just use the best lines from the circles you drew before and erase the rest.

THE SEA
The sea is darker in the foreground, use long thick lines going back and forth to give it movement and darkness. The sea is lighter far away, use short thin lines with a lot of white areas between them to give the feeling of distance.

Oops! I forgot the seagulls, but you can take care of that!

I am thankful that you are visiting my blog and trying my worksheets, and if you use the Paypal button to give a gift to keep this blog going I am thankful for that too.
A. E. Dozat 1/14/19
 

Thank You!

Wednesday, June 1, 2016

How To Draw A Submarine Worksheet and Lesson

This is a how-to-draw a submarine lesson and worksheet.

Here is a printable how-to-draw a submarine worksheet and the lesson that will help give some ideas. This submarine is a type of fantasy of what might be a research submarine for a scientist or maybe one used by special forces for covert operations

SCROLL DOWN TO ACCESS THE FREE PDF.
THANK YOU FOR YOUR DONATION!

These handouts are something I give to my students at the end of m class so they can have take-home project or two that they can try on their own.

For help with printing CLICK HERE to visit the how-to-print page or try the enhanced link below.


How To Draw A Submarine Worksheet

Sometimes it takes me hours but I create these how to draw worksheets but I do it so that I can give back because I believe that when you have been given a gift it is so you can be a gift to others, and I hope these worksheets are a means of blessing to you.


Thank you!

If the image file does not work well the PDF below will work better. 

CLICK HERE for a file in a universal portable format, PDF.

PRINTABLE NOTES

Draw lightly at first so you can erase later.
The beauty of this project is the gracefully flowing lines so take your time with the lines.

BEGINNING
Use basic common shapes to design your sub.
Use a guideline across the center to help keep things balanced and level. You can erase it later.
The bottom of the submarine goes straight across and curves sharply up at the front and gradually at the back.
The top is higher at the front and slopes gently to the back.
The tail is a half-circle it can be big or little. It is centered on the guideline.

DEVELOPING FORM
Round off the lines and make them smooth and flowing.
The rudder has a second smaller half circle inside the first one. There is a long tall rectangle at the back of it all.

Erase all the extra lines before you start the cool details like portholes and periscope.

DETAILS
Draw double circles a circle around another circle for the portholes. If you have trouble drawing a circle try tracing around something like a button or coin.
Use the shading technique to give the sub roundness.

Don't forget the fish, bubbles, sharks, and mermaids.

I hope you draw a masterpiece

(c)Adron D. 6/1/16

Monday, November 16, 2015

Printable How To Draw Ocean Waves Worksheet

This is a free printable how-to-draw ocean waves worksheet,


Here is a lesson that will help give the young artist some direction in drawing a simple ocean wave crashing on the beach. It is one of the projects I often use when creating illustrations for a book or something else.

SCROLL DOWN TO ACCESS THE FREE PDF.

A WORD ABOUT PRINTING

If you have problems getting it to print,  CLICK HERE to visit the how to print page for suggestions or try one of the links below.

YOU CAN HELP

I do not charge you to print my how-to-draw worksheets, so you may print as many as you need. If you are able, won’t you please consider making a small contribution to support my art? Please click HERE and enter an amount that best shows how much you appreciate having these available. Your gift will enable me to create more. 

Thank you.  


How To Draw An Ocean Wave Worksheet.

Sometimes it takes me hours, but I create these how-to-draw worksheets, but I do it so that I can give back because I believe that when you have been given a gift, it is so you can be a gift to others, and I hope these worksheets are a means of blessing to you.


Thank you!

To print in a universal portable format- PDF, CLICK HERE.

PRINTABLE NOTES

BEGINNINGS
Start with the horizon (the line where the sky meets the earth), or in our case, the distant sea. The horizon should never be in the middle of the picture; it should be above the halfway point. This is the only straight line you have to worry about.

Draw a line for the top of the wave going across the picture.  The top of the wave should curve up and down at least once.

Draw the line for the rollover part of the wave; it will start at the top and curve down in a slight half circle.  The line will continue across the picture and meet the other side of the rollover, where it will go up.

Draw a line where the beach and the ocean meet. It should not be straight but curve up and down slightly.

DEVELOPMENT
The crashing wave has foam and splash at the bottom; draw a scribble pattern for the foam. The foam is three-dimensional with a front edge, a middle ground, and a background; design these by scribbling a second and third row of scribbles.

The ocean is darker than the wave, so dark lines go back and forth behind the wave.

Add clouds in the sky beyond the horizon. Shade in the sky for contrast.

DETAILS
The bottom edge of the foam is in shadow and darker. The bottom inside the wave is darker than the top of the inside of the wave.

Use a lot of circular lines to make the foam look foamy.

There are lines at the bottom in front of the wave where the water is going back from the beach to the wave, These lines criss-cross. They are darker on the bottom and lighter on the top.

SHADING
Shade everything except the splash and foam. The water is dark just above the wave and gets lighter as it goes back to the horizon.

I hope you create a masterpiece!

(c) Adron D. 11/16/15

Thursday, August 13, 2015

How to Draw A Sailboat Printable Worksheet

I am glad to share with you my free how-to-draw-a-sailboat worksheet and lesson.


Scroll down to access the revised PDF with a clearer font.👇👇👇 

If you have trouble making it print, then CLICK HERE  to visit my how-to-print page for some helpful suggestions.


How To Draw A Sailboat Printable Worksheet.


Sometimes, it takes me hours to create these how-to-draw worksheets, but I do it so that I can give back. I believe that when you have been given a gift, it is so you can be a gift to others, and I hope these worksheets are a blessing to you. Thank you!

👉👉👉Here is a link to a revised file in PDF with the text in a readable font. CLICK HERE ðŸ‘ˆðŸ‘ˆðŸ‘ˆ

This printable worksheet for how to draw a sailboat is simple and great for when your student says they do not know what to draw.  It uses a few shapes and lines to form the sailboat, and then the bottom example has a scene that includes the texture of the water and distant land to interest the project and introduce a little challenge to the young artist. Sailboats come in all shapes, so if yours doesn't look right, do not get upset because there is one like it somewhere.

Printable Project Notes.

BEGINNINGS
Draw the line where the water touches the bottom of the boat first, make it horizontal and straight across, and don't look like the boat is going uphill. The second line should be the mast. It will be a little ahead of the 1/2 way point. Use simple shapes to form a basic outline of the boat. The sails are like triangles. The boat is like a rectangle with a triangle at the front.

DEVELOPING FORM
The mast is two lines. There is a cabin, it is another rectangle, on top of the first. There are windows on the side of the cabin. The front sail curves, so go over the lines to give it a curve. The front of the boat has a curve. The water at the front of the boat has a splash.

FINISHING TOUCHES
Draw a little man sitting in the back but keep him simple.
Draw islands in the distance.
Add waves to the water. The waves are thicker and darker in the lower foreground and less thinner and lighter in the distance. Add an island or two and the setting sun.

I hope you create a masterpiece!

(c) Adron 8/13/15

Friday, February 20, 2015

How To Draw A Leaping Orca Killer Whale, Free Printable Worksheet.

How to draw an orca whale leaping drawing lesson and printable worksheet.

The free worksheet below is a fun and easy way to draw a popular picture.  I drew this as a handout in a class I was teaching to some young artists and they loved it. It breaks down the image into simple steps.


How to Draw An Orca Whale Leaping, Free Printable Worksheet

Sometimes it takes me hours but I create these how to draw worksheets but I do it so that I can give back because I believe that when you have been given a gift it is so you can be a gift to others, and I hope these worksheets are a means of blessing to you. You are welcome to print as many as you like.


Thank you!

Here is another orca worksheet you might like. CLICK HERE.

To print the free worksheet just highlight it and send it to your printer or save to your device to print later. If you have problems printing see the how to print tab above for suggestions, or try the updated link below

CLICK HERE for a link to a file in photo format that may print better.

BEGINNING
Draw lightly at first so you can erase later. Start with the horizon, where the sky meets the sea. Draw a horizontal line. You could scribble in some lines for the hills if you want it to look like the orca is in a bay.

BASIC SHAPE
Draw a curved line for the back of the orca. The bottom of the line will be at the water and a little below the horizon line you drew before, the curve will be more rounded at the head.

The bottom line is not really curved but is made up of three lines that are almost straight. One for the tail to the waist, the second is from the waist going to the neck or jaw, and the third is from the jaw to the tip

FINS.
There are more than one kind of orca and they have the back fin in different places some are in the middle and some are more forward. The Orca fin is like a triangle but narrow, draw it with two curving lines curving backward. The two front fins are large ovals.

WATER
The splash is a lot of lines that curl back and forth. There are layers of splash inside layers. To make the splash look white and foamy make the water dark. The water is darker in the foreground near the bottom and lighter at the top near the horizon. The mountains can be any way you want

COLORING
The orca is black but don' start with black if you have gray do it all in gray first then do the darkest areas in black and leave some gray so it has a rounded look. There is white behind the ear, under the chin, and under the belly.

(c) Adron D.2/20/15

I hope you enjoy this art project and that it turns out well. You can support my art with a small contribution. See the DONATE tab to learn more. 

Thursday, February 6, 2014

How To Draw A Pelican on a pier Worksheet.

How to draw a pelican on a pier drawing lesson and worksheet.


This how-to-draw a pelican worksheet is an easy and fun drawing project that any young artist can do easily. It breaks down the figure into some basic shapes and then adds details until you have a beautiful pelican.  

SCROLL DOWN TO ACCESS THE FREE PDF.


How to Draw a Pelican Worksheet


Thank You!

Here is a link to an updated and easier-to-read file. It is a PDF and will be easier to download and print.  

CLICK HERE for the PDF file.

PRINT THE WORKSHEET

If you have trouble making the worksheet below print or are printing on A-4-sized paper, then CLICK HERE to visit my how-to-print page for some suggestions. 

Sometimes it takes me hours, but I create these how to draw worksheets, I do it so that I can give back because I believe that when you have been given a gift, it is so you can be a gift to others, and I hope these worksheets are a means of blessing to you.

YOU MAY PRINT THE PROJECT NOTES BELOW.

BEGINNING
Start sketching lightly so you can erase later. The basic shape is an oval for the body. Above the oval draw two lines for the neck, and on top of that, draw a circle for the head. The beak is a long triangle that is as long as the neck.

The back has a slight hump at the shoulder. Make the body a little wider at the lower half.

HEAD AND BILL
The eye is halfway down and a third of the way forward. The eye is a black dot inside a circle. The bottom of the bill is bigger; draw a line from the tip to below the eye and make sure the bottom beak is half as thin as the top. The nostril is on the top of the beak by the eye. This pelican has a black face; it looks like a wavy patch that goes around the eye and behind the bill. The bill has a little hook at the tip.

WING
The wing starts slightly below the shoulder and curves down to the tail. There are lots of feathers going downward on the wing. Draw the feathers as many lines but not too many; make sure they have a little space between them. There is a dark edge at the bottom of each feather.

FEET
The feet are a triangle with a line going down the middle for the middle toe. The legs have a backward bend like a person's ankle.

PIER AND WATER
The pear is a cylinder; it has an oval top and straight lines going down on the sides. The bottom has a curve that matches the top curve.

The water is a lot of back and forth lines like the letter Z but flatter. The water is darker in the lower area and lighter by the horizon. Make sure the horizon is level and not tilted.

I hope you draw a masterpiece!

(c) Adron 2/6/14


Thank You!

Thursday, January 2, 2014

How To Draw An Orca Killer Whale Side View Worksheet

How to draw an orca killer whale drawing lesson and printable worksheet. 

How to draw a killer whale is a simple project to help the young artist gain confidence. It is drawn with a few lines that have graceful curves. Parents, teachers, and homeschool families will find many ways to use this at home and in class.

To print the worksheet above, just highlight it and send it to your printer or save it to your device to print later. If you have problems printing, CLICK HERE to visit my how-to-print page for some suggestions. Or try one of the updated links below.


How to Draw an Orca Killer Whale Worksheet.

Sometimes it takes me hours, but I create these how-to-draw worksheets I do it so that I can give back because I believe that when you have been given a gift, it is so you can be a gift to others, and I hope these worksheets are a means of blessing to you. You are welcome to print as many as you like.


Thank you!

CLICK HERE for a file in PDF.

YOU MAY PRINT THE PROJECT NOTES BELOW.


BEGINNINGS
The basic fish shape is a low wide arch on top that has a long slope at the back and an almost straight line for the bottom. Draw this lightly since it will need slight changes as we go on.

DEVELOPMENT
The dorsal fin is almost halfway on the back. The back edge of the fin is at the halfway point and is almost straight up but just slightly tilted forward. The flipper is about 1/4 of the way back from the nose. The nose has a very little bump keep it small or the whale will look like a dolphin. The tail is two narrow triangles they are thin since we are drawing them from the side.

FINE TOUCHES
The back curves slightly down and up and back down again at the tail it is only slightly. The bottom has a slight curve from the nose to the fin after the fin the line curves up to the waist and a little down for the tail then back up to connect to the fins.

MARKINGS
There are white marks on the chin going back to the fin. There is an oval mark midway on the bottom and a small white mark under the tail. The mark behind the eye is like an oval. Every whale has slightly different marks so don't struggle to get them just right.

COLORING
Start coloring the whale with gray and after you have an undercoating of gray use black on the body but leave the edges gray so it will look round.

(c) Adron D. 1/2/18

Wednesday, August 14, 2013

How To Draw A Pirate Flag Worksheet

How to draw a pirate flag drawing lesson and printable worksheet.

The free printable worksheet below is a popular image that is fun to use and draw.  Parents, teachers, and homeschoolers are welcome to use this for personal and class use.


How To Draw A Pirate Flag Worksheet


Sometimes it takes me hours, but I create these how-to-draw worksheets I do it so that I can give back because I believe that when you have been given a gift, it is so you can be a gift to others, and I hope these worksheets are a means of blessing to you. You are welcome to print as many as you like. Thank you!

Some printers are better with a PDF image format. For PDF, CLICK HERE.

To print the free worksheet, highlight it and send it to your printer or save it to your device to print later. Some printers work better if you first drag it off to the desktop and print from there. If you have problems printing, CLICK HERE to visit the how-to-print page for suggestions.

You may print the project notes below.

OVERVIEW
Learning to draw takes practice, so if you draw every day, you will get better. If your first sketch doesn't come out the way you expected, do not give up, you are learning, and your next picture will be better. I have a lot of how-to-draw worksheets, so come back every day for a while and do a few. You will be surprised at how good an artist you will be.

DRAWING TIP
Draw the skull and crossbones first, then draw the flag around them.

SKULL
The skull starts as a circle, and a large letter "U" for the jaw below. Use a guideline up and down the center to keep things straight.

The eyes are two circles at the center of the head. The nose is a triangle going between the eyes and down to the upper jaw, and then it finishes as an upside-down heart. Use the big circle to start the cheeks. The cheeks wrap around the bottom half of the eyes. The teeth are half way between the nose and the bottom of the jaw, use a guideline across to keep them even but they don't really need to be even. Draw the four in the front on the top and bottom carefully. but the ones on the sides are around the side, and you don't see them. They are just a little line going up and down.

BONES
The crossed bones are two parallel straight lines with circles on the ends. These leg bones have a large circle on the side of the top for the hip joint.

DRESS IT UP
Dress up the skull with a hat or bandanna. Give him an eye patch (If you have trouble drawing the eye, sometimes an eye patch covers up a mistake. Draw a dagger in his mouth.

Some flags had crossed swords instead of bones.

FLAG
After you draw the skull and crossbones, draw the black flag around them. Make the edge tattered and torn. Put a few cannon holes in it.

Take your time, and it will spread fear wherever you hang it.

Click this link to see how to draw a pirate ship.

(c) Mr Adron D. 8/14/13

Thursday, June 6, 2013

How To Draw The Loch Ness Monster, Worksheet

How to Draw the Loch Ness Monster

This is an easy printable project and can help give young artists confidence.  

ABOUT PRINTING
If you have problems printing see the "HOW TO PRINT" tab above or try one of the updated links below that should print better.

SCROLL DOWN TO ACCESS THE FREE PDF.👇👇👇
THANK YOU FOR YOUR DONATION!

How to Draw The Loch Ness Monster. Worksheet.

Thank You!

The file above was created with my scanner the one below is a digital file. One of these two will work for you. 

👉👉👉 CLICK HERE for a file in PDF format.


PRINTABLE INSTRUCTIONS

Start with a light outline.

HEAD
The head looks like a triangle with a second triangle behind it for the gaping mouth. Round off the corners. The view is turned a little so you only need to draw one eye. Draw the large tooth before you draw the other teeth so it fits.

NECK
The neck starts behind the head. It is two lines that curve, one line comes off the top of the head the other is from under the jaw. The neck is more narrow at the head and wider at the body.

BODY
The body is a hump; draw it like an arch.  It is behind the neck.  Behind the body is the tail.  Use a line to show where the body is coming out of the water.
The flipper is two lines that curve outward and then back to touch at the ends.

WATER
The splash has a top where the water is rounded upward. There are bubbles flying up. The splash also has a darker bottom where the water is rounded downward. The ocean waves are smaller far away and look like dashes. The waves close by are bigger and are like lots of streaks back and forth.

SHADING AND COLOR.
Loch Ness is a very beautiful lake. Make the mountains around it colorful and the distant water light blue. The nearby water is dark. The monster is dark gray, green, or blue.

For more fun worksheets choose from the favorites on the left sidebar.

(c) Mr Adron 6/6/13

I hope this worksheet helps you create a beautiful picture. Please consider making a small contribution to help keep this art-lesson blog going. Thank you.

Thursday, May 16, 2013

How To Draw A Harbor Seal Worksheet,Free to Print

How to draw a harbor seal drawing lesson and printable worksheet.

How to draw a harbor seal is a free printable worksheet that will help the young artist gain confidence in drawing.

This worksheet may be printed by highlighting it and sending it to your printer. if you have problems see the HOW TO PRINT tab above for some helpful suggestions.


How to Draw A Harbor Seal Worksheet by MrAdron.

Printable lesson notes


Harbor seals are easy to draw; they can be a focus in a picture or a part of the composition that gives character to a scene. Just download the worksheet below and print it to get started.

BEGINNINGS:
Start with a simple outline. The head starts out as a circle and the body is shaped like a teardrop that is on its side. Use two lines to draw the body, draw the lines going around the shape of the body.

DETAILS:
The front flipper is like a hand, but no arm; draw it like two letters, "L," one above the other, and a third line going between them. There are five short claws.

FACE:
The face is happy. The eyes are high on the face. The eyes are round at the top and flat at the bottom. (If the bottom is slightly arched he looks like he is smiling.) The nose is two short dashes that almost touch and form a letter "V." The mouth is like a letter "W" but rounder. The face has a few long whiskers, and tall eyebrows going up. He has a little chin it is a short curved line.

Sometimes I draw a snout but adding a curved arched line between the nose and the eyes. It is optional.

COLOR:
Color him grey-brown or black. There are spots on his back, and he is white below.
Give him some friends and a rock to sit on.

(c) Mr. Adron 5/16/13

Tuesday, May 7, 2013

How To Draw Boat On Beach Worksheet

How to draw a boat on a beach drawing lesson and printable worksheet.

This printable drawing worksheet will be helpful for the young artist who wants to gain confidence in drawing.

This worksheet may be printed by highlighting it and sending it to your printer. If you have problems, CLICK HERE to visit my how-to-print page for some suggestions.


How to Draw a Boat on The Beach Worksheet by MrAdron.

Sometimes it takes me hours, but I create these how to draw worksheets, but I do it so that I can give back because I believe that when you have been given a gift, it is so you can be a gift to others, and I hope these worksheets are a means of blessing to you. You are welcome to print as many as you like.


Thank you!

The image above should work for most printers, but use the PDF below if you still have trouble. 

CLICK HERE for a PDF file that may print better on some printers (it may require a two-step process, first download the temporary file, next open the file, then print).

Almost every famous artist did a portrait of the boat stuck on the beach- why not you? This is a fun and rewarding project that the young artist can be proud of. There are many different designs and shapes of boats around the world, if yours doesn't turn out like mine, it is OK since somewhere there is a boat just like the one you are drawing.

Draw a line for the foreground sand and another for the horizon before you start on the boat. Start out by drawing lightly, so you can erase.

The challenge for many people is the angles of the boat's sides and how they come together to a point at the front. Think of it as a banana with the back end chopped off. The top lines of the near side and the far side start apart at the rear of the boat; they curve down and back up until they touch at the front. The line of the back goes down at an angle to the sand. The line of the front curves slightly as it goes down and back.

Once you have the basic design, then start to add the details. The walls are thick, so draw a second line next to the tops to show the thickness. There is a seat in the middle; use two parallel lines for its front and back edges, and then a third for the bottom under the front edge. There are ribs going up on the inside; draw these as two parallel lines. Our boat has a floor, draw it as a line going across the inside bottom. The outside wall has boards going across it, don't draw them all the way across- leave a few blank places to give it interest.

Add shadows.

Draw a world around your boat. Shadow in the sand and give the sand texture with lots of dots. Put in some beach grass, add the waves of the sea, and put in some islands or the mountains of the bay far away.

I hope you create a masterpiece!


(c) Mr. Adron D. 5/7/13

If you are able, won't you consider making a small contribution to support my art? Please click HERE and enter an amount that shows your level of appreciation. Thank you. 

Thursday, April 5, 2012

How to Draw A Dolphin Drawing Lesson For Young Artist.

This free printable drawing worksheet is an easy lesson that uses a few simple lines to draw a dolphin and young artist are quick to master this project.

The worksheet below may be printed by highlighting it and sending it to your printer or saving to you device to print later.


How to draw a Dolphin worksheet.


Once you master the basic shape you can have them doing all kinds of things in your pictures. Drawing the dolphin is all about graceful lines. Take your time and make the lines flow like water.

Start with a simple arch like a rainbow.  The back of the arch near the tail is bent more than the front near the nose.

Draw the line for the bottom.  It will be an arch too, but straighter for the first 2/3rd of the way.

Lightly draw a triangle for the top fin.  Make it near the center. There are different types of dolphins and some have the fin more forward and other's have the fin more back, so don't worry if it is not perfect.

Draw the triangle for the lower fin.

Draw a triangle for the back flipper; it is like a flattened triangle.

Go over your lines with a darker pencil or marker, make the lines flow.

The nose is rounded.  The mouth goes almost all the way to the eye.

The eye is a round shadow with a line through it.

(c) Adron

Monday, November 28, 2011

How to Draw a Tugboat

This is a free printable drawing worksheet art lesson for how to draw a tugboat.


Here is an easy and rewarding project for artists of any age.  It not only uses basic shapes to create the boat but also has a few ideas for details.

Tugboats are cool. They come in all sizes and shapes, so you can make yours just the way you want to. Take your time, and when you are done, people will say," "Wow! What a cool tugboat!"

If you have any problems making the image below print, CLICK HERE to visit my how-to-print page for some suggestions.


How to draw a tugboat worksheet.

Sometimes it takes me hours, but I create these how to draw worksheets, but I do it so that I can give back because I believe when you have been given a gift, it is so you can be a gift to others, and I hope these worksheets are a means of blessing to you.


Here is a link that might print better on some printers.

CLICK HERE for a file in photo format.

Start with lightly drawing the basic outline shape.

Use the basic shapes of a rectangle and triangle.

Stack smaller rectangles for the upper decks. The boat's shape is a little lower at the back than at the front, so angle the rectangle that makes the main body of the tugboat down toward the back. A rectangle makes the smokestack.

Circles make the tires that hang on the sides. They can be any size and don't worry if they are not perfectly round since on a real tugboat they get all beaten up.
Add whatever details you like, such as windows, air funnel, lifeboat, life ring, barrels, boxes, ropes, ladder, windows, and radio antennas.

Go over your pencil sketch with colored pencils or a marker. Color the tires and smokestack black; keep the sides pale. Add rust dripping down here and there. The smoke is darker on the bottom. Don't overdraw the city in the background. You can put a lot of color in the sky and water to make up for the white boat.

I did my worksheet with a fine tip marker and a few broad-tipped markers with different values of gray for the illustration. So you can see it can be drawn nicely with markers.

Here is one way to do the tugboat picture. It is painted in watercolor. I did it in about 40 minutes. If I took my time, it would have been better. (Just like I always say, take your time, and people will be amazed, but if you hurry, it will be disappointing).

Watercolor illustration for How to Draw a Tugboat.

To see more how-to-draw worksheets use the search box above.

(c) Adron D.11/28/11

Tuesday, September 27, 2011

How to Draw a Lighthouse,

How to draw a lighthouse.

I am glad to share this free printable How To Draw A Lighthouse Worksheet.


It is a simple picture of a lighthouse and is easy to draw. You only need to know how to draw a straight line with a ruler, how to draw jagged lines like lightning bolts, and how to draw curvy lines.

 If you have problems,  CLICK HERE to visit the how to print page for suggestions or try one of the updated files below.


Printable How to Draw a Lighthouse Worksheet


Even though it takes hours, I am glad to draw these How to Draw Worksheets because I believe that when we have been blessed, it is so that we can become a blessing to others. I hope you enjoy these projects and they help you.


Here is a file that I updated to PDF; it should be more printer-friendly.

CLICK HERE for a PDF formatted file.

PRINTABLE LESSON NOTES


BEGINNINGS
Draw the horizon first, do not make it too high or too low, and avoid putting it in the middle.

The bluff starts a little above the horizon. The cliff starts as a jagged line. The beach begins as a bent line. Draw a guideline straight up and down for the center of the lighthouse.

DETAILS
The top of the lighthouse is slightly arched upward. The bottom is somewhat arched downward. Draw the top first, then the bottom, use the guideline you drew to keep things even. Lastly, draw the sides- use a ruler for straight lines.  Use jagged lines to fill in the cliff. Add a few more bent lines for the waves.

Draw the light ray before filling in the sky, be careful that you don't draw over it when you fill in the clouds.

SKY
Fill up the sky with dark clouds make the sky dark but keep the light ray white. Use curvy lines for the tops of the clouds and straight lines for the bottoms. Shadow in the back of the lighthouse and the jagged cliffs keep the cliffs irregular and interesting. Make the ocean dark. The sky is darkest at the top and pales at the bottom. Leave parts of the ocean pale for the waves by the beach.
I did this drawing in 20 minutes with ink markers.  If you take your time, yours will look much better than mine.

Example of how to draw a lighthouse
(c) Adron D. 9/27/11

I hope you draw a masterpiece. 


Become a Patron!