Showing posts with label Cartoon. Show all posts

Friday, November 27, 2020

How To Draw A Cat Who Is About To Pounce. Free Drawing Worksheet

How to draw a cat who is about to pounce drawing lesson and printable worksheet.

This simple how-to-draw a cat about to pounce worksheet will help give the young artist confidence in drawing.

SCROLL DOWN TO ACCESS THE FREE PDF.
THANK YOU FOR YOUR DONATION!

Parents, teachers, and homeschool families will be able to use this lesson in class, or it may be a take-home project or used in an after-school homework club.

This cat is a cartoon drawing because of its simplicity and exaggerated features like the face and the pose.

PRINT THE WORKSHEET

If you have trouble making the worksheet below print, CLICK HERE to visit my how-to-print page for some suggestions.


Free How To Draw A Cat Who Is About To Pounce.


Sometimes it takes me hours, but I create these how to draw worksheets, but I do it so that I can give back because I believe when you have been given a gift, it is so you can be a gift to others, and I hope these worksheets are a means of blessing to you.

These worksheets are free to print but your gift will help keep this blog going.


Thank you!

CLICK HERE to access the PDF that may print better. 

YOU MAY PRINT THE PROJECT NOTES BELOW.


BEGINNINGS
Start with a tall oval for the body, and below the oval, draw a wide circle for the head. Add two ovals for the paws on both sides of the head.

FACE
Use guidelines across the center of the face and down the center of the face to keep things even. Draw them lightly since you will want to erase them later.
     * Add the ears on the top of the head.
     * The eyes are below the guideline that is going across the face.
     * The eyes are almond-shaped; there is a curved line on the top and a curved line on the bottom.
     * The nose is a little below the eyes and on the center guideline; the nose is a triangle pointing down.
     * The eyes are looking sideways, so draw the iris on the left half to appear as if he is looking left.
     * The pupils are lines going up and down, and they are low in the iris, so he looks like he is watching the toy mouse.
     * His mouth is shaped like a rounded "W," and a line connects the nose and the mouth.

BODY
     * The paws have three curves underneath with lines for the claws.
     * There are elbows on the side of the face; they are a bent line.
     * The rear legs are a curving line that follows the bend of the body.
     * There is a circle for the rear paws.
     * The tail is made of two parallel lines; it can be straight up or curve like an "S" or a "?" shape.

MOUSE
The toy mouse gives the picture a story.
     * The mouse is a half circle for the body and a straight line below.
     * There are circles for the ears and a curving line for the tail.
     * Draw circles for the wheels.
     * Draw two circles like a figure * for the wind-up key.

I hope you draw a masterpiece!

© A. E. Dozat 3/24/14
Thank You

Sunday, November 10, 2013

Beginning Lesson For Drawing Cartoon Characters, Worksheet

How to draw cartoon characters lesson and printable worksheets. 

How to draw cartoon characters worksheet teaches the beginning artist to draw expressive characters. The purpose is to keep things simple at first and leave out anything that is not necessary. This exercise helps to practice drawing expressive eyes.

If you have problems making the worksheet below print then see the HOW TO PRINT tab for some suggestions. 

YOU CAN HELP

I do not charge you to print my worksheets, so you may print as many as you need. If you are able, won’t you please consider making a small contribution to support my art? Please click HERE and enter an amount that best shows how much you appreciate having these available. 
Thank you.  


How To Draw Cartoon Characters Worksheet.


Sometimes it takes me hours but I create these how to draw worksheets but I do it so that I can give back because I believe when you have been given a gift it is so you can be a gift to others, and I hope these worksheets are a means of blessing to you.


YOU MAY PRINT THE PROJECT NOTES BELOW.

Our characters are shaped like gourds or rocks or water bubbles, with eyes.

Draw two circles a large one and a smaller one above it. Outline the circles to make a gourd shape. Add feet like blobs or peanut shapes if you like, this gives the opportunity to practice basic body pose.

EYES
Our gourd people are all about eyes. Draw different eyes to express different emotions and feelings. Example...

     Surprise: Two circles side by side with black dots in the center. Eyebrows are high.
     Disgust:  The top of the eye is a low curve and a half dot under each. Eyebrows are low.
     Worry Eyes curved at the top, Dots to the side. Eyebrows to the side slightly.
     Curiosity: The eyes are wide open the dots to the side, eyebrows are high.
     Anger: Eyes tilt down leaning toward the middle, with a half dot under the eyelid.
     Embarrassment: Dot in the middle and outline at the sides.

BODY LANGUAGE
Try different gourd shapes to express emotion.

You might like to look at my other lessons, how to draw funny letters. and How to Draw Mushroom People

(c) Adron 11/10/13

Wednesday, October 2, 2013

How To Draw A Goblin Worksheet.

How to draw a Goblin drawing lesson and printable worksheet.

This how-to draw a goblin project will give the young artist a rewarding experience as they develop confidence in drawing.

You do not have to make a donation to download my 'How Do Draw Worksheets'. However, if you'd like to, the donate button is located below the picture. I would not be able to create these without your support. Thank you.

👇👇👇 SCROLL DOWN TO ACCESS THE FREE PDF. ðŸ‘‡ðŸ‘‡ðŸ‘‡

Parents and teachers will find numerous ways to utilize this printable project to help young artists gain confidence in drawing. It can be done in class or at home.


How To Draw A Goblin, Worksheet.


Thank You.

CLICK HERE for a file in a universal portable format.

YOU MAY PRINT THE PROJECT NOTES BELOW.


Because I do not like scary subjects, I made Mr. Goblin a barber who needs more customer service skills, so the picture has some humor and a story.

TIP
Since this is a fantasy creature you can change features and body type to suit your personal project.

START
Use a stick figure to work out the pose.
     * There is no neck the head is low and looks like the ears are right on top of the shoulder.
     * The head is larger than normal and is like a long upside-down egg.
     * The arms are way too long.
     * The legs are short and bowed.
     * He has big hands and big feet.

FACE
The face is long and skinny. Use straight choppy lines to give it character.
     * The eyes are high up they are small black dots surrounded by wrinkles.
     * The nose looks like a carrot.
     * The mouth is a small frown.
     * There are lines under the cheek and over the eyebrow.
     * There are frown lines going down the cheek.
     * The ears stick out from the side, give them a little wave.
     * There is straight wire-like hair going up and out.
     * I gave him two small horns on his forehead.

DEVELOP THE BODY
The stick figure tells where to put the shapes. The arms and legs are ovals for the muscles; after they are right trace around them to give them shape.

HANDS
The hands are like a square with fingers coming out. Draw a square for the back of the hand. Then with a stick figure method draw the three fingers and thumb. Trace around the stick figure fingers then erase the extra lines.

FEET
Draw a flat line for the bottom but give it a little hump in the middle. The toe area curves around going high then down over the top of the foot. The back is straight up and down.

CLOTHING
Draw the clothes after you have the body developed. Because he is a barber he is wearing a smock, it is like a long shirt with short sleeves. Remember to follow the shape of the body and put some wrinkles. Our goblin has a loincloth that is ragged at the bottom and tied with a rope at the top.

Draw a comb in one hand with some teeth missing, and put a mirror in the other. If you try to draw a screaming face in the mirror keep it simple- it is just to tell the story. Draw some scissors on the floor.

If this has been helpful you might like my worksheet titled: How to Draw A Witch and Cauldron.

(c) Mr. Adron D 10/2/13

If you are able won't you consider making a small contribution to support my art? Please click HERE and enter an amount that shows your level of appreciation. 
Thank you. 

Thursday, May 30, 2013

How to Draw A Skinny Cat Face Worksheet

How to draw a skinny cat face, drawing lesson, and printable worksheet.

This free printable drawing worksheet is perfect for drawing a cartoon cat, so you don't need to worry about getting everything perfect because if something is off a little, it adds to the effect.


How to Draw a Skinny Cat Face Worksheet


Thank You!


This worksheet may be printed by highlighting it and sending it to your printer. If you have any problems, CLICK HERE to visit my how-to print page for suggestions.

THE BASIC OUTLINE
I use a guideline up and down to help keep things even and straight. This face starts as a series of ovals. The first is a large oval for the forehead. Below the forehead are two smaller ovals for the upper jaw; they touch where the nose is. The last oval is a small one for the lower jaw. Use two lines for the cheeks on the side of the face; they point down to the chin like a "V."

ADD DETAILS
The ears are triangles at the top of the head; they are larger than normal cats. The nose is only a line that goes across the space between the two ovals. This should form a triangle.

The eyes are drawn as a line going up from each side of the nose and arching outward for the top of the eyes. The eyes are halfway to the top of the head because he has a big forehead. The bottom of the eye is a curved line going across. Draw the shiny spot in the eye before you get to the iris or pupil. The eye is a circle, but most of it is hidden at the top and bottom by the eyelid, so you only draw the sides of the circle. The pupil is a diamond shape, but the top of the diamond is hidden.

FINAL TOUCHES
The nose has two nostrils on each side; they are like little triangles. There are five freckles and three crooked whiskers on each side of his mouth. There is fur inside his ears and short fur around this face. There is a wrinkle under each eye. Three eyebrow hairs are going up. The bottom edges of his eyes are darker.

(c) Mr. Adron 5/30/13

Friday, May 24, 2013

How To Draw a Fat Cat Worksheet

How to draw a fat cat drawing lesson and printable worksheet.

This free printable drawing worksheet is a fun cartoon type of drawing of a very fat cat.

This worksheet may be printed by highlighting it and sending it to your printer. If you have problems, CLICK HERE to visit my how-to-print page for some suggestions.


How To Draw a Fat Cat Worksheet

These worksheets are free to print, but your gift will help keep this blog going.


Thank you!

Design the body as a dome or half circle with the flat on the bottom. Outline the head as a smaller circle at the top; they overlap a little. Use a guideline up and down the center to keep things even on both sides.

The paws are like ovals at the bottom; the back paw is more oval and slightly higher since it is farther back. The rear legs are ovals tilted outward, and only the knees are visible.

Once you are happy with the outline, then add details. The tail is two lines that reach around to hide the rear paw on one side and rest on top of the front paw. Give him a little chin. The eyes are halfway down the face, The ears are triangles on top of the head. Be careful not to make them too big. The nose is a triangle halfway between the eyes and the chin.  The legs are tilted inward like a "V." Draw them as two lines each. There is a bend at the ankle where the legs go straight down.

Our cat has stripes: three on the forehead, one over each eye, two on the cheeks, two on each shoulder, three on each leg, and four on the tail.

Use shadowing to give him roundness.

(c) Mr. Adron 5/24/13

Thursday, December 6, 2012

How To Draw A Nutcracker Worksheet.

How to draw a nutcracker drawing lesson and printable worksheet. 

This free drawing worksheet, How to Draw a Nutcracker, is an easy drawing lesson for the young artist. There are so many variations possible that each student can make the project unique. This project is ideal for the younger artist since it uses the most basic shapes and designs.

SCROLL DOWN TO ACCESS THE FREE PDF.


Worksheet For How To Draw a Nutcracker Art Lesson.


Thank you!

For a file in PDF format. CLICK HERE. (This one is a lot clearer)
Print in grayscale to get the shadows.


 CLICK HERE to visit the how-to-print page for some suggestions

PRINTABLE PROJECT NOTES


Start by lightly drawing the outline using basic shapes; rectangles for the hat, legs, arms, circle for hands and head and a square for the body.

Once you are satisfied with the outline add more basic shapes to develop the details. To make the torso an hourglass shape, (this is two triangles one pointing up and one pointing down) you can draw an inward curve on both sides of the waist. Draw the nose with a rectangle, and the mouth with a rectangle. Make the eyes with two circles. The hair and beard are drawn with many wavy lines.

Add detail to the cuffs on the sleeves, buttons, pockets, belt, mustache, lips, and teeth. Do not make the hair solid but use the wavy lines over and over in a pattern to give the hair texture.

The hat has fur, this takes time; first using the cheek of the pencil shadow the hat so it looks round by shading toward the edges after that use the point of the pencil and draw a lot of short lines going in the same direction out and away from the center.

If you are drawing in pencil remember to use the cheek of the pencil and add shade for roundness.

If you are using a color medium here is a color scheme- but you can use your own.
     * The hat is black,
     * The face and hands are tan.
     * The jacket is red there is a white shirt under the jacket;
     * The jacket has white cuffs and a white belt with a gold buckle.
     * There is a gold decoration on the shoulders.
     * The pants can be white, blue, or black,
     * The boots are black but parts like the tops are gray.


My illustration was done in watercolor.
Illustration for Art Lesson 


(c)Adron Dozat 12/6/12

Thursday, November 1, 2012

How To Draw A Troll Worksheet And Lesson

This free printable drawing worksheet, How To Draw a Troll, is a fun lesson for beginning artists and helps give them confidence in creating their own characters.

The worksheet may printed by highlighting it and sending it to your printer or saving to your device and printing later. Some people find it easier to drag the image to the desktop and print from there. If you have problems printing see the how to print tab above.


Worksheet How to Draw a Toll.

To see more projects search the list in the sidebar.

This lesson combines fantasy character drawing with storytelling. The story is in the expression, body position and the props; the props are the boxes of soap he is holding and the bubble bath behind the troll. The story of the picture is in a world, many young artists are content to draw their characters floating on a white page, but here they are encouraged to create an entire world illustrated by the forest.

The worksheet is limited to the character; the scene and story is left to the student.


It is easy to draw the troll using the jointed stick figure method. Make a stick figure like a skeleton. Draw circles for the joints like knees, elbows, hips, etc. You will erase some of this later, so draw lightly. You will draw the body around the stick figure.

Make the arms long and the legs short. Draw a series of ovals for the muscles. Draw the fingers like a skeleton hand at first, then draw the fingers around the lines.

His face is like a pig; the eyes are higher than normal.  The nose is a half-circle with two lines up and down. The mouth is a straight line with a shadow line underneath it. He has two tusks going up. His ears are pointed.

His belly is fat and hangs over his shorts. Don't forget the belly button.

I like to give my characters a world to live in and not just draw them on a page. It is best to make the picture say something like telling a story. My illustration of the troll tells a little humorous story. Can you figure it out?


A troll. A good picture tells a story. What is the story?
 (c) Adron

Tuesday, October 2, 2012

How To Draw A Scarecrow Man Worksheet

How to Draw A Scarecrow.

How to draw a scarecrow art lesson.

This free printable drawing worksheet, How To Draw A Scarecrow, is an easy drawing project for a young artist or a beginner. Very few rules apply since a scarecrow man is made out of rags and straw, so if an arm or leg is too long that is OK because after a few days in the weather it gets roughed up.

My how to draw lessons are free and I hope you print as many as you can use. If you are able won't you please consider making a small contribution to support my art? Your gift will tell me you appreciate my worksheets. CLICK HERE TO DONATE
Thank you. 


How to draw a scarecrow worksheet, (enhanced image)


Even though it takes hours, I create these How to Draw Worksheets because I believe that when we have been blessed it is so that we can become a blessing to others. I hope you enjoy these projects and they help you. 


Thank you!

Below are some files that may work better on some devices. 

Some printers work better with a PDF image file, CLICK HERE. 


PRINTABLE PROJECT NOTES

Quickly scribble out a basic design. It starts like a stick figure with wide shoulders, then dress the stick figure in coveralls and shirt. The hands are a little lower than halfway down. Have some straw sticking out of the cuffs of the shirt and the bottom of the pants.

The head is just a circle with a happy face drawn on it. Sketch a handkerchief around the neck; it is like two triangles, a circle for the knot, and a scribble for the ends.

The hands are just gloves stuffed with straw so they do not have the correct shape. You can scribble them out and then color them in dark.

The shoes look like peanuts with laces. Just draw the peanut shapes then make sure the bottom is flat. Draw some "Xs" for the crisscross laces.

The hat is maybe the hardest part. Draw a rectangle for the top then draw two curving lines for the brim; one curving line goes across the front and dips down on the outside edges, the second is in two parts, one on each side of the head halfway down, this is for the back brim of the hat and will curve up to touch the tips of the front line that curves down.

The pole is two dark lines going from the ground up to his back.

Draw his world by scribbling across the ground with light and then dark pencils. Draw the field as long lines going up and down but topped with short choppy lines for the tops of the grain. Draw the farm and hills very simply so the attention is on the scarecrow man.


Illustration, how to draw a Scarecrow 

I hope you create a masterpiece!
 (C) Adron D.10/2/12

Friday, March 2, 2012

HOW TO DRAW THE MAD SCIENTIST DR. FRANKENSTEIN

This free printable worksheet for how to draw a mad scientist

This is a simple lesson and has tips that will give the young artist confidence in drawing a basic face with a theme. 

Parents and teachers will find many ways to use this in class and at home. This lesson can be for any face, not just the mad scientist. 

If you have problems printing see the "HOW TO PRINT" tab above or try one of the updated links below that should print better.


How to draw the mad scientist worksheet

The photo format is like a scanned picture and some printers have trouble with them. The file bel is a PDF and it is digital so most printers work with it nicely.

CLICK HERE for a file in the universal portable format.

PRINTABLE LESSON NOTES

Start by lightly drawing a circle on your paper. Make it a little higher than the middle of the page. Then draw a large shaped “U” below the circle for the jaw.

Lightly draw a line down the middle to use as a guide and one halfway across for where the eyes go. 


Halfway from the centerline to the jaw draw another line for the nose and halfway down again draw a line for the mouth. You will erase these later on. 


He has a “monocle” over one eye- draw it first. You can trace around a coin to make a circle. His other eye is blind so I drew it wrinkled and closed and shadowed it lightly. 


The ears are like a figure “8” with a few curved lines inside.


Start the nose with three circles across make the one in the middle bigger. The nostrils are like parentheses on either side. I only put a shadow on one side of the nose and underneath. 


Give him bushy eyebrows to make up for his bald head.


Keep the mouth simple like a very flat “M” with a shadow underneath for the lower lip. 


Put some lines on both sides of the mouth. 


The neck starts right under the ears. His shoulders slope down.


Draw the operating lamp on his head last. Or maybe two pair of glasses. Erase the extra lines.


Dr Frankenstein pen and marker by Adron


(c) Adron 3/2/12

I do not charge for you to print my how to draw worksheets but if you could make a small contribution by clicking on the Paypal button or the DONATE tab or Paypal button and choose an option that shows your appreciation. Then I will be enabled to create more how to draw worksheets for you. Thank you. 

Tuesday, January 10, 2012

How to Make Funny People Letters.

How to draw funny people letters. A free worksheet.  


This printable worksheet gives ideas about how to give simple letters personality, It is not hard and is fun for the young artist. You can use this with a poster, card or anything that needs illustration.

This free drawing worksheet, How To Make Funny Letters, may be downloaded to your device and printed easily.

How to Make Funny Letters.

Start by block drawing all the letters in a light pencil like an HB or 2B. You can do this by drawing a box for each letter and leave a space between each box. Not all letters need the same room some like M or W are going to be wider and need more room than I or J. Use guidelines to keep the letters straight and even.

Once you have drawn the letters in plain simple blocks then give them eyes, mouths, and feet. Keep them simple don't try to add hands and legs.

The eyes can be circles or glasses or dots with lines above for eyebrows. Girl letters can have long eyelashes. Try out different shapes for eyes. Try to make as many different eyes as you can.

The mouths can be just a smile, a u shape, a dash, a circle or big lips for the girls. You can have a tooth hanging down on some and frowns for others. A little line under a mouth looks like a shadow of a lower lip. If you put parenthesis on each side of a smile it looks like dimples.  Put the eyes and mouths anywhere you like in the letters there is no right or wrong place.

Put in feet or slippers or flippers or shoes or boots. Just draw ovals for the basic shape. You can have hip-high boots on letters like K or M or R. Letters like I and T can have two feet close together.

The letters are more fun when they have a personality. Make one look smart and one look dumb and one look vain and one look shy or any personality you like. Have some drama between them maybe one could be singing loudly and another squinting like he doesn't like her song. You can have one look like he is in love with another who wants to getaway. You can have one sleeping. Where you have letters that repeat you can have them be twins or the bride and groom in a wedding, or some kind of opposites.

Have Fun.

(c) Adron

I like drawing these for you and hope you like making a donation through the Paypal button.  Thank you. 

How To Draw Churchmouse Cartoon - a Drawing Lesson For Young Artist

This is a free printable worksheet for how to draw a churchmouse. 

It is a fun project, you can put them on greeting cards, posters, covers of reports, and even little love notes. These are called Churchmouse but they are like little people mouse. 
How to draw a Church mouse cartoon 

Once you have mastered the basic design you can adapt them to any situation.

Start by making the basic shape by drawing four circles to make the head, body and ears.  (You can trace around coins or jar lids if drawing circles are too hard.  A big circle for the body, the head is not so big and two circles for the ears.

Remember to draw lightly use an HB or 2B pencil at the start, that way you can erase when you need to.

In every picture, there is some cute thing you really like and want to get to right away but save the fun stuff for last. Let the special part be the finishing touches.

Add a circle for the nose and mouth area, and draw half-circles for the inside area of the ears.

Use ovals for Mama's feet and box shapes for Papa's boots. 

Halfway down the body draw a curved line for the arms. Keep the hands simple just circles or ovals. 
The eyes are just dots with a little dash above, if you tilt the dash you can give the face expression.

Erase a little on each side of the circle that makes the nose mouth area just enough to leave the mouth smiling. A dash underneath makes the chin.

You can put any clothing on the mouse you like, but keep it simple. Make shoes, ties, bows, and things like that big- it makes the illustration look cute.

You can make the tale any way you want or just leave it out. The tail can give it a playful pose.

Color the mouse black, pink, white, grey or brown. 

Most importantly when you are sketching something like this remember to have fun!

(c) Adron

I hope you enjoy this little project and let your creativity run wild.  Please feel free to go wild with with the Paypal button and support my art.

Sunday, November 13, 2011

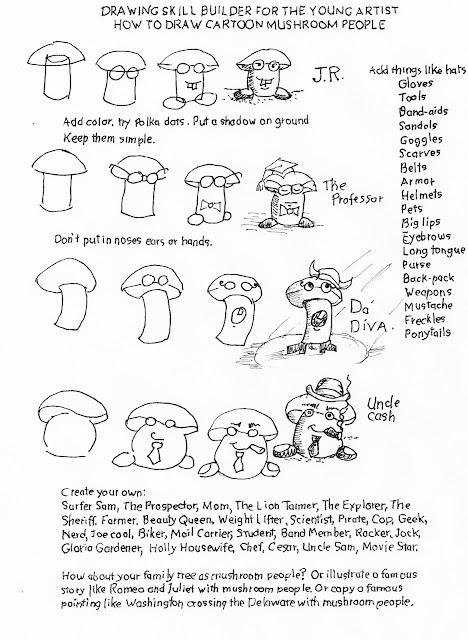
HOW TO DRAW CARTOON MUSHROOM PEOPLE

This is a free printable drawing worksheet, How To Draw Cartoon Mushroom People.

You can download it to your device and print it easily. 

These mushroom people are fun and always get your creative juices flowing. These are easy to draw so give them a try. Since they are colorless, you can do a lot with a pencil with these.

How to Draw Cartoon Mushroom People worksheet
Start with a simple cylinder and add the half-circle cap to the top. Don't worry about making everything perfect it is just in not being perfect that makes these creatures interesting. Draw the circles for the eyes across the bottom line of the cap, and you can sketch eyebrows floating above. My mushroom people have mouths so draw a smile you can add a tooth if you like. I put a circle on each side of the base for feet, put one in front and one at back for interest.

Add whatever accessories that make sense for the person you are drawing like hats, gloves,tools, band-aids, sandals, goggles, scarves, belts, armor, helmets, pets,  Big lips, eyebrows, long tongue, purse, back-pack, weapons, mustache, freckles, or ponytails.

Take time to do a good job in coloring and shading, this is what makes the project stand out as a serious piece of art and not some kid daydream doodle.

Create your own:
Surfer Sam, The Prospector, Your Teacher, Mom, The Lion Tamer, The Explorer, The Sheriff, Farmer, Beauty Queen, Weight Lifter, Scientist, Pirate, Cop, Geek, Nerd, Joe cool, Biker, Mail Carrier, Student, Band member, Rocker, Jock, Gloria Gardener,  Holly Housewife, Chef, Cesar, Uncle Sam, Movie Star.

How about your family tree as mushroom people?  Or illustrate a famous story like Romeo and Juliet with mushroom people. Or copy a famous painting like Washington crossing The Delaware with mushroom people.

Make your family into a mushroom family and do a mushroom portrait of each member

(c) Adron

I hope this drawing lesson was fun. You know what is also fun? Making a donation to support this blog through the Paypal button.  Thank you.