Showing posts with label fantasy. Show all posts

Sunday, October 27, 2019

Free How to Draw a Hero Rescuing a Wounded Friend, Printable Worksheet and Drawing Lesson

This free printable is a drawing lesson that will help give the young artist some confidence and direction to draw a picture of a man carrying another.  It is not a very difficult project and is ideal for young artists or for extra drawing practice.

πŸ‘‡πŸ‘‡πŸ‘‡SCROLL DOWN TO ACCESS THE FREE PDF.

How to Draw a Hero Rescuing a Wounded Friend Worksheet


If you need help with the photo file above, the PDF below should work better.

πŸ‘‰πŸ‘‰πŸ‘‰ CLICK HERE for a file in PDF format.


If you have problems printing see the "HOW TO PRINT" tab above or try one of the updated links below that should print better.


YOU MAY PRINT THE ART LESSON NOTES BELOW.

BEGINNING
Start out by drawing lightly at first so you can erase later.
Keep it simple at the beginning.
It is ok to use tracing paper and trace it over a few times until you have it right.
Use a basic stick figure to work out the pose.
This project has two figures one is carrying another. You may have to practice and draw them separately at first then combine them into one composition.


DEVELOPING
After you have the pose the way you want it then draw around the stick figure to give the body its shape and then draw the clothes over.

DETAILS
Keep the hands simple, think of drawing them like mittens. Remember, thumbs point inward on hands facing down and thumbs point outward on hands pointing up.

Keep the face simple, the nose and eyebrow form a letter "S" Use a short line for the upper lip and a shorter line for the lower lip. The eyes are two slightly curving lines since the wounded man is not awake and the hero is watching his step.

Color or shade the line drawing after you finish.

Do not forget to put in the background like a battle scene or a dead monster. Draw the ground around the hero's feet so he doesn't look like he is floating.

(c) Adron D. 10/27/19

My worksheets are free and you may print as many as you like. I only ask that if you are able that you consider making a small contribution to support my art.


Thank You!

Saturday, February 10, 2018

How To Draw Worksheet for A Butterfly Fairy Girl Floating on the Water

This is a how-to-draw worksheet of a fairy floating on a leaf in water.

 Here is a free printable worksheet and drawing lesson that gives some basic principles and inspire creativity at the same time. 

πŸ‘‡πŸ‘‡πŸ‘‡SCROLL DOWN TO ACCESS THE FREE PDF.
THANK YOU FOR YOUR DONATION!

I first drew this as a printable coloring page and I thought it would make an interesting drawing lesson for a young artist. It is a simple project and ideal for young artists or for extra drawing practice.
Click on the "HOW TO PRINT" tab for help with printing. You can try one of the updated links below that should print better.

YOU CAN HELP

I do not charge you to print my worksheets I only ask that you would make a small contribution so that I can continue to create these for you. To make a one-time contribution click HERE. You may also support my art through a monthly membership through Patreon.  Thank you.


How to draw a butterfly fairy floating on a leaf worksheet and lesson.

These take a long time to create but I am glad to do it for you since art has been such a blessing to me and I hope it will be a blessing to you!


Thank You!

To see the larger version of this project as a coloring page for kids CLICK HERE.

You might also like to try the How to Draw a Butterfly Fairy Kneeling. CLICK HERE.

The image above is like a photo but PDF is digital and may print better.  

πŸ‘‰πŸ‘‰πŸ‘‰ CLICK HERE for a file in a portable universal format. PDF.

PRINTABLE NOTES.


BEGINNINGS
Start by drawing lightly so you can erase it later. Begin by drawing a stick figure just to get the pose and size right. The head is tilted back since she is looking up at the flower umbrella. Make the head like an oval for now.
Use three guidelines to help draw the face. One for the eyes halfway across the head. The nose is halfway from the eyes to the chin, The mouth is halfway from the nose to the chin.
Draw a horizontal line to show where the leaf is floating on the water.

OUTLINE THE WINGS.
Outline the wings. The wings have two shapes. The top wing is like a triangle with a bent edge. The bottom wing is like a long letter "U."

DEVELOPING THE FIGURE
Draw around the stick figure to make the body shape. The legs and arms are thin. The knees are a few straight lines. The hand is at an angle and almost square.

CLOTHING
The clothing could be made out of silk so it has flowing lines. Draw the clothing around the figure, then erase the stick figure lines. The sleeve hangs down and curves back. The legs are covered by a skirt, the lines follow the legs on the left side and drape backward on the right side since it is floating in the water.

FACE
Keep the face simple. The forehead dips in at the eyes. The nose is like a triangle. The top lip is like a backward-facing letter "J" laying down. The bottom lip is like the letter "C". Draw the hair with long sweeping lines going over the wings.

DETAIL THE WINGS
Use ovals and circles to add detail to the wings. The circles can go around the edge. Draw the back edge of the wings with a back and forth pattern. Remember to leave the hair.

THE LEAF
The leaf is a straight line at the bottom where it floats in the water and the sides are just some curved lines that meet at points pointing up. The back of the leaf has the stem going up like the back of a chair for her to rest against.

Use curved lines for the ripples in the water.

Add shading.

(c) Adron D. 2/10/18

Please consider making a small contribution to keep this blog going.


Thank you!

Sunday, February 4, 2018

How To Draw A Village on a Distant Hill Printable Worksheet

How To Draw A Village on a Distant Hill.

This is a free printable worksheet and drawing lesson. The young artist or beginner will find it gives some challenge to their landscapes. 

I first drew this village as a part of a comic book I am helping to write and illustrate. I thought it would make an interesting drawing project for a young artist. It is a simple project and ideal for young artists or for extra drawing practice.

SCROLL DOWN TO ACCESS THE FREE PDF.
THANK YOU FOR YOUR DONATION!

If you have problems printing see the "HOW TO PRINT" tab above or try one of the updated links below that should print better.

YOU CAN HELP

I do not charge for you to print my worksheets, so print as many as you like. I only ask that if you are able that you make a small contribution so that I can keep on creating these for you. Click HERE to make a donation. Thank you very much for your support. 

How to draw a village worksheet by MrAdron.

These how-to-draw worksheets take a long time for me to create. I am glad to do it for you because art has been a blessing to me and I hope it will be a blessing to you.


Thank You!

You might also like the How To Draw A Bell Tower worksheet. CLICK HERE.

CLICK HERE for a file in PDF format. 

YOU MAY PRINT THE PROJECT NOTES BELOW.

BEGINNING
Use a few lines to draw a very simple landscape. Here we are drawing meadows and a hill for the village. The hills in the distance are closer together and the hills in the foreground are farther apart.
Be sure to have one big hill for the village.
Make the road that leads to the village with a few zigzags or curves- a straight road is boring.

Old villages had a stone wall around them like a fort for protection. Use a few lines to draw the village wall like a rectangle coming up from the lower hills. Add towers to the village walls.

HOUSES
Some houses are outside the wall but be careful to make sure they are smaller than the wall and be sure to leave the wall showing above those houses.

Use straight lines to make squares and rectangles and parallelograms to create houses. Draw the houses from the corner and not the full side view it is more interesting.

The houses closest to you are the lowest ones. Start with the lowest houses first like an uneven row. Then draw the next row above so they are behind the second row. The higher up the hill the less of the side of the houses you see and more of the roofs are visible. Keep adding more rows until you cover the hill. Have some houses facing one way and some facing another.

Develop the landscape with trees and bushes on the ridges of the hills. Use bushes or stone walls or fences beside the road that leads to the village. The bushes in the foreground will be darker and with more detail. The bushes in the distance will be lighter and drawn simply.

Add towers to the village walls.

When you think you have put in all the houses you can then look at it again and see if you can put in some more. This is hard work and takes patience but it will look good if you do.

Use dots and dashes to make rows for the crops in the fields. Make the rows go in different directions from one field to the next.

(c) Adron D. 2/4/18


Thank You!

Saturday, January 7, 2017

How to Draw Worksheet A Titan Mythology God

This is a how-to-draw worksheet and art lesson for the ancient Giant Titan Warrior.

This is a fun project for a young artist. It will be helpful to give the young artist confidence in drawing a fabled monster and will challenge them to push beyond their comfort level.

SCROLL DOWN TO ACCESS THE FREE PDF.
THANK YOU FOR YOUR DONATION!

If you have problems printing CLICK HERE to visit the how to print page for some suggestions or try one of the enhanced links below.


How To Draw A Titan Myth Worksheet


Sometimes it takes me hours but I create these how to draw worksheets but I do it so that I can give back because I believe that when you have been given a gift it is so you can be a gift to others, and I hope these worksheets are a means of blessing to you.


Thank you!

If you have problems with the photo format the PDF below should work better

CLICK HERE for a file in a PDF format.

YOU MAY PRINT THE PROJECT NOTES BELOW.

DESIGN
Start by drawing lightly so you can erase later.

Use circles and lined to design an articulated stick figure of the Titan. The shoulders are wide apart the arms are long and the legs are short there is no neck.

Use something to show his size since he is a giant. Our Titan is holding up a car so you can compare his size to the size of the car. It also makes the picture tell a story.

BODY FORM
Go around the stick figure to fill in the form of the body.

CLOTHING AND ARMOR
Draw the clothing and armor lightly after you have gotten the body the way you want it. Draw the clothing and armor around the body. Give the cape flowing lines.

FACE
Continue to work lightly as you create your design.
Keep the face simple. Give a single long eyebrow, a pig nose or monkey nose, horns, or long hair.

After you have developed the designs go over it with darker color pencils or pen. Add shading and more details to armor. Design a background.  Put a shadow underneath him.

(c) A. E. Dozat 1/7/17


Thank You!

Tuesday, June 14, 2016

How to Draw A Cat Warrior Worksheet

How to draw a cat warrior drawing lesson and worksheet. 

This free printable how-to-draw worksheet will help the young artist to draw and design a half-cat half-person fantasy creature.  Many people just put a cat head on a human body but I try to encourage a form that blends humans and a cat more realistic. The cat arms are longer than a person proportionally. The legs look stockier, and the foot is much longer and he stands on the toes. The back is curved more than a person could be.

SCROLL DOWN TO ACCESS THE FREE PDF.
THANK YOU FOR YOUR DONATION!
If you have problems printing see the How-To-Print tab above or try one of the updated links below that should print better.


How to Draw a Warrior Cat Worksheet.

Sometimes it takes me hours but I create these how to draw worksheets but I do it so that I can give back because I believe that when you have been given a gift it is so you can be a gift to others, and I hope these worksheets are a means of blessing to you.


Thank You!

If you cant get the image above to print the PDF below is a better choice. 

CLICK HERE for a file in a universal portable format. 

PRINTABLE NOTES. 


Start by drawing lightly so you can erase later.

BEGINNING
Start by drawing an articulated stick figure, which is a stick figure that has the joints like wrist, elbows, knees.  Use a guideline so the feet both touch the ground on the same plane. The far foot will look higher than the nearer foot.
The head is just a circle at first.

Take your time to make sure you get the pose right. You might need to try a few drawings first to get the position of the arms and legs the way you want them.

After the pose is right, then go around the stick figure to fill out the body, use curved lines to show muscles. Remember to draw lightly.

Then erase the stick figure and leave the outlined shape.

DETAILS
Keep the face simple. The eyes are just a couple of lines, the nose is a triangle, the cheeks are two circles that meet at the base of the nose the ears are triangles on top of the head.
Do the tale last.
The hands are wearing gloves so they are easy and boxy.

ARMOR
Draw the armor around the body. Remember the cat is very flexible so use a lot of smaller pieces overlapping like scales. Use a ruler to keep the lines of the sword straight.

Use shading to give it a complete look and a roundish look. Pick a few things to make dark like boots or gloves or belts so that it will have some interest.

Finish the story. He could be fighting a dragon, protecting a princess cat or cutting his birthday cake, just make sure he is doing something that makes a story out of the picture.

Use the share buttons below to share or to save to your social network so you can find it again. Thank you for your gift.

(c) A. E. Dozat. 6/14/16

Saturday, February 13, 2016

How To Draw A Viking Warrior Worksheet

This printable how to draw a Viking warrior worksheet is a fun project that may be used in class and at home.

The Viking Warrior can be adapted to different scenes, it might be a barbarian or a warrior from any fantasy world.

If you can't get it to print out properly CLICK HERE to visit the  HOW TO PRINT TAB  or try the link below.


How To Draw A Viking Warrior Worksheetby MrAdron.

If you are able won't you consider making a small contribution to support my art? 

Thank you. 


CLICK HERE for a file in PDF format.

PRINTABLE NOTES


Start by drawing lightly so you can erase later.

BEGINNING
Use an articulated stick figure to work out the pose. An articulated stick figure is one with the joints like elbows and knees.  You see in the example the left arm was drawn over since the first pose didn't seem right.
Don't just have him standing there give him some drama by a pose that shows action.
Note that the hand that is raised is palm forward, fingers over and coming down in front and thumb back.

One arm will be hidden by the shield but we draw it anyway so we will know where to put the shield so it looks right.

FATTEN HIM UP
Go around the stick figure to give the arms, legs, and torso some muscles. Use ovals to get the shape of the muscles.
The front of the leg is a straight line.
The knees and hands are boxy and straight lines.
The feet are like triangles.

Erase extra lines and develop the outline of the man.

CLOTHING.
Draw the clothes over the body. Take your time with the clothes. He has a long chainmail shirt over a tunic, he has wool pants, fur-lined boots, a helmet gloves belts, and a pouch.

DETAILS
Keep the face simple. The mustache covers the upper lip and the beard hides most of the face.
Draw the sword as a long line then draw two lines one on each side so it stays even. don't make it too fancy.
Use a lot of short lines going different directions for the fur in the boots and his cloak.
Use a lot of little 'Us' for the chain mail. This will take longer but will make it look good.

(c) Adron D. 2/13/16 


Saturday, January 23, 2016

How To Draw The Devoted Knight Worksheet and lesson

This is a free how-to-draw the Devoted Knight worksheet. 


Here is a little drawing project and free printable worksheet that will make the young artist proud and excited about drawing a picture that is full of meaning and fun.

If you have problems printing CLICK HERE to visit my how-to-print page for some suggestions or try one of the updated links below.

How to Draw the Devoted Knight.


Sometimes it takes me hours but I create these how-to-draw worksheets but I do it so that I can give back because I believe that when you have been given a gift it is so you can be a gift to others, and I hope these worksheets are a means of blessing to you, You are welcome to print as many as you like.


Thank you!

CLICK HERE for a file in PDF format.

PRINTABLE NOTES. 


Start by drawing lightly so you can erase later.

BEGINNING
Start by drawing an articulated stick figure, that is a stick figure that has the joints like wrist, elbows, knees.  Use a guideline so the foot and knee both touch the ground or else one will be higher than the other.
The head is an oval.

Take your time to make sure you get the pose right.

After the pose is made right, draw around the stick figure to fill out the body, use curved lines to show muscles.

DETAILS
The face is in profile start it as a curved line. Halfway down make a guideline for the eyes, below that, make two more for the nose and mouth. Use straight lines to give the face a rugged look. The eye is tilted down and only a little part of the pupil shows under the upper eyelid to make him look like he is looking up.

The hand has the thumb on top and four fingers wrapped around the sword. The back of the hand is slightly curved, the fingers are not the same length. The fingertips are slightly square.

ARMOR
Draw the armor around the body. The elbows and knees are a series of triangles. The shield looks like an upside-down teardrop. Use a ruler to keep the lines of the sword straight. Practice the dragon on a separate piece of paper and trace it onto the shield.

Finish the story. He could be pledging his sword to God, or king, or a beautiful maiden. Work out the story on another piece of paper and then trace in into the picture.

(c) Adron D. 1/23/16

Monday, May 18, 2015

How To Draw A Space Creature With Your Own Ideas.

How to draw a space creature drawing lesson and printable worksheet.


How To Draw A Space Creature Worksheet.


Thank you!

Sometimes, it takes me hours, but I create these how-to-draw worksheets I do it so that I can give back because I believe that when you have been given a gift, it is so you can be a gift to others, and I hope these worksheets are a means of blessing to you.

 If you have problems printing,  CLICK HERE to visit the how to print page for some suggestions or try one of the updated links below.

To try a file in a universal portable format, CLICK HERE.

PRINTABLE PROJECT NOTES

BEGINNINGS
To get ideas, start by drawing shapes randomly on the page, like doodling; in the worksheet, I started with random circles; I admit I had a few ideas about one being the head and another being the body.

DEVELOPMENT
Just like doing connect the dots, start to organize the circles into legs and arms or other parts.

Add variety with contrasting shapes like triangles. I used triangles for a collar or armor-like thing.

For arms or legs start with a stick figure approach to get the position right then go around the stick figure arm to give it thickness and form.

FINISH
Go over the lines that you like and erase the rest. Add things like eye-stalk, ears, wings or sucker cups.

(c) Adron D. 5/18/15

Thursday, February 26, 2015

How To Draw A Robot Dog, Free Printable Worksheet

This is a how-to-draw a robot dog drawing lesson and printable worksheet.

Here is a  how-to-draw a Robot Dog worksheet is a fun project for the young artist that will give an approach in drawing a robot creature.

If you have trouble printing CLICK HERE to visit my how-to-print page for some suggestions..

How to Draw A Robot Dog, Free Worksheet

Sometimes it takes me hours but I create these how to draw worksheets but I do it so that I can give back because I believe that when you have been given a gift it is so you can be a gift to others, and I hope these worksheets are a means of blessing to you. You are welcome to print as many as you like.


Thank you!

CLICK HERE for a link to a file in photo format that may print better.

BEGINNINGS:
Use some basic shapes to work out the ideas. Our example is a beagle like a robot with short legs and a medium body. Use circles to get a rough peanut shape for the body, draw lightly since you will be erasing later. The head starts like a teardrop pointing sideways. Use a stick figure technique to get the legs positioned.

DEVELOPING THE DETAILS:
The body is boxier so go over the peanut shape with some straight lines. Go around the stick figure legs and make them wider. Add circles for nuts, bolts, and for hinges.

DEVELOPING THE HEAD:
Use an oval for the ears. Draw a rectangle for the nose and snout. Sketch a narrower rectangle for the lower jaw. Draw a window for the eyes it could be round or any shape you want.  Go around these basic shapes again to make them look more dog-like but not too much.

DETAILS
Add buttons and knobs and antenna.

SHADING:
Use shading technique to give the robot dog roundness and thickness. The legs and the far side are in shadow and so they are darker. Find some places to make dark for contrast.

(c) Adron D. 2/26/15

Sunday, November 16, 2014

How To Draw A Friendly Human Type Robot. Free printable Drawing Worksheet

How to draw a picture of a friendly robot lesson and printable worksheet.

There are many ways to draw a robot this is an easy approach.

Learning to draw takes practice so do not get discouraged if the project didn't turn out perfect, keep on drawing. If you sketch every day soon you will be making beautiful pictures. I have lots of projects so come back often and try another.

To print the worksheet above just highlight it and send it to your printer or save to your device to print later. If you have problems printing,  CLICK HERE to visit the how to print page for some suggestions.

When you print remember to use the greyscale setting on your printer so you get the shadows.


How To Draw A Friendly Human Type Robot. Printable Worksheet.

Sometimes it takes me hours but I create these how to draw worksheets but I do it so that I can give back because I believe that when you have been given a gift it is so you can be a gift to others, and I hope these worksheets are a means of blessing to you. You are welcome to print as many as you like.


Thank you!

CLICK HERE for a file in photo format that may print better.

BEGINNING
Start with a stick figure but give him elbows and knees. Draw circles for the joints. Draw lightly so you can erase later. Decide on the pose.  Draw a horizontal line to help keep the feet on the same plane and draw the feet as if he is standing on that line.

DEVELOPMENT
When you have the pose how you like it then draw around the figure to give the body thickness.

ROBOT IT
Use rectangles and other shapes to give the figure a robot-like appearance. Try drawing some random lines here and there to make it interesting. Erase any extra lines.

SHADING
Use shading to give the robot a rounder look.

To see more free printable how to draw worksheets click on the label for fantasy in the sidebar. Or choose one from the favorites list on the left.

I hope you create a masterpiece!

© Adron D, 
11/16/14

Wednesday, November 5, 2014

How To Draw A Space Soldier Worksheet, Free and Printable

This is a free how-to-draw worksheet.  How to draw a space soldier. 

This worksheet will help the beginner artist to draw a figure in a space outfit.  There is more than one way to draw a human figure, and this is the simplest.  

ABOUT PRINTING THE FILE BELOW

The free worksheet at the bottom of this post may be printed by highlighting it and sending it to your printer or saving it to your device to be printed later. If you have problems, see the HOW TO PRINT tab for some suggestions.

My how-to-draw worksheets are free, but they take a lot of my time to design and draw. I hope they are useful to you. You may download and print as many as you like.
.


How To Draw A Space Soldier Worksheet. by MrAdron.

My worksheets are free, and you may print as many as you like.  Please use the Paypal button to make a contribution.  Thank you.


Below is a file that may work better on some devices

CLICK HERE for a file in photo format that may work better on some printers.

BEGINNINGS
Start with a stick figure that is articulated at the joints like elbows and knees. At this point, we are just trying to get the pose.

After you are happy with the pose, fill out the body with lines around the stick figure. Imagine the stick figure is a skeleton, and the lines around it are the muscle.

DESIGN TECHNIQUE
Come up with a unique and original suit that is both space suit and armor scribble all over the drawing you have made so far. It is like you are trying to ruin the drawing. Look at the scribbles, then choose the lines that you like. Go over these favorite lines and work them into the suit of space armor.

Erase the extra lines.

FINISHING TOUCHES.
Use random shapes to design a weapon.
Use shadow technique to give roundness.
Use thin, jagged lines for the distant scene.
Use short choppy strokes for the foreground.

To see more free drawing worksheets like this one, see the label for people in the sidebar.

(c) Adron 11/5/14

Bookmark this site so you can come back for other worksheets. 

Monday, March 17, 2014

How To Draw A Chinese Dragon, Free Drawing Worksheet.

Ho to draw a Chinese dragon drawing lesson and printable worksheet.

The free worksheet below and the project notes may be printed by highlighting it and sending to your printer or saving it to your device and printing later.

Parents, teachers, and home school families may find this helpful in class or at home.

The Chinese Dragon is thought to be a creature of mythology so you can make it any way you want since it is very unlikely that someone will come up to you and say, "no that is wrong," since they never saw one so how can they know.

This style of the dragon is drawn as a long serpentine creature with legs.


How To Draw A Chinese Dragon Worksheet by MrAdron.


To print the worksheet above just highlight it and send it to our printer or save to your device to print later. If you have problems see the how to print tab for help.

PROJECT NOTES


BEGINNING
Draw the body as two long twisty lines. Start at the head end and gradually taper the lines to a point at the tail. Make it twisty. Add a third line for the spinal ridge; this third line will cross over from one side to the other to show the dragon is twisting.

LEGS
Position the legs where ever you want. To help get them right start lightly draw them like stick figures. Remember the elbows of the front legs point back and the knees of the back legs point forward. Draw the paws like stick figures too. After you have the legs in the place you want them to then go around the lines to give the legs thickness and the roundness of muscle. Do the same with the claws.

SPINE
The spine has a ridge made of spikes, draw them like small triangles. Follow the third line you drew so the spine ridges cross over. They will face one way and then the other.

HEAD
The head can be the most fun. In our drawing, it is long and narrow. You can sketch it any way you want. Decorate the head with flames and spikes. There is a chin beard, a mane of fire, long flowing whiskers, and long feathery eyebrows.

TAIL
The tale has flowing feathers or flame, they can fan out or form a shape like a paddle.

Add details like scales, flames, smoke, circles and what every you like to make it truly your own.

To see more free how to draw worksheets like this click on the label for dragon in the sidebar.

If your sketch of the Chinese dragon does not turn out the way you had hoped it would do not give up, you are learning. No one is as hard on themselves as a person who has the gift of art because you have the vision in your head and know how you want it to turn out- this shows you are thinking like a real artist.  Drawing takes practice, so come back to my blog every day and print off a few more of my drawing lessons and sketch them in a little while you will be drawing beautiful pictures.

(c) Mr. Adron 3/17/14 

Become a Patron!

Sunday, January 5, 2014

How To Draw A Pirate Treasure Chest Worksheet

How to draw a pirate's treasure chest drawing lesson and printable worksheet.

This fun project will help the young artist gain confidence in his abilities. The free worksheet below may be copied and printed for personal use. Parents and teachers will be able to use this in class and at home. It could be an activity to fill in extra time or given out as a take-home project for the kids to do on their own.

To print the worksheet just highlight it and send it to your printer or save to your device to print later. If you have problems printing this  CLICK HERE to visit the how to print page for some suggestions or try one of the updated links below.


How To Draw A Pirate Treasure Chest, Free Worksheet

Sometimes it takes me hours but I create these how to draw worksheets but I do it so that I can give back because I believe that when you have been given a gift it is so you can be a gift to others, and I hope these worksheets are a means of blessing to you. You are welcome to print as many as you like.


Thank you!

CLICK HERE for a link in a universal portable format- PDF.

If you like this project you might also like to see "how to draw a pirate ship.

YOU MAY PRINT THE PROJECT NOTES BELOW.

START
Begin with a light drawing so you can erase later.  The chest a wooden rectangular box, draw this with nine parallel lines. The lid is two sets of parallel lines and two curved lines they could be a half-circle.

DEVELOPMENT
The chest is made out of wood planks draw these as more parallel lines but they don't need to be perfectly parallel it will give the picture interest. There are metal bands wrapping the chest so draw these vertically over the planks.

DETAILS
Decide where you want to have things hanging over the side and lightly sketch them in. Add the handle on the side and the padlock on the front and the clasp on the top.

FINISHING TOUCHES
The wood has texture add the texture by drawing light scratchy lines across like the grain. The bands have studs; draw them as circles. Keep the treasure simple and just draw a few things and a lot of circles and ovals to indicate coins. Add a few coins on the ground around it. Shadow one side and use shadow inside the lid.


(c) Adron D. 1/5/14

Friday, December 27, 2013

How To Draw A Flying Angel Worksheet

How to draw a picture of a flying angel drawing lesson and printable worksheet.


This printable worksheet is a project that will help the beginner gain confidence in drawing a simple angel in flight; the technique can be adapted to any number of subjects involving the human form.

πŸ‘‰πŸ‘‰πŸ‘‰ SCROLL DOWN TO ACCESS THE FREE PDF.


How To Draw A Flying Angel Worksheet by MrAdron.


Sometimes, it takes me hours to create these how-to-draw worksheets, but I do it so that I can give back. I believe that when you have been given a gift, it is so you can be a gift to others, and I hope these worksheets are a means of blessing to you.

Here is a link to a file that may print better on some devices. It s a PDF.

πŸ‘‰πŸ‘‰πŸ‘‰ CLICK HERE for a PDF file. 


If you have trouble printing the picture, then CLICK HERE to visit my how-to-print page for some suggestions. 

YOU MAY PRINT THE PROJECT NOTES BELOW.


START
Even though we are drawing an angel with wings, we will save the wings until we have worked out the body's position. Use an articulated stick figure with elbows, ankles, wrist, knees, and shoulders to pose the body.  For interest, have the near arm and leg pass over the far one.  Place the trumpet in this first step, so it is positioned well.

BODY
After the stick figure is posed, use ovals and loops to flesh out the body with the curves and contours of muscle. Add the wing nearest you as a triangle that is curved outward at the top point.

DETAILS
The face and hands are hard for some. The eyes are halfway down since the angel is blowing a trumpet to draw her eye closed; it is just a line with a slight downward curve. The mouth is like a sideways "W" with the trumpet in the middle. Draw a curve for the puffed-out cheek.

The hands are easy if you think of them as mittens. The thumb on the near hand is inside toward the face, and it is behind the trumpet. The hand holding the trumpet is like a square with the thumb coming off the side. The far hand is flat, and the thumb is down.

The feet can be hidden inside the long robe if they are too hard to draw. They have a round circle at one end attached to a triangle bent slightly away from the body.

The wings are like triangles with feathers on them. To help space the feathers evenly, mark off the spacing before you draw them in.

FINISHING TOUCHES
Draw the robe as flowing lines that gracefully go around the body.  Add the far wing by drawing only a few feathers showing behind the front wing and the wing's top, giving the far wing less detail than the near one. Draw the headband on the angle. The hair can be flowing waves. If you shadow the far wing, the hair will look brighter.

(c)Adron D. 12/27/13

Tuesday, December 3, 2013

How To Draw A Space Fying Car

How to draw a flying space car drawing lesson and printable worksheet.

This printable worksheet and the how-to-draw lesson are fun projects that will inspire imagination and give the young artist confidence in drawing. 


SCROLL DOWN TO ACCESS THE FREE PDF.


This lesson encourages the young artist to do rough concept drawings first. If your drawing of a flying car does not turn out the way you hoped, do not give up. You are learning, and every time you sketch, you will get better. Sketch every day. Bookmark this blog and come back every day and do another project. Soon, you will be surprised at what a good artist you are.


How to Draw A Flying Car Worksheet.
 Click below to donate. Your gift will enable me to create more, no matter how small. 


Thank you. 

The file above is like a photo, and the link below is to a digital file. One of the two will work for you. 

CLICK HERE for a file in PDF format.

A LITTLE ABOUT PRINTING

To print the free worksheet below just highlight it and send it to your printer or save it to your device to print later. If you have problems printing this, CLICK HERE for some suggestions or try one of the updated links below.

Even though it takes hours, I create these How to Draw Worksheets because I believe that when we have been blessed, it is so that we can become a blessing to others. I hope you enjoy these projects and they help you.


Do some concept drawings first on a separate piece of paper. Start with the basic shape of a car or a rectangle. Draw lightly so you can erase later.

Roughly sketch in some of the shapes of an airplane, like the rudder stabilizer, and cockpit.

You can experiment with random shapes; after you sketch a few shapes over the design ask yourself what that looks like and work it in. An oval on the side could be a rotor or a jet engine.

After you have gotten your ideas worked out then you can put them together for your final project.

Use shadows to give it roundness, draw a background and create a world or city for it.

These worksheets are free to print but your small gift will help keep this blog going. 

I hope you create a masterpiece!

(c) Adron D. 2/3/13

Tuesday, November 19, 2013

How To Draw A Young Elf Warrior

How to draw the face of an Elf drawing lesson and printable worksheet.


This printable how to draw worksheet is a simple face at the three-quarter view. Parents, teachers, and homeschool families may print this how-to-draw lesson for personal or class use.


How To Draw The Young Elf Worksheet.

Sometimes it takes me hours, but I create these how to draw worksheets, but I do it so that I can give back because I believe that when you have been given a gift, it is so you can be a gift to others, and I hope these worksheets are a means of blessing to you.


YOU MAY PRINT THE PROJECT NOTES BELOW.


The elf youth has a slightly larger forehead and smaller chin.

BEGINNINGS
Start with a circle, then below the circle, draw a triangle for the jaw and chin. Use guidelines to keep things even; one guideline will go down the face a little over from the center since the face is slightly turned away. Use a guideline for the eyes a little lower than halfway down the face. The nose is about halfway from the eyes to the chin.

DETAILS
The eyes are almond-shaped and a little pointed up on the outside.

The nose is like a ball with a little ball next to it. Use a line to connect the nose to the eyebrow on one side.

The mouth is just three lines. The upper lip is stretched into a smile and is only a straight line across the face close to the nose. The lower lip is two curved lines.

The ears are triangles that point up and outward.

The neck on one side is a straight line that is in line with the nose going down. The neck on the other side starts at the ear and goes down until it curves into the shoulder.

FINISHING TOUCHES.
After you have a nice face, draw the shirt and the hat. Add shadows to give the features roundness. The hair and eyebrows are last.


Illustration for How To Draw a Young Elf Warrior. by MrAdron.

To find more drawing projects like this, click on the label for people, face, or fantasy in the sidebar.

(c) Adron 11/19/13

Sunday, November 10, 2013

Beginning Lesson For Drawing Cartoon Characters, Worksheet

How to draw cartoon characters lesson and printable worksheets. 

How to draw cartoon characters worksheet teaches the beginning artist to draw expressive characters. The purpose is to keep things simple at first and leave out anything that is not necessary. This exercise helps to practice drawing expressive eyes.

If you have problems making the worksheet below print then see the HOW TO PRINT tab for some suggestions. 

YOU CAN HELP

I do not charge you to print my worksheets, so you may print as many as you need. If you are able, won’t you please consider making a small contribution to support my art? Please click HERE and enter an amount that best shows how much you appreciate having these available. 
Thank you.  


How To Draw Cartoon Characters Worksheet.


Sometimes it takes me hours but I create these how to draw worksheets but I do it so that I can give back because I believe when you have been given a gift it is so you can be a gift to others, and I hope these worksheets are a means of blessing to you.


YOU MAY PRINT THE PROJECT NOTES BELOW.

Our characters are shaped like gourds or rocks or water bubbles, with eyes.

Draw two circles a large one and a smaller one above it. Outline the circles to make a gourd shape. Add feet like blobs or peanut shapes if you like, this gives the opportunity to practice basic body pose.

EYES
Our gourd people are all about eyes. Draw different eyes to express different emotions and feelings. Example...

     Surprise: Two circles side by side with black dots in the center. Eyebrows are high.
     Disgust:  The top of the eye is a low curve and a half dot under each. Eyebrows are low.
     Worry Eyes curved at the top, Dots to the side. Eyebrows to the side slightly.
     Curiosity: The eyes are wide open the dots to the side, eyebrows are high.
     Anger: Eyes tilt down leaning toward the middle, with a half dot under the eyelid.
     Embarrassment: Dot in the middle and outline at the sides.

BODY LANGUAGE
Try different gourd shapes to express emotion.

You might like to look at my other lessons, how to draw funny letters. and How to Draw Mushroom People

(c) Adron 11/10/13

Tuesday, November 5, 2013

How to Draw A Spaceship Worksheet. Space Scout Ship.

How to draw a spaceship drawing lesson and printable worksheet.

This is an easy project for young artists.  It is fun to draw spaceships and imagine what the future will be like. This project is how to draw a Space Scout Ship that is supposed to be fast and ready for adventure.

Parents, teachers, and homeschool families will find many ways to use this in class and at home.


How To Draw A Space Ship Worksheet

My how-to-draw worksheets are free, and you may print as many as you like.  Please use the Paypal button to make a donation. 


Thank You. 

To print the free worksheet above, just highlight it and send it to your printer or save it to your device to print later. If you have problems printing, then visit the how to print tab for some suggestions.

I have other spaceship projects; search for them in the sidebar.

YOU MAY PRINT THE PROJECT NOTES BELOW.


Start with a basic design. It is good to work out ideas on something that you can throw away when you are finished.

Our design is the classic rocket design with a teardrop shape.  Use a guideline down the center to help keep things even on both sides. Use guidelines to keep the front and rear of the fins even. You will erase these guidelines later.

The scout ship has four wings or fins, with a rocket and motor on each one. Use the guidelines to keep them even. The fins taper down and back. The rockets are long cylinders with a point at one end and a ball shape where the rocket fire comes out. Trace coins or buttons to get the circles right. You might want to draw one and then trace it each time for all the rest.

Add details. If you want to have windows or doors, keep them small, making the spaceship look big. Add a few flames at the bottom of the rockets. Have laser guns poking out or a landing dock.

Use shadow to make it look round.

(c) Adron. 11/5/13

Sunday, October 13, 2013

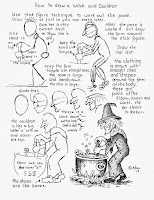
How To Draw A Witch And Cauldron Worksheet

How to draw a witch and a cauldron drawing lesson and printable worksheet.

This printable drawing worksheet is project will help the young artists to develop character and expression in their drawing.

Parents and teachers will find many ways to use this project to encourage young artists and give them confidence.


Printable How To Draw a Witch Worksheet.


Sometimes it takes me hours, but I create these how-to-draw worksheets I do it so that I can give back because I believe that when you have been given a gift, it is so you can be a gift to others, and I hope these worksheets are a means of blessing to you. Thank you!

Some printers work better with a PDF format. CLICK HERE to go to a copy in PDF

To print the worksheet above just highlight it and send it to your printer or save it to your device to print later. Some printers work better if you drag the image to your desktop and print from there. If you have problems  CLICK HERE to visit the how to print page for some suggestions. Below are some links to other file formats that may work if this one doesn't.

YOU MAY PRINT THE PROJECT NOTES BELOW.

TIP: save the fun stuff for last like the hat and the cauldron.

The challenge is to pose her as an old person stirring the pot so the hands show in a way that explains what she is doing.

BEGINNINGS
Use a stick figure technique to work out the pose so one hand is at the middle of the stirring ladle and the other is on top this way you show both hands. In the same way, put one foot behind the other.

The stick figure should have a very curved back since she is old. Use circles to indicate the location of elbows, shoulders knees, and hips.

After the stick figure is satisfactory draw the form around the lines.

FACE
We keep the face simple and use choppy straight lines to give it character. Lightly draw an oval for the head. Use a guideline halfway down going across to place the eyes, another guideline halfway between the first guideline and the chin for the mouth.
     * The nose is large and bends down. The upper lip is two lines like a < under the nose.
     * The lower lip is like the letter C.
     * The mouth is two straight lines the first going back and the second short one tips up.
     * The chin is long and sticks down, it is three or four straight lines going down under and back.
     * The eye is looking down, the eyelid is one line curving down like an upside-down rainbow with a half-circle near the nose for the eye.
     * Put wrinkles under the eye, and outside the eye, outside the mouth, and under the cheek.
     * Don't forget a few warts and stray hairs on the chin.
     * Draw the hair last as a few straight lines going outward.

HANDS
Keep the hands simple. Use straight lines. The lower one is closer to the viewer and the back of the hand is drawn as a square with three short lines that indicate the fingers. The thumb is on the top and goes behind the ladle.
The far hand is on top of the ladle. Draw the thumb inside toward the witch and the fingers on the far side.

SHOES
She wears boots, draw them like boxes on her feet with rectangles for the heals.

CAULDRON AND CLOTHING
Now the fun and easy stuff. The cauldron is a half-circle with an oval for the top. It is on logs that are circles on the ends of rectangles. The fire is wiggly lines. Make the cauldron dark so the fire shows up. Use shading technique to give it roundness, by making the edged darker than the center.

Draw the clothing with straight lines and drape the clothing around the form by drawing around the stick figure. There will be wrinkles and folds where the elbows, waist and knees create angles in the clothing. The far sleeve is in shadow so it looks away from the near sleeve. Give her a scarf or shawl on the shoulder draping down the back or front.

I hope you create a masterpiece!

(c) Adron D. 10/13/13
How To Draw A Witch