Sunday, August 25, 2013

How to Draw The Ancient Roman Pillars Worksheet

How to draw the ancient Roman pillars drawing lesson and worksheet.


👇👇👇 SCROLL DOWN TO ACCESS THE FREE PDF. ðŸ‘‡ðŸ‘‡ðŸ‘‡

This worksheet will give the young artist confidence in drawing a classic scene that can be adapted to many themes. The nice thing is that since we are drawing ruins, things do not need to be perfect- in fact, if they are a little off, it is better.


How to Draw Ancient Roman Pillars Worksheet.

You do not need to make a donation to download the worksheet. But if you would like to, you may use the donate button below. 

If your printer is better with PDF, then CLICK HERE to go to a PDF file.

If you have problems printing, CLICK HERE to see the how-to print page above for some suggestions. Below are a couple of links to this image in different formats, in case your printer has trouble with the original.

You can print the project notes below.


DRAWING TIP: If you have lined paper or a grid paper, put it underneath to see it through the paper; that way, you can line things up straight.

BACKGROUND
Part of the scene is the Mediterranean landscape, so lightly draw a hilly horizon and some hills with a village or a farm. Keep it light and faint, so it looks far away.

PILLARS
The pillars are thin rectangles of different heights. Arrange them, so they are interesting. The eye-level is middle, so the top of the pillar curves downward, and the bottoms curve upward.  The short pillar is seen from slightly above, so the top looks like an oval. They stand on blocks that look like rectangles. About eight lines go up and down the pillars; the lines get closer together toward both outside edges. There are divisions across the pillars at even spaces; keep them the same on all the pillars. The bottom has a ring that uses curved lines to draw it. The top is shaped with curved lines like six or eight-letter "u" in a row. Make some of the lines inside the pillars to be broken or scruffy, so they look ancient.

THE BASE
The pillars are on a sill of sorts, so draw a large rectangle on the bottom and divide it into squares.

THE TILE FLOOR
The floor tiles do not look square; the lines go closer together as they go back. Weeds are growing up between them, and some are cracked.

SHADOWS
The light is coming from one side, so the shadows are all on the other side. The shadows get darker as they go around the pillars.

FUN DETAILS
Make some cracks and some chips on the pillars and things. Throw in some weeds and bushes, even an old tree.

(c) A. E. Dozat. 8/25/13

Thursday, August 22, 2013

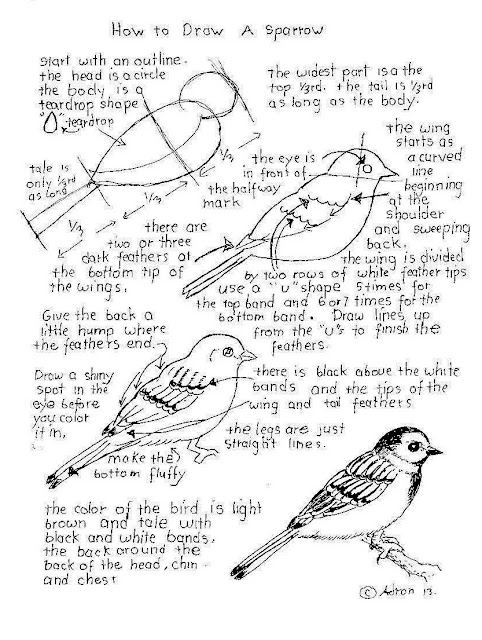
How To Draw a Sparrow, Worksheet and lesson.

How to draw a sparrow drawing lesson and printable worksheet.

This free how-to-draw a sparrow worksheet will help give young artists confidence in drawing and enable them to create something they can be proud of. Parents, teachers, and homeschool communities may print the worksheet at the bottom and the project notes below for class use and personal fun.


If you like this, you might also like how to draw a robin.

PRINT THE WORKSHEET

If you have trouble making the worksheet below print or are printing on A-4 sized paper, then CLICK HERE to visit my how-to-print page for some suggestions. 
How To Draw a Sparrow Worksheet.


Thank you!


Sometimes I spend hours creating these how-to-draw worksheets, but I do it to give back because I believe that when you have been given a gift, it is so you can be a gift to others, and I hope these worksheets are a means of blessing to you. You are welcome to print as many of my worksheets as you like.

You may want to print the project notes below.

BEGINNING
The sparrow is a small bird. The body is shaped like a teardrop. Start by drawing an outline of the bird as a circle for the head and a teardrop shape for the body. The tail is 1/3rd as long as the body, begin it as a couple of straight lines.

WING
The wing starts as a curved line beginning at the shoulder and sweeping across the center of the bird lengthwise and coming to a point above the base of the tail. The wing is divided by two bands of white feather tips. Use a "U" shape five times for the upper band and again seven times for the lower band. Draw lines up for the feathers. The white has a black top edge.

HEAD
The head is simple; the beak is a short triangle, and the eye is a little forward of center. The eye is black, but leave a little shiny spot in it by outlining the shiny spot before you black in the eye.

BODY
The body has fluffy feathers so draw the tummy soft and with short lines.

The tail is 1/3rd as long as the body it is three or four lines that are dark and have black tips.

The legs and feet are just straight lines. The leg bends backward.

COLOR
The color of the bird is light brown on the wings and tail with black and white sports. There is black around the back of the head and on the chin down to the chest.

(c) Mr. Adron 8/22/13

Wednesday, August 14, 2013

How To Draw A Pirate Flag Worksheet

How to draw a pirate flag drawing lesson and printable worksheet.

The free printable worksheet below is a popular image that is fun to use and draw.  Parents, teachers, and homeschoolers are welcome to use this for personal and class use.


How To Draw A Pirate Flag Worksheet


Sometimes it takes me hours, but I create these how-to-draw worksheets I do it so that I can give back because I believe that when you have been given a gift, it is so you can be a gift to others, and I hope these worksheets are a means of blessing to you. You are welcome to print as many as you like. Thank you!

Some printers are better with a PDF image format. For PDF, CLICK HERE.

To print the free worksheet, highlight it and send it to your printer or save it to your device to print later. Some printers work better if you first drag it off to the desktop and print from there. If you have problems printing, CLICK HERE to visit the how-to-print page for suggestions.

You may print the project notes below.

OVERVIEW
Learning to draw takes practice, so if you draw every day, you will get better. If your first sketch doesn't come out the way you expected, do not give up, you are learning, and your next picture will be better. I have a lot of how-to-draw worksheets, so come back every day for a while and do a few. You will be surprised at how good an artist you will be.

DRAWING TIP
Draw the skull and crossbones first, then draw the flag around them.

SKULL
The skull starts as a circle, and a large letter "U" for the jaw below. Use a guideline up and down the center to keep things straight.

The eyes are two circles at the center of the head. The nose is a triangle going between the eyes and down to the upper jaw, and then it finishes as an upside-down heart. Use the big circle to start the cheeks. The cheeks wrap around the bottom half of the eyes. The teeth are half way between the nose and the bottom of the jaw, use a guideline across to keep them even but they don't really need to be even. Draw the four in the front on the top and bottom carefully. but the ones on the sides are around the side, and you don't see them. They are just a little line going up and down.

BONES
The crossed bones are two parallel straight lines with circles on the ends. These leg bones have a large circle on the side of the top for the hip joint.

DRESS IT UP
Dress up the skull with a hat or bandanna. Give him an eye patch (If you have trouble drawing the eye, sometimes an eye patch covers up a mistake. Draw a dagger in his mouth.

Some flags had crossed swords instead of bones.

FLAG
After you draw the skull and crossbones, draw the black flag around them. Make the edge tattered and torn. Put a few cannon holes in it.

Take your time, and it will spread fear wherever you hang it.

Click this link to see how to draw a pirate ship.

(c) Mr Adron D. 8/14/13

Thursday, August 8, 2013

How To Draw An Angelfish Worksheet

How to draw an angelfish drawing lesson and printable worksheet.

How to draw an Angelfish worksheet. This free-to-print worksheet is easy to follow and gives the young artist satisfaction in doing a beautiful picture. Parents and teachers will be able to use it in class and at home. It can be used as an art lesson by itself or as an extra activity, or as a handout to do on one's own time.


How to Draw an Angelfish Worksheet 

To print the free how-to print worksheet above, just highlight it and send it to your printer or save it to your device to print later. If you have problems, see the how-to print tab above.


Thank You!

You may want to print the project notes below.


OUTLINE
Start by lightly drawing the outline, use basic shapes to get the design right. The body is shaped like a sideways teardrop. The tail starts as a triangle, the top and bottom fin start out as a triangle.

ADDING FORM
The lines of the fins and tail taper and flow to the back with a curve. The tail curves gently and has long spikes on the top and bottom. The head is like a rounded bump at the front of the fish. The eye is a circle at the head. The mouth is open with a longer upper lip and a shorter lower lip.  The fin on the side is an irregular rectangle; two long feather-like fins under the front flow backward.

DETAILS
There is a half-circle for the gill but flat at the top. The upper jaw has a ridge; draw it as a slight line over the mouth. There are lots of bones in the fins; take your time and draw them carefully and slowly. The eye is a black dot inside a round circle.

STRIPES
The first black stripe goes right across the eye and down to the bottom. The second stripe is a third of the way back; it is narrow. The third stripe is widest, and ii is at the back third; it continues up into the top and down into the bottom fin. There are faint stripes on the tail and on the fins.

CAREFUL
If you add scales, take your time, draw careful rows of straight lines, and then turn them into scales.

(c) Mr. Adron 8/8/13

Wednesday, August 7, 2013

How To Draw A Birdbath Worksheet

How to draw a birdbath drawing lesson and printable worksheet.

How to draw a birdbath is an easy project for the young artist and will give much satisfaction.

Parents, home school families, and teachers may print a copy for personal and classroom use; just highlight the worksheet and the project notes and send to your computer or save them to your device.

To print the worksheet below, just highlight it and send it to your printer or save it to your device to print later. If you have problems,  CLICK HERE to visit the how to print page for some suggestions or try the updated link below.

How To Draw A Birdbath Worksheet 

My how-to-draw worksheets are free, so print as many as you need.  I only ask that you consider making a small contribution to support my art if you can. Your gift will let me know you appreciate these, and I will be able to create more.


Thank you

Here are two links that may work better on some printers.

CLICK HERE for a link to a file in a portable format (PDF).

You may want to print the project notes below, too. Start by drawing a guideline down the center to give balance and to help keep things even. Then using basic shapes of circles and ovals, draw the top and base of the birdbath. All the top and bottom curves should match, so don't draw a curved bowl and straight lines elsewhere. The body of the pedestal is shaped like a teardrop.  It helps to draw from the top down a little on each side as you measure against the guideline.

Add decorations, like leaves or shapes. Use a guideline to keep the decorations following the same curves as the top bowl.

Using shading will give the effect of the birdbath being round and three-dimensional.

Put the birdbath in a scene like a garden by adding flowers around the bottom. Put a wall or fence behind it. Add bushes behind the wall and trees behind the fence. Bushes and leaves can give a contrasting effect against the smooth stone of the birdbath.

I hope you create a masterpiece.

(c) Mr. Adron D. 8/7/13

Monday, July 29, 2013

How To Draw An old Time Car Worksheet

How to draw an old-time car drawing lesson and printable worksheet.

This how-to-draw an old-time car is a great way to give the young artist confidence in drawing. It uses a few basic shapes to develop the design.

👇👇👇 SCROLL DOWN TO ACCESS THE FREE PDF. ðŸ‘‡ðŸ‘‡ðŸ‘‡

Parents, homeschool classes, and teachers may print this for personal and class use.

PRINT THE WORKSHEET

If you have trouble making the worksheet below print or are printing on A-4 sized paper, then CLICK HERE to visit my how-to-print page for some suggestions. 


How to Draw an Old Time Car Worksheet

 Use the Paypal button to make your donation. 


Thank you!

Here is a link that has been modified to print better.

CLICK HERE for a file in a universal portable format (PDF).

You may want to print the project notes below.

OVERVIEW
Learning how to draw takes practice, so come back every day and choose a few how to draw worksheets, and in no time, you will be a good artist. If your first pictures do not turn out like you hoped, do not get discouraged because you will be learning things, and your next picture will be better. I have a lot of drawing projects for the young artist so try a few.

NOTE
This drawing is in 3/4 view, so we see a little of the side and the front.

BASIC SHAPE
Use basic shapes to form the outline of the old-time car. A square for the body of the cab and a smaller square for the engine cover. There is a triangle shape on the top front of the engine. Divide the squares into rectangles going up. Add the circles for the wheels. Draw a line across the ground to keep the wheels even.

ADD DETAILS
There are windows on the front and two on the side. You can see inside through the window, so put something in there. There is an oval window on the inside back. The seat is four diagonal lines. There is a triangle connecting wheels under the front. The front-engine has a square with some lines, and the side of the engine has five short lines going down for air vents.  The headlights are ovals.

FENDERS
Draw the lines that round off the fenders. It is two lines that go over each wheel and across the lower part of the body.

WHEELS
Each wheel is three large circles; two are narrow for the iron rim, and one is wider for the rubber tire. There is a round hub in the center. Each wheel has twelve wooden spokes. Mark them off around the rim lightly before you draw them in. it will look like a clock face at first.

Take your time, and you will have a drawing you will be proud of.

(c) Mr. Adron D. 7/29/13

Tuesday, July 23, 2013

How To Draw A Flamingo Worksheet and Lesson

How to draw a flamingo drawing lesson and printable worksheet.


This how-to-draw a flamingo is an easy printable drawing lesson that will give the young artist confidence. A few curved and straight lines are all it takes to draw a beautiful flamingo.


Free How to Draw A Flamingo Worksheet


My how-to-draw lesson worksheets are free; you can download and print as many as you like. Please consider contributing through PayPal so I can continue to create these for you. Thank you.

You may print the worksheet and project notes by highlighting them and sending them to your printer or saving them to your device for reference later. 

If you have problems making it print, CLICK HERE to visit the how-to-print page for suggestions.

You can print the project notes below, too.

Start drawing lightly so you can erase the unnecessary lines later. 

Begin with the arch of the back. Make the arch slope outward toward the tail. The back or top line of the neck is just as long as the back and may curve like an "S." Use a circle to get the size and shape of the head. The line of the bottom of the neck curves all the way down and continues to the tail.

The beak is big. Draw a rectangle on the front of the head and then a triangle going down.

The legs are as long as the body. They start halfway on the body and halfway down is the knees.

After you have the basic outline of the body, then add the details.

The eye is slightly forward on the head; it is small and has a dot in the middle.

The beak is black at the triangle part. There is a line from the top end of the beak to the bottom of the eye.

The feathers sweep down and back on the body. There is a dark line of feathers low on the body.

The tail feathers droop down at the end.

The feet are webbed, with three toes.

(c) Mr.Adron 7/23/2

Saturday, July 20, 2013

How To Draw A Troll's Face Worksheet

I am glad to share with you my how-to-draw a troll's face drawing lesson and printable worksheet.

Drawing a troll's face is an easy drawing project that will allow the young artist to explore his creativity since it is a fantasy creature.

ABOUT PRINTING

This worksheet may be printed by highlighting it and sending it to your printer. If you have problems printing it, CLICK HERE to visit my how-to-print page for some printing tips. 

FIRST, A WORD OF ENCOURAGEMENT: If your drawing of a troll's face does not turn out the way you hoped, do not give up- no one is as critical of their work as much as a true artist!. Learning to draw takes practice, so draw every day and come back and print another worksheet. Soon you will be an artist. Try different projects and draw a lot of different stuff. I have many worksheets to choose from, so do something different every day, and soon you will find what your talent is.

How to Draw a Troll's face, Worksheet


To see more projects like this, search the labels in the sidebar.

You may want to print the project notes below, too.

Start with a large circle for the basic shape. Lightly draw guidelines to help keep things even. One guideline up and down the middle and three dividing the face into quarters. Add a huge "U" for the chin. Draw the cheeks out a little and the side of the face near the eyes in a little.

     * The eyes are small and high up on the face.
     * The nose is turned up. It looks like an arch with two triangles under it.
     * The mouth is huge. It is three lines shaped like a "W" on the bottom and two "M's" on top.
     * Draw tusks like long triangles coming out of his mouth they can point up or down.
     * Make the ears point up.
     * Give him bushy eyebrows.
     * Give him four of five warts, spread them around on the head, cheek, chin, and maybe the nose.
     * Give him a few hairs on the top of the head and on the chin.
     * Do not give him a neck; just draw the shoulders high up by the mouth or ears.

Use shading to make a face look three-dimensional. Shade the area around the eyes and between the nose, under the jaw, under the chin, and under the lower lip.


These are free to print, but your small gift will help me keep this blog going. Choose your gift amount.


Use the share buttons below to share this. Thank you.
(c) Mr. Adron 7/20/13

Sunday, July 14, 2013

How To Draw A Beta Fish Worksheet

How to draw a beta fish drawing lesson and printable worksheet.

How to draw a Beta Fish is an easy printable drawing lesson that a young or beginning artist can do and be proud of. 

YOU CAN HELP

My how to draw worksheets are free and you may print as many as you like. I only ask that if you are able that you make a small contribution to support this blog. Click on the DONATE tab to learn more.


How To Draw A Beta Fish Worksheet by MrAdron.

If you have problems printing this see the how to print tab above.

To see more projects like this search the labels in the sidebar.

You may want to print the project notes below, too.

THE BASIC BODY SHAPE
Start with a pencil and draw lightly so you can erase later. Draw the basic body like a teardrop sideways, the head is wider and the tail end is narrow and almost comes to a point.

FINS
On the beta, the fins can go any way you want. Start with a long sweeping curved line to make a half-circle for the tail. Draw sweeping curved lines on the top and the bottom of the body for the front and back of the two big fins. The edges of these fins have zig-zag line shapes.

DETAILS
There is a small fin on the side, draw it with a curved line for the outside edge and two curving lines on the top and bottom going forward like a slight triangle but not touching.
The gill is a curved line.
There is a jaw bone below the eye it is a curved line.
The eye is two circles one inside the other. Fill in the inside circle but leave a little white spot somewhere.
The moth looks like a frown.
The nose curves upward slightly

SCALES.
Lightly draw five to seven guidelines from the head to the tail for the scales, this will keep them in even rows. After you have the guideline draw the scales in even rows from the top to the bottom, each scale is a half-circle.

DETAIL THE FINS
The fins have thin bony ridges. Where the fin meets the body carefully mark off even spaces for the ridges before your draw them this keeps them even. After marking them off then slowly and carefully draw the ribs following the curve of the fins.


(c) Mr. Adron 7/14/13

Saturday, July 6, 2013

How To Draw a Buck Deer With Antlers, Worksheet

How to Draw A Buck Deer With Antlers is a free how-to-draw worksheet and art lesson.


It may be printed by parents, teachers, and homeschool families for class and personal use.

If you have problems printing see the "HOW TO PRINT" tab above.

YOU CAN HELP

It takes hours to create one of these printable art lessons for you. I make them for you for free, but if you can make a small contribution through the PayPal button, it would be appreciated. Your small gift will help me keep this going.

How to Draw a Buck Deer With Antlers Worksheet.by MrAdron.


To see more projects like this, search the labels in the sidebar.

PROJECT NOTES


There are many types of deer. This is a very basic drawing that you can adapt as you need.

BEGIN
Draw a rough outline lightly in pencil first. The head is like a teardrop upside down, narrow a the bottom and wider at the top. Use guidelines up and down and across the center to help keep things even.

The ears are at the top of the head in front of the antlers. They look like big spoons slightly diamond-shaped.

THE ANTLERS
The antlers go out and up. The first line is the bottom of each side, it goes out and up and ends in two points like a letter "Y." The other three points are in a row. Two are right at the top of the head. The others are near the end, draw them behind the "Y" point.

THE FACE
The eyes are a little higher than halfway from the bottom. They start as two rainbow shapes pointing outward, then two rainbow shapes pointing downward. The eyeball is a bent line going outward and back in, It looks like a fancy teardrop pointing inward.

The nose is flat on the top and has a black shape like an hourglass in the middle and a black square outline.

The mouth is a straight line with a little downward turn at the very ends.

The four points away from the center. There is white around the eyes, inside the ears, around the nose, and across the brow.

(c) Mr. Adron 7/6/13

Would you kindly make a small contribution so that I can continue to create these for you? Click on the Paypal button or the DONATE tab and choose an option that shows your appreciation.  Thank you.