Tuesday, September 27, 2011

How to Draw a Lighthouse,

How to draw a lighthouse.

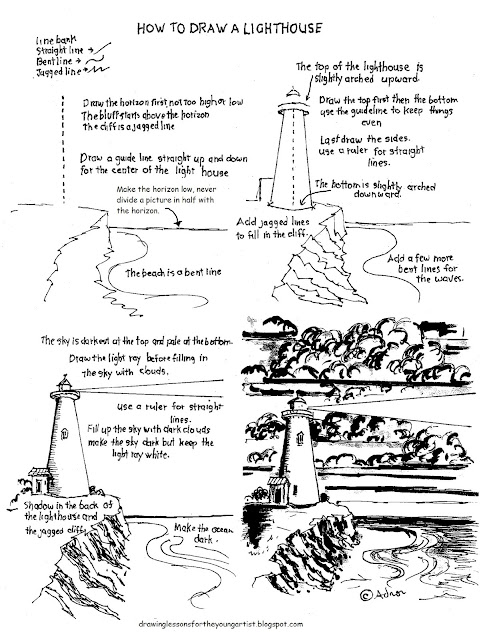
I am glad to share this free printable How To Draw A Lighthouse Worksheet.


It is a simple picture of a lighthouse and is easy to draw. You only need to know how to draw a straight line with a ruler, how to draw jagged lines like lightning bolts, and how to draw curvy lines.

 If you have problems,  CLICK HERE to visit the how to print page for suggestions or try one of the updated files below.

Printable How to Draw a Lighthouse Worksheet


Even though it takes hours, I am glad to draw these How to Draw Worksheets because I believe that when we have been blessed, it is so that we can become a blessing to others. I hope you enjoy these projects and they help you.


Here is a file that I updated to PDF; it should be more printer-friendly.

CLICK HERE for a PDF formatted file.

PRINTABLE LESSON NOTES


BEGINNINGS
Draw the horizon first, do not make it too high or too low, and avoid putting it in the middle.

The bluff starts a little above the horizon. The cliff starts as a jagged line. The beach begins as a bent line. Draw a guideline straight up and down for the center of the lighthouse.

DETAILS
The top of the lighthouse is slightly arched upward. The bottom is somewhat arched downward. Draw the top first, then the bottom, use the guideline you drew to keep things even. Lastly, draw the sides- use a ruler for straight lines.  Use jagged lines to fill in the cliff. Add a few more bent lines for the waves.

Draw the light ray before filling in the sky, be careful that you don't draw over it when you fill in the clouds.

SKY
Fill up the sky with dark clouds make the sky dark but keep the light ray white. Use curvy lines for the tops of the clouds and straight lines for the bottoms. Shadow in the back of the lighthouse and the jagged cliffs keep the cliffs irregular and interesting. Make the ocean dark. The sky is darkest at the top and pales at the bottom. Leave parts of the ocean pale for the waves by the beach.
I did this drawing in 20 minutes with ink markers.  If you take your time, yours will look much better than mine.

Example of how to draw a lighthouse
(c) Adron D. 9/27/11

I hope you draw a masterpiece. 


Become a Patron!

Tuesday, September 20, 2011

How to Draw a Black Cat on a Fence

This is a free how to draw a black cat on a fenceWorksheet and drawing lesson.


It is a free printable worksheet that makes drawing a cat easy. If you make a mistake, just go over it and make it a black cat.

If you have any problems making the image below print, CLICK HERE to visit my how-to-print page for some suggestions.


How to draw a cat worksheet. (c) Adron 2011

These worksheets are free to print but your gift will help keep this blog going


Thank you!

BEGINNING
Start with the body by drawing a rectangle. Below that rectangle, draw a guideline for the top of the fence. The neck is a large triangle. Start the head with a medium circle halfway over the neck triangle the muzzle or nose is a smaller circle at the bottom of the head circle.

The hind leg is like a half-circle, and two lines going down, they are closer at the paw than at the knee. The other hind leg is almost the same. The front legs are straight lines but narrower at the paw. Make sure the paws meet the top of the fence.

DETAILS
The ears are triangles on top of the head, and they point forward.  Erase the extra lines

The tail is up but not perfectly straight so give it a curve. The shoulder and hip are slightly arched.

COLORING
Don't color him black too grey, so then you can add black for the darker shadow. I didn't draw the whiskers since he is so small in my drawing; if you draw on a large paper you have more opportunity to add detail.

Finish the fence and add the background. You don't have to put him on a fence; you can just as easily draw him walking on a tree branch or top of a car or the kitchen counter.

Have fun.

I did this drawing with markers. Some of the markers were fine-tipped, and some were broad. I use some markers that are light grey, medium grey, and dark grey. When you use a variety of pens it makes a more interesting picture. I kept the background simple, so the cat is the focus. I was thrilled with the fence since I shaded around it so the fence will look white.


Example of how to draw a cat on a fence. (c) Adron  2011
(c) Adron

Sunday, September 18, 2011

How to draw the face of the old Cowboy

I am glad to share this is a free how-to-draw the face of the old cowboy lesson and worksheet.

This free printable worksheet is an easy project that will give satisfaction to any young artist. The face of the old cowboy is full of character.

ABOUT PRINTING

If you have trouble printing this worksheet, CLICK HERE to visit my how to print page, where I have collected some suggestions that may help. Or try one of the updated files below the image.


How to draw the face of the old cowboy.

I am happy to create these how-to-draw lessons for you. I hope you like them.


Here is a file that may work better on some printers; it is a PDF.

CLICK HERE for a file in PDF format.

I had lots of fun drawing the face of this old cowboy with the big mustache and the big hat.

Start with a lightly drawn outline. Make the outline by drawing a circle and a square shape for the jaw. Mark lightly reference lines for the eyes, nose, and mouth. The eyes are halfway from the crown of the head to the chin.
Make reference marks for the outside and inside of the eyes. Pay attention that you don’t make them too close or too wide apart, and they are even.  Draw the two circles for the eyes.

Shape the ears like large peanuts.

The mustache is big. It is like a rainbow; it covers all upper lip, so only part of the lower lip shows.

The lower lip is shaped like a “W” but more rounded.

The nose is a big letter “U” dipping over the mustache.  Just outline the mustache for now; keep it simple and white. Round off the jaw.

Develop the eyes and features of the face.  Add the coat; the collar comes right up to the ears. Erase the reference lines.

Outline the hat keep it simple and low over the forehead.

Draw eyelids over the eyes.  Add eyebrows.

Continue to add details and shadows. Remember, the source of the sun and the shade is opposite. Add some balancing dark areas on the other side, like in the background or the jacket; it is your drawing, so do it any way you want. I drew mine with a fine tip marker and gray marker pens, but you can use any medium. If you use colored pencils, remember to make his face sunburned but keep the mustache white with only a little shadow on the shady side.

An example of how to draw the Old Cowboy. (c) Adron 2011
How to draw the old cowboy

I did this finished drawing with gray markers and sharpies.


(c) Adron 9/18/11

Wednesday, September 14, 2011

How to Draw A Sunflower, Lesson For Young Artist

This is a free how-to draw a sunflower worksheet.

I designed this as a handout for my young art friends. It is an easy project and will give the young artist confidence in drawing. Parents and teachers will be able to use this in class and at home.

Remember, learning to draw takes practice, so don't give up if your work is not perfect. Just draw every day, and soon you will be making beautiful pictures.

PRINT THE WORKSHEET

If you have trouble making the worksheet below print or are printing on A-4 sized paper, then CLICK HERE to visit my how-to-print page for some suggestions. 


How to draw a sunflower worksheet (c) Adron 2011


Thank you!

The image file above is like a scan, and the file below is digital. 

CLICK HERE for a file in PDF format.

PRINTABLE LESSON NOTES


SHAPE BANK
The shape bank is simple. If you can draw a circle, a few straight lines, some triangles, and teardrops, then you can draw a lovely sunflower or even a field of them.

BEGINNINGS
Start with two circles, one inside the other like a doughnut. Draw them lightly with a hard pencil like a 2h or 2b to be erased later on. Draw the first 4 petals like triangles. They should start on the inside circle and the point touch the outside circle. Draw them like the points on a compass using the circles as guidelines. These first 4 helps to keep the spacing of the petals evenly spaced. Now begin to fill in the petals between the first four by adding triangles.

DEVELOP FORM
Fill in the second row of petals between the ones you already drew, so they look like a back row behind the first ones. Now you can erase the outside circle.

 The leaves are shaped like giant teardrops. Draw them lightly and then go over the leaves to make jagged zig-zag edges.

 The middle of the sunflower is full of seeds. Take your time and draw lots of little circles so that they touch each other. You might plan to take a few breaks on this part since it is boring. The shadows make it take on a realistic look. So put a shadow down one side of the stem and on the bottom edges of the leaves. Put some shadowing around the seeds and some on the bottom of the petals.

Don't forget to sign and date your sunflower.

(c) Adron D 9/14/11

I do not charge for my coloring pages. Please, use the Paypal button to make your donation.  Your gift will enable me to create more worksheets for you.