Monday, November 28, 2011

How to Draw a Tugboat

This is a free printable drawing worksheet art lesson for how to draw a tugboat.


Here is an easy and rewarding project for artists of any age.  It not only uses basic shapes to create the boat but also has a few ideas for details.

Tugboats are cool. They come in all sizes and shapes, so you can make yours just the way you want to. Take your time, and when you are done, people will say," "Wow! What a cool tugboat!"

If you have any problems making the image below print, CLICK HERE to visit my how-to-print page for some suggestions.


How to draw a tugboat worksheet.

Sometimes it takes me hours, but I create these how to draw worksheets, but I do it so that I can give back because I believe when you have been given a gift, it is so you can be a gift to others, and I hope these worksheets are a means of blessing to you.


Here is a link that might print better on some printers.

CLICK HERE for a file in photo format.

Start with lightly drawing the basic outline shape.

Use the basic shapes of a rectangle and triangle.

Stack smaller rectangles for the upper decks. The boat's shape is a little lower at the back than at the front, so angle the rectangle that makes the main body of the tugboat down toward the back. A rectangle makes the smokestack.

Circles make the tires that hang on the sides. They can be any size and don't worry if they are not perfectly round since on a real tugboat they get all beaten up.
Add whatever details you like, such as windows, air funnel, lifeboat, life ring, barrels, boxes, ropes, ladder, windows, and radio antennas.

Go over your pencil sketch with colored pencils or a marker. Color the tires and smokestack black; keep the sides pale. Add rust dripping down here and there. The smoke is darker on the bottom. Don't overdraw the city in the background. You can put a lot of color in the sky and water to make up for the white boat.

I did my worksheet with a fine tip marker and a few broad-tipped markers with different values of gray for the illustration. So you can see it can be drawn nicely with markers.

Here is one way to do the tugboat picture. It is painted in watercolor. I did it in about 40 minutes. If I took my time, it would have been better. (Just like I always say, take your time, and people will be amazed, but if you hurry, it will be disappointing).

Watercolor illustration for How to Draw a Tugboat.

To see more how-to-draw worksheets use the search box above.

(c) Adron D.11/28/11

Sunday, November 20, 2011

How to Draw a Lizard. A Skill Builder for the Young Artist.

This is a free how to draw a lizard worksheet. 


Here is a fun printable worksheet is a project that will give the young artist confidence in drawing.

Parents and teachers will find many ways to use this in class and as a take-home project.

Remember learning to draw takes practice so do not give up if your first attempt does not turn out the way you hoped. Keep trying, come back, and try some of my other projects. If you draw every day soon you will be making beautiful pictures.

How to draw a lizard. A skill builder for the young artist.
 If you have problems see the how to print tab above for helpful tips.

Drawing lizards are fun and easy.

Start with a double curved line to be the spine of the lizard.  The head is like a triangle. If you make it too rounded it will look like a salamander.

Draw a line across the point where the shoulders will be, and a line for the hips. Draw the sides and tail with two lines on each side of the spine. The arms and legs are crooked so draw the "V" downward for each arm and then an upside-down "V" for the legs.

Draw light circles where the knees, elbows, and different muscles.  Outline these circles to make them into legs and arms. The fingers and toes are long.

Finish the head with eyes and nostrils.

 Erase the extra lines. Outline the finished lines with a marker and color the lizard green.

How to draw a lizard by Adron

To see more how to draw worksheets like this click on the label for animals in the sidebar.

(c) Adron

Thank you for stopping by, I hope you have fun drawing lizards.  Please make a gift through the Paypal button. Thank you.

Sunday, November 13, 2011

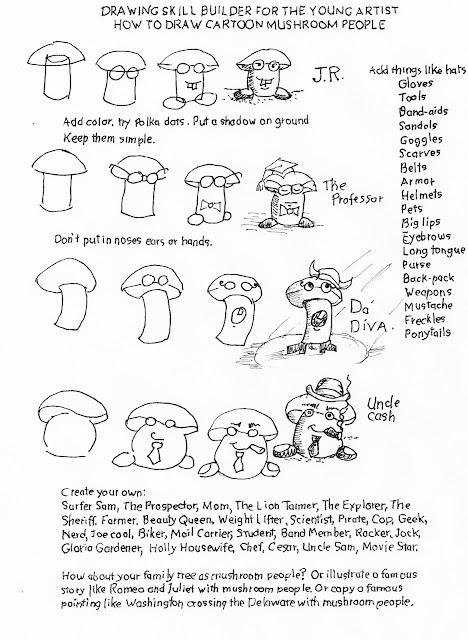
HOW TO DRAW CARTOON MUSHROOM PEOPLE

This is a free printable drawing worksheet, How To Draw Cartoon Mushroom People.

You can download it to your device and print it easily. 

These mushroom people are fun and always get your creative juices flowing. These are easy to draw so give them a try. Since they are colorless, you can do a lot with a pencil with these.

How to Draw Cartoon Mushroom People worksheet
Start with a simple cylinder and add the half-circle cap to the top. Don't worry about making everything perfect it is just in not being perfect that makes these creatures interesting. Draw the circles for the eyes across the bottom line of the cap, and you can sketch eyebrows floating above. My mushroom people have mouths so draw a smile you can add a tooth if you like. I put a circle on each side of the base for feet, put one in front and one at back for interest.

Add whatever accessories that make sense for the person you are drawing like hats, gloves,tools, band-aids, sandals, goggles, scarves, belts, armor, helmets, pets,  Big lips, eyebrows, long tongue, purse, back-pack, weapons, mustache, freckles, or ponytails.

Take time to do a good job in coloring and shading, this is what makes the project stand out as a serious piece of art and not some kid daydream doodle.

Create your own:
Surfer Sam, The Prospector, Your Teacher, Mom, The Lion Tamer, The Explorer, The Sheriff, Farmer, Beauty Queen, Weight Lifter, Scientist, Pirate, Cop, Geek, Nerd, Joe cool, Biker, Mail Carrier, Student, Band member, Rocker, Jock, Gloria Gardener,  Holly Housewife, Chef, Cesar, Uncle Sam, Movie Star.

How about your family tree as mushroom people?  Or illustrate a famous story like Romeo and Juliet with mushroom people. Or copy a famous painting like Washington crossing The Delaware with mushroom people.

Make your family into a mushroom family and do a mushroom portrait of each member

(c) Adron

I hope this drawing lesson was fun. You know what is also fun? Making a donation to support this blog through the Paypal button.  Thank you.

Saturday, November 12, 2011

How to Draw a Frog

This is a free printable drawing worksheet, How to Draw A Frog

You can downloaded it to your device and printed.

There are tips on how to print it at the HOW TO PRINT tab above 

How to draw a frog step by step.

Frogs are fun to draw they have many different poses and moods, so you can do a lot with them.

Start by drawing a large oval for the body, a smaller oval, for the head and two circles for the eyes.  Be sure to make the eyes the same size.

Curved lines make the legs. The back feet are like long skinny triangles. There are three toes.The hands have three fingers and one thumb. Frogs have floppy hands so don’t worry if they are not perfect.

Draw the eyelids with curved lines and half-circles for the eyes. The smile is a simple curved line. Draw him on a lily pad or in a pond or a rock with water around it. Frogs can be any color. Color spots on his shoulders, knees, legs, feet, and hands. His belly is off white. You can draw him on a Lily pad like I did or on a rock or on a throne like the frog prince.

 Illustration for How to sketch a frog.


(c) Adron

Please support this blog by making a gift trough the Paypal button.

Sunday, November 6, 2011

How to Draw a Viking Ship, a lesson for the Young Artist.

This how-to draw a Viking ship is a free printable how-to draw worksheet for the young artist. 


This free printable drawing worksheet, How To Draw A Viking Ship, is an artist skill builder for the young artist I designed it for the kids who like Viking ships. You can quickly draw this freehand by following the patterns below. It would make a great cover page on a report or a poster.

If you need help printing, CLICK HERE to visit the how to print page for some suggestions or try one of the updated links below that should print better.


How to draw a Viking Ship worksheet for the young artists.


Thank You!

Some printers work better with a PDF format. To print in PDF, CLICK HERE


If you like this project, you might want to see how to draw a pirate ship.

Remember to draw the Viking ship large in the center of the paper. Use a light touch with a hard pencil, so when you draw over it in marker, the pencil will be easy to erase. Start with the shapes and work from the outline of the ship to the interior details. You can use coins or jar lids to draw perfect circles for when you are starting the rough draft of the Viking ship.

You don't have to draw it just like I did. Don't draw the Vikings until the end and keep them simple; remember they had long hair and beards, so you can cover a lot up. Color the sail with red stripes. The ship's hull could be brown or gray-brown; the shields were made of wood and painted different designs, but I left that up to you. Use contrasting colors to darken in the shadows. I didn't draw this with attention to the shadows since it was a complicated drawing, but you can figure out where you want the shadows, like under the shields or the hull of the ship.

Don't forget the background; you can put your Viking ship at sea with a blue sky or in a bay with a village in the background. Enjoy!


Viking ship pencil drawing.

(c) Adron D. 11/16/11 

Saturday, November 5, 2011

How to Draw the Arch Stone Bridge

This is a free printable worksheet for  How to Draw The Stone Arch Bridge.


This worksheet will help give some ideas about how to draw a stone bridge picture.

About printing

If you have trouble making the image print on your printer, visit the HOW TO PRINT page 
for suggestions.  You may also try the updated PDF file below that may print better. 


How to draw a stone bridge in the woods

My how-to-draw worksheets are free, and you may print as many as you like.  Use the Paypal button to make a donation.  


Thank you.

Here is a link to a file that has been modified to print better.

Some printers work better if you use a PDF format. To print this in PDF, CLICK HERE.

PRINTABLE LESSON NOTES


This project is a little more complicated since it has a structure in a forest.  The arched stone bridge makes a great contrast to the woods, both in shape and texture.

Always start with the horizon, but here we are under the trees, so there is no normal horizon, but I added the light at the edge of the woods and the bushes. You would not put the focus or point of interest in the center, but this time, it works. Draw the bridge as two arches, then draw the "S" curve of the creek with two big "S"s. Sketch the rocks and the tree trunks for the front trees lightly.

Develop the foreground by adding the texture of leaves on the ground. Create shadows and roughness on the rocks with jagged strokes with your pencil. Shade and texture the tree trunks and add leaves.

The bridge is foreground so add stones and shading. Make the stones different shapes. Draw them lightly with a 2b pencil and after they look good, go over them with a darker pencil like a 4 or 6.

Keep the background light by only using a 2b or HB pencil. Don't put in a lot of details in the background. Just suggest trees and bushes with a few outlines.

Build up the foreground with 4b pencils and more details and more leaves. Put a shadow under the bridge and leave the rest of the creek alone, so it is white.

Take your time. A drawing like this can take hours, but it will be beautiful when you are done.

I offer these how-to-draw worksheets for free, but your support will help me keep it going on.  Thank you.

© Adron D. 11/5/11 

I hope your drawing is a masterpiece.