Thursday, March 6, 2014

Free How To Draw An Australian Frilled Lizard Worksheet

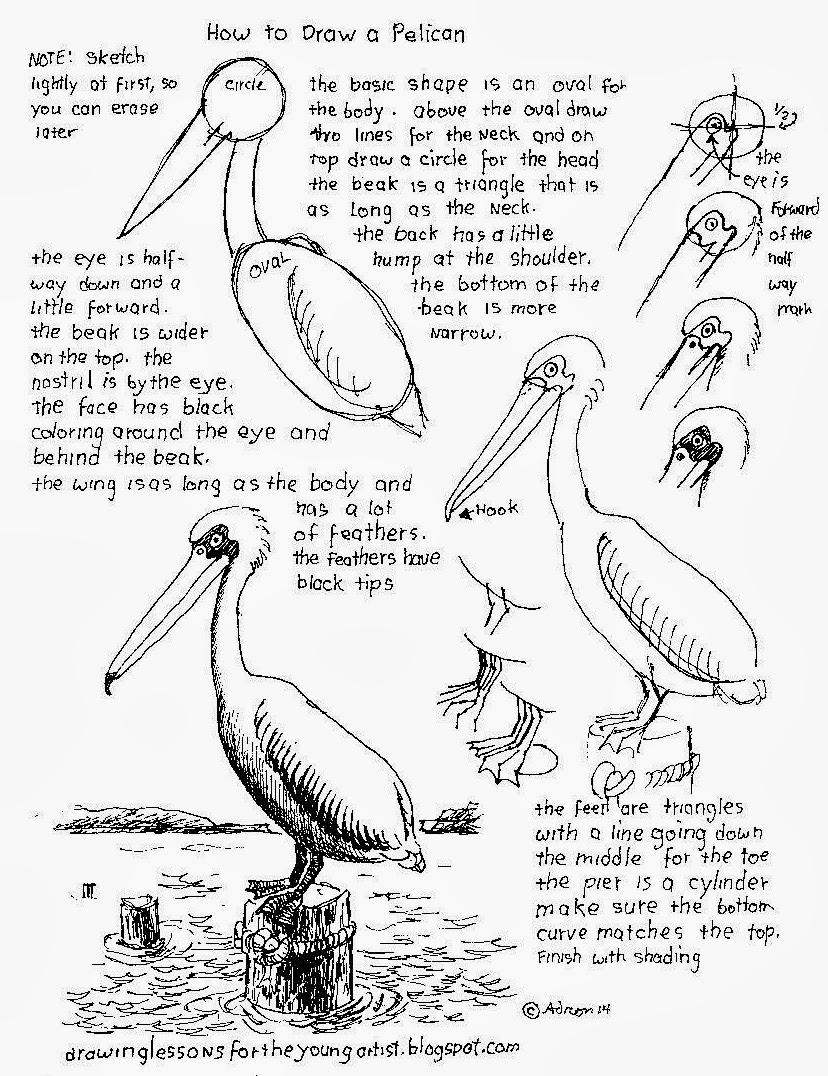
How to draw an Australian frilled lizard drawing lesson and printable worksheet.


This free printable how to draw and Australian frilled lizard worksheet is one that I designed and use with my own art students. It gives the young artist confidence in drawing. Teachers, parents and home-school families will find many ways to use this project in class and at home. It can be a lesson by itself or used for extra time or given out as a take-home project.

 If you have problems printing see the how to print tab above for some tips or try one of the updated links below that might work better.

YOU CAN HELP

My worksheets are free, and you may print as many as you need, but won't you consider making a small contribution to support my how to draw lessons.  Use the Paypal button or the DONATE tab and choose from the pull-down menu. Thank you, your gift is appreciated.
How to Draw a Frilled Lizard, free worksheet. by MrAdron.
.
Here are two links that may work better

CLICK HERE for a file in photo format.

CLICK HERE for a file in a universal portable format.

 YOU MAY PRINT THE PROJECT NOTES BELOW.

BEGINNING
This lizard is mostly the frill and the head, so we will start there. The head is shaped like a square on top of a diamond. The top of the head is the eyebrows and they are two slightly curving lines going down to the middle. The eyes are circles under the eyebrow and curve outward. The mouth has a diamond shape inside, inside the top half of the mouth is all in shadow. The teeth are very small and are only little bumps along the edge of the mouth.

FRILL
The frill is shaped like two circles on each side of the head. There are folds going from the edge of the frill almost to the face, some may go all the way. The outside edge of the frill is wavy and wrinkly.

BODY
The body is very simple it is two long lines that get closer to each other until they touch at the tip of the tail. The legs are very skinny, they stick out at the sides. The feet have two thumbs each and the other fingers are very long.

COLOR
Some frilled lizards have a lot of colors some do not.

(c) Adron 3/6/14

Tuesday, March 4, 2014

How To Draw The Hunchback of Notre Dame, Quasimodo, Free Drawing Worksheet.

How to draw the hunchback of Notre dame drawing lesson and worksheet. 

This How To Draw The Hunchback Of Notre Dame, Quasimodo worksheet may be used by parents and teachers for the classroom and home use. It may be a class project or a take-home project.

If you have problems printing, see the "HOW TO PRINT" tab above, or try one of the updated links below that should print better.


How To Draw The Hunchback of Notre Dame, Worksheet by MrAdron.


The file above was made with a scanner the one below is digital. one of the two will work for you. 

CLICK HERE for a file in PDF format.

YOU MAY PRINT THE PROJECT NOTES BELOW.


BEGINNING
Some people start on the humpback but that is only a minor detail, so save it for later on even last. Do the face first because the story is in the expression and the pose. Draw a large oval or egg shape for the head, make sure it is leaning over on one side. Draw a guideline down the center to help reference things. Use a stick figure technique for the arms, shoulders, and hands to get the pose right. Because he is hunched over and leaning forward the shoulders look like they are at his ears.

DEVELOPING THE FACE
Since the face is deformed it is OK if things are off-center.
     * The eyes are halfway down and are just two curved lines going down with half circles below.
     * The nose is like three large circles in the middle of the face.
     * The mouth is almost like a lopsided triangle.
     * Make the upper lip like the letter "m."
     * The ear is big and sticking out of the side of the head.
     * The hair is only above the ear and a little above the forehead.
     * Give the face wrinkles and two or three baggy chins by drawing curving lines.
     * Put a few warts here and there.
     * Give him three teeth on the top and on the bottom.

BODY
Use large circles and ovals to go around the stick figure form and fill out the arms and shoulders. After the form looks right sketch over it the shirt and tunic. Keep the hands simple they are mostly seen on the side. The thumb is at the back and sticks up over the top.

THE SCENE
Draw the arch behind him and the part of the bell showing behind the arch. The balcony railing is full of fancy decorations start them as circles and then connect the circles into decorations. Fill in the spaces between the decorations with arches and lines.

(c) Adron 3/4/14

Friday, February 28, 2014

Tips for How To Draw a Still Life, Free Printable Worksheet.

How to draw a still life drawing lesson and printable worksheet.

This is a worksheet with some tips that will help you to draw a basic still-life.  Parents, teachers, and home school families may print this for personal or class use. It is very a simple summary of a still life drawing and is good as an introduction to the subject.

This worksheet is free but your gift will be appreciated. Use the DONATE tab or the Paypal button. Thank you.

If you have trouble making it print see the HOW TO PRINT tab above for some suggestions. 


Tips for Drawing a Still Life With Jars Worksheet by MrAdron.


YOU MAY PRINT THE PROJECT NOTES BELOW.

BEGINNINGS
Start slow. For your first project select three or four items that share a theme. In our example, we have glass jars but it could be four cups, or four apples, or four tools, etc.  Arrange the subject. Do not get too tidy; put some things in front and some in back. Leave a little space between so things are not too crowded. The things in front will be lower on the page.
Look it over and decide if it is interesting.  Avoid items that create barriers to the eye like something with long lines that dominate the arrangement. The eye should rove around the subject.

PRE-SKETCH
Do a rough draft of the drawing loosely. Don't try to be perfect just get things in place on the paper. Look for the shapes of objects and use the basic shapes of squares, rectangles, ovals etc. to compose the parts of the drawing.

MAPPING
Our still life is of glass jars. We want to catch the shiny spots, so we draw them early as outlines, that way when we are shading we don't shade over them. The darkest areas are determined and the first layer of shading is applied.

DEVELOPING DETAIL
Sketch in the details like the far sides seen through the glass or the raised edges.

SHADING
Use the side of the pencil shade in areas. Do all the light areas first then go over the darker areas. Look for reflected shadows and shadows inside shadows. Remember to not shade over the highlights that you mapped out before. Use a blending stub or a tissue to blend the shadows and give the glassy effect.

Shading is the biggest job in the drawing so take your time and take a few breaks.

(c) Adron 2014

I do not charge you to print my worksheets. You may feel free to print as many as you can use. I only ask that you consider clicking on the Papal button or the DONATE tab and making a small contribution to support my art. Your contribution tells me that my art is appreciated and then I will be able to draw more of these for you.  Thank you.

Sunday, February 23, 2014

How To Draw A Roman Legion Soldier Worksheet

How to draw a Roman Legion soldier drawing lesson and printable worksheet. 

This project is a how-to-draw an ancient Roman Legion foot soldier. I researched and have tried to make it historically accurate without too much challenge to the young artist. The Roman Legionnaire is a simple basic figure with military details like armor, shield, and weapons.

This drawing lesson is perfect for parents, teachers, and homeschool use. It can be part of a lesson or a take-home project.

If you have problems printing this then see the HOW TO PRINT tab above or the updated link below.

My how to draw worksheets are free and you may print as many as you like. I only ask that if you are able that you consider making a small contribution to support my art. Please click HERE TO DONATE  and enter an amount that shows your level of appreciation. 
Thank you. 


How To Draw A Roman Legion Soldier Worksheet by MrAdron.

DONATE

Below are two links that may perform better depending on your program.

You might also like how to draw a Roman Chariot, CLICK HERE.

Below is a PDF. 

If you are having problems printing try this link to a file that may work better. CLICK HERE.

YOU MAY PRINT THE PROJECT NOTES BELOW.

BEGINNINGS
Use the stick figure technique to draw a man standing. Use circles for the major joints and bend the arm at the elbow. Add in the line for the spear and a large rectangle for the shield.

DEVELOP FORM
Around the stick figure add the thickness of the arm and the leg. Draw the torso as a boxy rectangle.

HELMET AND ARMOR
The helmet is a half-circle on top. It has a bold line across the brow. The helmet has two side guards that cover the cheeks, they are drawn with curved lines. Behind the helmet is a neck guard, only the edges show out of the sides like narrow triangles.
The body armor is a series of rectangles that come over the shoulder and another set of rectangles that wrap the body. They have buckles in the middle.
The kilt looks like a skirt that goes almost to the knee. It is leather strips that look like long rectangles

HAND
The hand is wrapped around the spear so you are looking at the back of the hand. Draw it like a square but curved outward no the side toward the solder. The thumb is on the backside of the spear just draw a half circle where it comes across.

WEAPONS
The spear has two parts, the wooden shaft, and the metal lance. Use a ruler or straight edge to draw this so it looks good.
The short sword hangs on a belt that comes down from behind the shield. The sword is a rectangle and goes from the waist to the knee, at the bottom is a triangle. The hilt is simple, a circle on the top, the grip curves inward slightly and there is a short crosspiece.
The shield has a metal edge, draw the edge as two parallel lines that go around the shield. In the middle of the shield is a metal round piece, draw it as a circle with a square around it. The shields were decorated, so draw lightning bolts or eagles or lions on it.

FACE
Keep the face simple. Make the jaw and chin square. Draw eyebrows as a thick straight line. Draw the eyes as straight lines with dots below. The nose is a line going down and over a little bit. The mouth is a straight line with a little downward dash at the end.

FEET
The feet are like rectangles but a little pointed on the large toe. The sandals have three straps going over and two straps wrapping around the ankle.

Draw the cape last.

(c) Adron 2/23/14

Saturday, February 22, 2014

How to Draw a Japanese Garden Pagoda

How to draw a Japanese garden pagoda drawing lesson and printable worksheet.

Many gardens all over the world have these little structures in them. Some are only decoration others have spiritual significance.  The shape and color is a powerful contrast in any garden scene. 

This is a beautiful project when it is done and easier to draw using a few tips provided in this worksheet.  Parents and teachers may use this how-to-draw worksheet and the notes for personal and class use.

If you have problems printing CLICK HERE to visit the how to print page for some suggestions or try the updated file below.
 

How to Draw a Japanese Garden Pagoda Worksheet

Sometimes it takes me hours but I create these how to draw worksheets but I do it so that I can give back because I believe that when you have been given a gift it is so you can be a gift to others, and I hope these worksheets are a means of blessing to you. You are welcome to print as many as you like.


Thank you!
If the jpeg file above does not work well for you then the PDF file below will be better. 

CLICK HERE for a file in a universal portable format, PDF.

YOU MAY PRINT THE PROJECT NOTES BELOW.

OVERVIEW
The pagoda is a small monument in a garden. Our sketch is composed of some basic shapes and lines.

BEGINNING
Lightly draw a guideline up and down for the center so things are even on both sides, you will erase this later.
The top of the pagoda looks like an umbrella. Draw a triangle with the top point on the guideline. Below the triangle draw a curve like a bow on its back from tip to tip of the triangle, this is another guideline, you will erase it later. Below the bow-shaped guideline draw a square and then a second square around the square for the front of the pagoda. On each side draw a parallelogram (it is like a crooked rectangle) for the side windows and then draw a larger one around it for the side walls. Below these three sides draw the rectangles of the lower edge. Below that draw a tall rectangle for the pillar.

DEVELOP FORM
The top has two or three circles on the very top. The top is divided into three sections each like a triangle. These sections have curving lines; each section has a ball at the corner. The sidewalls of the pagoda each have a window. The pillar has flat sides, draw these as lines going up and down. The bottom has a circle base draw this as an oval with sides going down.

DETAILS
Draw the inside that you see through the window. Add shadows to the side away from the sun and inside. Create a garden to put it in.

(c) Adron D. 2/22/14

Thursday, February 20, 2014

How to Draw A Hand Holding a Coffee Cup. Worksheet

This is a free how-to-draw a hand holding a coffee cup drawing lesson and printable worksheet.

The hand is a challenge for many to draw but here are a few tips to help make it easier. Parents, teachers, and homeschool families may print this lesson for personal and classroom use.

If you have problems printing CLICK HERE to visit my how-to-print page for some suggestions or try the updated link below.

How to Draw A hand Holding a Cup Worksheet by MrAdron.

Sometimes it takes me hours to create these how to draw worksheets but I do it so that I can give back because I believe when you have been given a gift it is so you can be a gift to others, and I hope these worksheets are a means of blessing to you.

Thank You

If the image file above does not respond to your printer, the PDF file below will be better. 

CLICK HERE for a universal portable file, (recommended).

YOU MAY PRINT THE PROJECT NOTES BELOW.


OVERVIEW
Take a moment and analyze the structure of the hand; inside are bones and joints and around them are muscles and flesh.

BEGINNING.
Draw the mug first. The mug is a cylinder with an inside and an outside. It has a handle like the letter "C." By drawing the mug first we have a reference for positioning the fingers and the hand.

Lightly draw the hand as lines for the bones and circles for the joints. The knuckles form a curve going outward and back toward the arm, the joints form a curve going out and toward the cup. The thumb is on top, the index finger goes straight into the handle of the cup. The other three fingers are below the handle of the cup.

DEVELOP FORM
Start to outline the hand's fingers by drawing around the lines and circles that represent the bones of the fingers and hand. Give the fingers thickness, the thickest finger is the index, then the middle finger, the thumb is thick but is half hidden by the handle. The last two fingers are thinner.

DETAILS
The knuckles and joints have wrinkles.

SHADING
The bottom two fingers are almost all in shadow. The top two fingers have a shadow nearest the cup where the fingers wrap around. The thumb has a little shadow where it meets the cup and a little behind the index finger. Put shadow around the cup on the far side so it looks round.

(c) Adron D. 2/20/14

I do not charge you to print my coloring pages and I hope you print as many as you can use. Click HERE and enter an amount that best shows how much you appreciate having these available. Your gift will enable me to create more. 
Thank you.

Become a Patron!

Thursday, February 13, 2014

How to Draw A British Royal Palace Guard.

How to draw a British Royal Palace guard drawing lesson and worksheet.

This printable How to Draw worksheet will help the young artist feel confident in drawing a figure. Parents, teachers, and homeschool families may print a copy for class or personal use.

FIRST, A WORD OF ENCOURAGEMENT: If your sketch of the British Royal Palace Guard does not come out as well as you hoped do not give up, you are learning to draw and it takes practice. You will learn more every time and every picture you do will be just a little bit better. Come back and find other drawing worksheets and do them every day, before you know it you will be a good artist. Some people draw some things better than others so try different projects you will find what is your subject and style.

PRINT THE WORKSHEET
To print the free worksheet above just highlight it and send it to your printer or save to your device to print later. If you have problems printing this CLICK HERE to visit the how to print page for some suggestions or try one of the links to updated files below. NOTE for this one set your printer on grayscale because the pants are not black but gray.

This worksheet is free to print but your gift is appreciated.

How to Draw A British Royal Palace Guard

Sometimes it takes me hours but I create these how to draw worksheets but I do it so that I can give back because I believe that when you have been given a gift it is so you can be a gift to others, and I hope these worksheets are a means of blessing to you.


Thank you!

CLICK HERE for a file in PDF format.

YOU MAY PRINT THE PROJECT NOTES BELOW.


BEGINNING
The guard is a simple figure of an adult. Start with a stick figure to get the height and proportions right. Do not draw the uniform or the hat at this time. The shoulders are wide and the waist is narrow the feet are spread slightly apart. The right arm, (which is on the viewer's left), is slightly bent. Draw a guideline for the weapon.

DEVELOP THE FORM
Around the stick figure draw the form of the man.

FACE
The hat covers everything above the eyebrows. The strap of the hat goes over the face and under the lower lip, so the chin shows below the strap. The eyes are straight ahead. Keep the face simple.

UNIFORM
The jacket has a white belt at the middle slightly above the waist. The collar has golden leaves on the sides but in the small drawing just do a triangle-ish shape and color black around it. The sleeves have square decorations going down at the cuff. There is a black background at the cuff. There are buttons to the right of the seam. The shoulders have golden decorations across the top. Many guards have medals won for bravery in combat, draw it as a circle with a triangle above and a thin rectangle above that. The pants are black.

HANDS
The hand holding the weapon is a line for the thumb that goes inward and back, the fingers is two lines that make it look like the letter C laying down. The other hand is mostly hidden by the sleeve but a line can show the fingers facing inward.

The shoes are very black and very shiny, so before you color them in outline a few shiny spots and make sure you leave them white.

I hope you create a masterpiece!

(c) Adron D. 2/13/14

Tuesday, February 11, 2014

How to Draw A Monster Truck Worksheet

How to draw a monster truck drawing lesson and worksheet.

This printable how-to-draw worksheet has many helpful tips that can take the young artist to the next level of success and confidence. Teachers, parents and homeschool families may print the how to draw a monster truck worksheet for personal and class use.

SCROLL DOWN TO ACCESS THE FREE PDF.


To print the free worksheet below just highlight it and save then open a word doc and save. If the image is not centered change the margins from your word toolbar then it is ready to print. You could save it to your device to print later. If you have trouble making the worksheet below print or are printing on A-4 sized paper then CLICK HERE to visit my how-to-print page for some suggestions. 

This worksheet is free but your gift is appreciated.

How to Draw A Monster Truck Worksheet.

Sometimes it takes me hours but I create these how to draw worksheets but I do it so that I can give back because I believe that when you have been given a gift it is so you can be a gift to others, and I hope these worksheets are a means of blessing to you.


Thank You!

Here is an updated PDF file that may work better with some printers.

CLICK HERE for a file in a portable universal format, PDF.

If you like this worksheet you might also like the old time car worksheet.

YOU MAY ALSO PRINT THE PROJECT NOTES BELOW

This drawing project is mostly putting together basic shapes into a design.

BEGINNING
Use rectangles and squares to work out the basic shape of the truck. Use huge circles for the wheels. (Sometimes I trace around lids from jars or other things to get the circles right).

DETAILS
There is a gearbox underneath the truck: draw it as a square or rectangle.
There are two driveshafts going to the tires from the gearbox: draw two parallel lines for these.
In the wheel wells are two shock absorbers: draw these as narrow rectangles.
There is an exhaust pipe going up behind the door: draw it as narrow rectangles.
There is a roll bar: draw it with straight lines.
There are headlights: draw them like rounded triangles.

TIRES
The big tires are circles inside of more circles. Draw guidelines up and down and across to make a reference so you can get the inner circles in the right places. Take your time drawing the knobs on the tire tread. Use reference marks to indicate where the knobs are and keep them even. After you draw the reference marks then draw the knobs.

FINISHING TOUCHES
Use shading technique inside the wheel wells. Make the tires dark gray with black details, put black between the knobs. The gearbox and drive shafts are a dark color.

I hope you draw a masterpiece!

(c) Adron. 2/11/14

Thank you for your donation.

Sunday, February 9, 2014

Helpful Tips for Drawing Landscape Worksheet.

Tips for drawing a landscape lesson and worksheet. 

The free worksheet at the bottom of this page and the project notes below may be printed by teachers and parents for personal use and classroom instruction.

PRINT THE WORKSHEET

If you have trouble making the worksheet below print or are printing on A-4 sized paper then CLICK HERE to visit my how-to-print page for some suggestions. 


Helpful tips for drawing a landscape worksheet.

You are welcome to print as many of my worksheets as you like. Use the Paypal button to make your donation. 


Thank you!

YOU MAY PRINT THE PROJECT NOTES BELOW.


INTRODUCTION
There are many ways to draw a landscape these tips are what works for me.

HORIZON
As a rule, do not put the horizon in the middle of the picture. If it is in the middle it just divides the picture in half and looks boring and like the artist does not have imagination. Put the horizon high on the page if you want to develop the foreground or put it low on the page if you want to have more sky.

The horizon may be mountains hills trees city buildings or anything that is where the land meets the sky.

THREE GROUNDS.
To give the picture realism have a background, a middle-ground, and a foreground. The background will be pale and lack detail. The middle ground will have some detail and a few colors. The foreground will have a lot of color dark areas and details.

THE GOLDEN MEAN
In every picture is a place of interest, some call it the golden mean. It is not right in the middle because that would be boring. Imagine the picture is divided in half then the golden mean would be a third way up from the bottom of one half and halfway across.

BRING YOUR EYE IN
Use a road, a river, a row of the fence post, or the curve of hills to bring your eye into the picture. Your eye will follow the strong lines so they show you how to look at the picture.


Pen illustration for how to draw a landscape.

To see more worksheets like this one click on the label for landscapes in the sidebar.

(C) Adron Dozat 2/9/14

Thursday, February 6, 2014

How To Draw A Pelican on a pier Worksheet.

How to draw a pelican on a pier drawing lesson and worksheet.


This how-to-draw a pelican worksheet is an easy and fun drawing project that any young artist can do easily. It breaks down the figure into some basic shapes and then adds details until you have a beautiful pelican.  

SCROLL DOWN TO ACCESS THE FREE PDF.


How to Draw a Pelican Worksheet


Thank You!

Here is a link to an updated and easier-to-read file. It is a PDF and will be easier to download and print.  

CLICK HERE for the PDF file.

PRINT THE WORKSHEET

If you have trouble making the worksheet below print or are printing on A-4-sized paper, then CLICK HERE to visit my how-to-print page for some suggestions. 

Sometimes it takes me hours, but I create these how to draw worksheets, I do it so that I can give back because I believe that when you have been given a gift, it is so you can be a gift to others, and I hope these worksheets are a means of blessing to you.

YOU MAY PRINT THE PROJECT NOTES BELOW.

BEGINNING
Start sketching lightly so you can erase later. The basic shape is an oval for the body. Above the oval draw two lines for the neck, and on top of that, draw a circle for the head. The beak is a long triangle that is as long as the neck.

The back has a slight hump at the shoulder. Make the body a little wider at the lower half.

HEAD AND BILL
The eye is halfway down and a third of the way forward. The eye is a black dot inside a circle. The bottom of the bill is bigger; draw a line from the tip to below the eye and make sure the bottom beak is half as thin as the top. The nostril is on the top of the beak by the eye. This pelican has a black face; it looks like a wavy patch that goes around the eye and behind the bill. The bill has a little hook at the tip.

WING
The wing starts slightly below the shoulder and curves down to the tail. There are lots of feathers going downward on the wing. Draw the feathers as many lines but not too many; make sure they have a little space between them. There is a dark edge at the bottom of each feather.

FEET
The feet are a triangle with a line going down the middle for the middle toe. The legs have a backward bend like a person's ankle.

PIER AND WATER
The pear is a cylinder; it has an oval top and straight lines going down on the sides. The bottom has a curve that matches the top curve.

The water is a lot of back and forth lines like the letter Z but flatter. The water is darker in the lower area and lighter by the horizon. Make sure the horizon is level and not tilted.

I hope you draw a masterpiece!

(c) Adron 2/6/14


Thank You!